
Can you restain kitchen cabinets? Yes, you absolutely can restain kitchen cabinets! It’s a fantastic way to give your kitchen a whole new look without the massive expense of replacing them. This comprehensive guide will walk you through every step of cabinet refinishing to achieve a stunning kitchen cabinet update. We’ll cover everything from preparation to the final coat, making this a truly achievable DIY cabinet restoration project. Whether you’re aiming for a subtle kitchen cabinet refresh or a dramatic kitchen cabinet makeover, these cabinet staining tips will ensure a beautiful, lasting result.
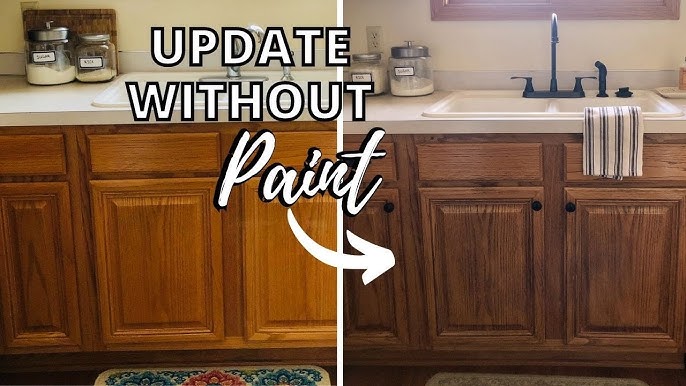
Image Source: i.ytimg.com
Why Restain Your Kitchen Cabinets?
Over time, kitchen cabinets can start to look tired. The finish might be worn, scratched, or simply outdated. Instead of living with dated cabinetry or investing thousands in new ones, restaining kitchen cabinets offers a compelling solution. It’s a cost-effective method that can drastically change the aesthetic of your kitchen, making it feel brand new.
Benefits of Restaining:
- Cost Savings: Significantly cheaper than replacing cabinets.
- Customization: Allows you to choose any stain color you desire.
- Durability: A properly stained and sealed cabinet is very durable.
- Environmental Friendliness: Reusing existing cabinets is more sustainable.
- Increased Home Value: A refreshed kitchen can boost your property’s appeal.
Fathoming the Process: What to Expect
Cabinet refinishing involves cleaning, sanding, staining, and sealing your existing cabinets. It’s a process that requires patience and attention to detail. Think of it as giving your cabinets a spa day, but with a much more dramatic transformation. This guide to refinishing wood cabinets breaks down the entire journey.
Step 1: Planning Your Kitchen Cabinet Update
Before you grab any supplies, a little planning goes a long way. What color do you want your cabinets to be? Will you go lighter or darker? Consider your kitchen’s overall style and color scheme.
Choosing Your Stain Color
This is perhaps the most exciting part! Stain colors range from light honey tones to deep espresso, and even vibrant colors.
Considerations for Stain Color:
- Existing Finishes: If you’re going darker, you might get away with less aggressive sanding. Going lighter will require more thorough stripping of the old finish.
- Wood Type: Different woods accept stain differently. Oak often shows grain prominently, while maple can appear smoother.
- Kitchen Style: Modern kitchens might suit darker, sleeker stains, while rustic kitchens can embrace warmer, more natural tones.
- Sample Swatches: Always, always test your stain on a piece of scrap wood or an inconspicuous area of your cabinets. This is crucial for wood cabinet staining.
Essential Supplies
Gathering all your materials beforehand will make the process smoother.
Materials Checklist:
- Safety Gear: Gloves, safety glasses, dust mask (N95 recommended).
- Cleaning Supplies: Degreaser (TSP substitute is good), clean rags, bucket.
- Sanding Supplies: Orbital sander, sandpaper (various grits: 80, 120, 220), sanding sponges, tack cloths.
- Paint Stripper (if needed): For very dark or old finishes.
- Wood Conditioner (optional but recommended): Helps ensure even stain absorption.
- Wood Stain: Your chosen color.
- Polyurethane or Varnish: For sealing and protection. Choose oil-based for durability or water-based for easier cleanup and less yellowing.
- Brushes and Rags: For applying stain and finish. Foam brushes can be good for stain application.
- Wood Filler: For any dings or gouges.
- Screwdriver/Drill: To remove doors and hardware.
Step 2: Preparation is Key for Refinishing Wood Cabinets
This is the most crucial stage. Proper prep work ensures the stain adheres well and the finish is smooth.
Removing Doors and Hardware
- Label Everything: Use painter’s tape and a marker to label each door and drawer front. Note which cabinet it came from and its position (e.g., “Upper Left Door 1”). This saves you a headache when reassembling.
- Remove Doors: Use a screwdriver or drill to detach the hinges from the cabinet frames.
- Remove Drawer Fronts: If your drawer fronts are separate from the drawer box, carefully detach them.
- Remove Hardware: Unscrew handles and knobs. Keep them organized.
Cleaning the Cabinets Thoroughly
Grease and grime are the enemies of a good stain job.
- Degrease: Mix a degreaser (like a TSP substitute) with warm water. Wipe down all cabinet surfaces, doors, and drawer fronts with a clean cloth.
- Rinse: Use a separate cloth dampened with clean water to wipe away any degreaser residue.
- Dry: Let everything air dry completely.
Stripping the Old Finish (If Necessary)
If your cabinets have a thick, dark, or very glossy finish, you might need to strip it.
- Apply Stripper: Follow the manufacturer’s instructions. Usually, you brush on a chemical stripper and let it sit for a while.
- Scrape: Use a plastic scraper or putty knife to gently scrape away the softened finish.
- Wipe Down: Use mineral spirits or denatured alcohol on a rag to remove any remaining stripper residue.
- Neutralize: Some strippers require a neutralizing step. Check the product label.
Sanding for Success
Sanding creates a smooth surface for the stain to adhere to and removes any remaining old finish. This is a critical step for good wood cabinet staining.
- Start Coarse (if needed): If you have stubborn finish or deep scratches, start with 80-grit sandpaper.
- Medium Grit: Move to 120-grit sandpaper to smooth out the surface and remove deeper sanding marks.
- Fine Grit: Finish with 220-grit sandpaper for a silky-smooth surface.
- Sanding Technique:
- Orbital Sander: Use with the grain for flat surfaces.
- Sanding Sponges: Great for getting into corners, edges, and detailed areas.
- Always sand with the grain of the wood.
- Clean Dust: After sanding, use a vacuum with a brush attachment to remove as much dust as possible. Then, wipe everything down with a tack cloth. Tack cloths are sticky and trap fine dust particles.
Repairing Imperfections
Now is the time to fix any dents or gouges.
- Wood Filler: Apply wood filler to any imperfections using a putty knife. Overfill slightly as it can shrink when drying.
- Sand Smooth: Once the filler is dry, sand it smooth with fine-grit sandpaper, ensuring it’s flush with the surrounding wood.
- Clean Dust Again: Repeat the dust cleaning process with your vacuum and tack cloths.
Step 3: Applying the Stain for a Beautiful Kitchen Cabinet Update
This is where your cabinets start to transform!
Using Wood Conditioner (Optional but Recommended)
Wood conditioner helps prevent blotchiness, especially on soft woods like pine or maple. It allows the stain to penetrate more evenly.
- Apply: Brush on the wood conditioner according to product directions.
- Wipe Off: Wipe off any excess after the recommended time.
- Dry: Allow it to dry completely.
Applying the Stain
Cabinet staining tips for a professional look:
- Stir, Don’t Shake: Stir your stain thoroughly. Shaking can introduce air bubbles.
- Test Patch: Apply stain to a scrap piece of wood or an inconspicuous area of a door to check the color.
- Application Method:
- Rag Method: Apply stain liberally with a clean, lint-free rag, working in sections and with the grain.
- Brush Method: Use a good quality natural bristle brush or foam brush.
- Wipe Off Excess: Let the stain penetrate for the time recommended on the can (usually 5-15 minutes). Then, use a clean, lint-free rag to wipe off the excess stain, again working with the grain. The longer you leave it on, the darker the stain will be.
- Multiple Coats: For a richer, deeper color, you can apply multiple coats. Allow each coat to dry thoroughly (check the can for drying times) and lightly scuff sand with 220-grit sandpaper between coats if recommended, then wipe with a tack cloth. This helps with adhesion.
Table: Stain Application Tips
| Technique | Description | Best For |
|---|---|---|
| Rag Application | Apply with a rag, work in sections, wipe off excess with another clean rag. | Even application, good for most woods. |
| Brush Application | Use a quality brush, apply evenly, wipe off excess. | More control in corners and edges. |
| Spray Application | Requires spray equipment, even coats, fast application. | Large areas, professional finish. |
Drying Time
Ensure the stain is completely dry before moving to the next step. Drying times can vary significantly based on the type of stain and humidity. Check the product label.
Step 4: Applying the Protective Finish (Sealer)
The stain gives your cabinets their color, but the finish protects it. This is key for a lasting kitchen cabinet update.
Choosing Your Finish
- Polyurethane (Oil-Based): Very durable, offers good protection against moisture and wear. Tends to yellow over time, especially in lighter colors.
- Polyurethane (Water-Based): Easier cleanup, dries faster, less odor, and doesn’t yellow as much. May not be as durable as oil-based in very high-traffic areas.
- Varnish: Similar to polyurethane, offers good protection.
Application Technique
- Stir Gently: Stir your finish, don’t shake.
- Apply Thin Coats: Apply thin, even coats using a high-quality synthetic brush or foam brush. Avoid over-applying, which can lead to drips and an uneven finish.
- Work with the Grain: Always brush with the grain of the wood.
- Multiple Coats: Apply 2-3 coats for good protection.
- Sanding Between Coats: Lightly sand between coats with very fine-grit sandpaper (320-400 grit) or a fine-grit sanding sponge. This smooths out any imperfections and helps the next coat adhere better.
- Tack Cloth: After sanding, always wipe down with a tack cloth to remove all dust before applying the next coat.
- Allow Adequate Drying: Let each coat dry completely according to the manufacturer’s instructions before applying the next. The final coat needs ample time to cure (this can take several days to a week for full hardness).
Table: Finish Application – Dos and Don’ts
| Do | Don’t |
|---|---|
| Stir finish gently. | Shake finish vigorously (introduces bubbles). |
| Apply thin, even coats. | Apply thick coats (leads to drips and runs). |
| Work with the grain. | Brush back and forth haphazardly. |
| Lightly sand between coats with fine grit. | Skip sanding between coats (reduces adhesion). |
| Use a tack cloth after sanding. | Apply next coat without removing dust. |
| Allow adequate drying time between coats. | Rush the process; impatient application leads to poor results. |
| Ensure a dust-free environment. | Work in a dusty area or without proper ventilation. |
| Use quality brushes. | Use cheap brushes that shed bristles. |
Step 5: Reassembly and Enjoying Your Cabinet Refinishing Guide Success
Once the final coat of finish is completely dry and cured, it’s time to put everything back together.
- Reattach Hardware: Screw your cleaned or new hardware back onto the doors and drawer fronts.
- Rehang Doors: Carefully reattach the doors to the cabinet frames.
- Reinsert Drawers: Slide the drawers back into place.
- Admire Your Work: Step back and enjoy the stunning transformation of your kitchen!
Frequently Asked Questions (FAQ)
How long does it take to restain kitchen cabinets?
The time can vary greatly depending on the size of your kitchen, whether you need to strip the old finish, and how many coats of stain and finish you apply. A typical project can take anywhere from a weekend for a small kitchen with minimal prep to a full week or more for a larger kitchen requiring extensive sanding and stripping.
Can I stain over existing varnish or paint?
Generally, no. To achieve a good stain result and ensure proper adhesion, you need to remove the old finish down to bare wood. Staining over varnish or paint will result in an uneven, blotchy finish that is unlikely to last.
What’s the best way to clean cabinets before staining?
A good degreaser, such as a TSP (Trisodium Phosphate) substitute, mixed with warm water is highly effective for removing grease and grime. Rinse thoroughly with clean water afterward.
Do I need to sand cabinets before staining?
Yes, sanding is crucial. It creates a smooth surface for the stain to adhere to and removes any old finish or imperfections. You’ll need to sand through several grits of sandpaper, starting coarser and moving to finer grits.
How many coats of stain should I apply?
This depends on the depth of color you desire and the type of wood. Typically, one to two coats are sufficient. Always test your stain on a scrap piece of wood or an inconspicuous area first. Allow each coat to dry according to the product instructions before applying another.
Is it better to use oil-based or water-based polyurethane?
- Oil-based polyurethane is more durable and resistant to scratches and moisture, making it ideal for high-traffic kitchen cabinets. However, it has a stronger odor, takes longer to dry, and can yellow over time, which might affect lighter stain colors.
- Water-based polyurethane dries faster, has less odor, and doesn’t yellow. It’s easier to clean up with water. While durable, it might not offer the same level of protection as oil-based in extremely demanding conditions.
What is the most common mistake people make when staining cabinets?
The most common mistake is inadequate preparation. Skipping proper cleaning, not sanding thoroughly, or not removing all dust before staining will lead to a poor and short-lived finish. Another mistake is not testing the stain first.
Can I restain my laminate cabinets?
No, laminate cabinets are typically made of particleboard or MDF with a plastic laminate veneer. Stain will not adhere to this surface. You can paint laminate cabinets, but staining is only for real wood.
How do I get a smooth finish?
Achieving a smooth finish comes down to thorough sanding with progressively finer grits and diligently removing all dust with a vacuum and tack cloths between each sanding stage and before applying each coat of stain and finish.
How long do I need to wait before using my cabinets after restaining?
While cabinets may feel dry to the touch within 24 hours, the finish needs time to cure for maximum durability. This can take anywhere from 3 to 7 days, depending on the type of finish used and environmental conditions. Avoid heavy use, cleaning, or placing items on the cabinets during this curing period.
This detailed cabinet refinishing guide should equip you with the knowledge to tackle your kitchen cabinet makeover with confidence. Enjoy the process and the beautiful results of your DIY cabinet restoration!