
Can you microwave a kitchen sponge? Yes, you can! Microwaving is a quick way to sanitize your kitchen sponge and kill germs. Do you need to clean your kitchen sponge? Absolutely! A dirty sponge can spread bacteria and make your kitchen less hygienic.
Your kitchen sponge is a workhorse. It tackles spills, wipes down counters, and scrubs dishes. But with all that hard work, it becomes a breeding ground for bacteria. Knowing how to clean a kitchen sponge properly is key to a healthy kitchen. This guide will show you the best ways to disinfect your sponge, keeping it fresh and germ-free.
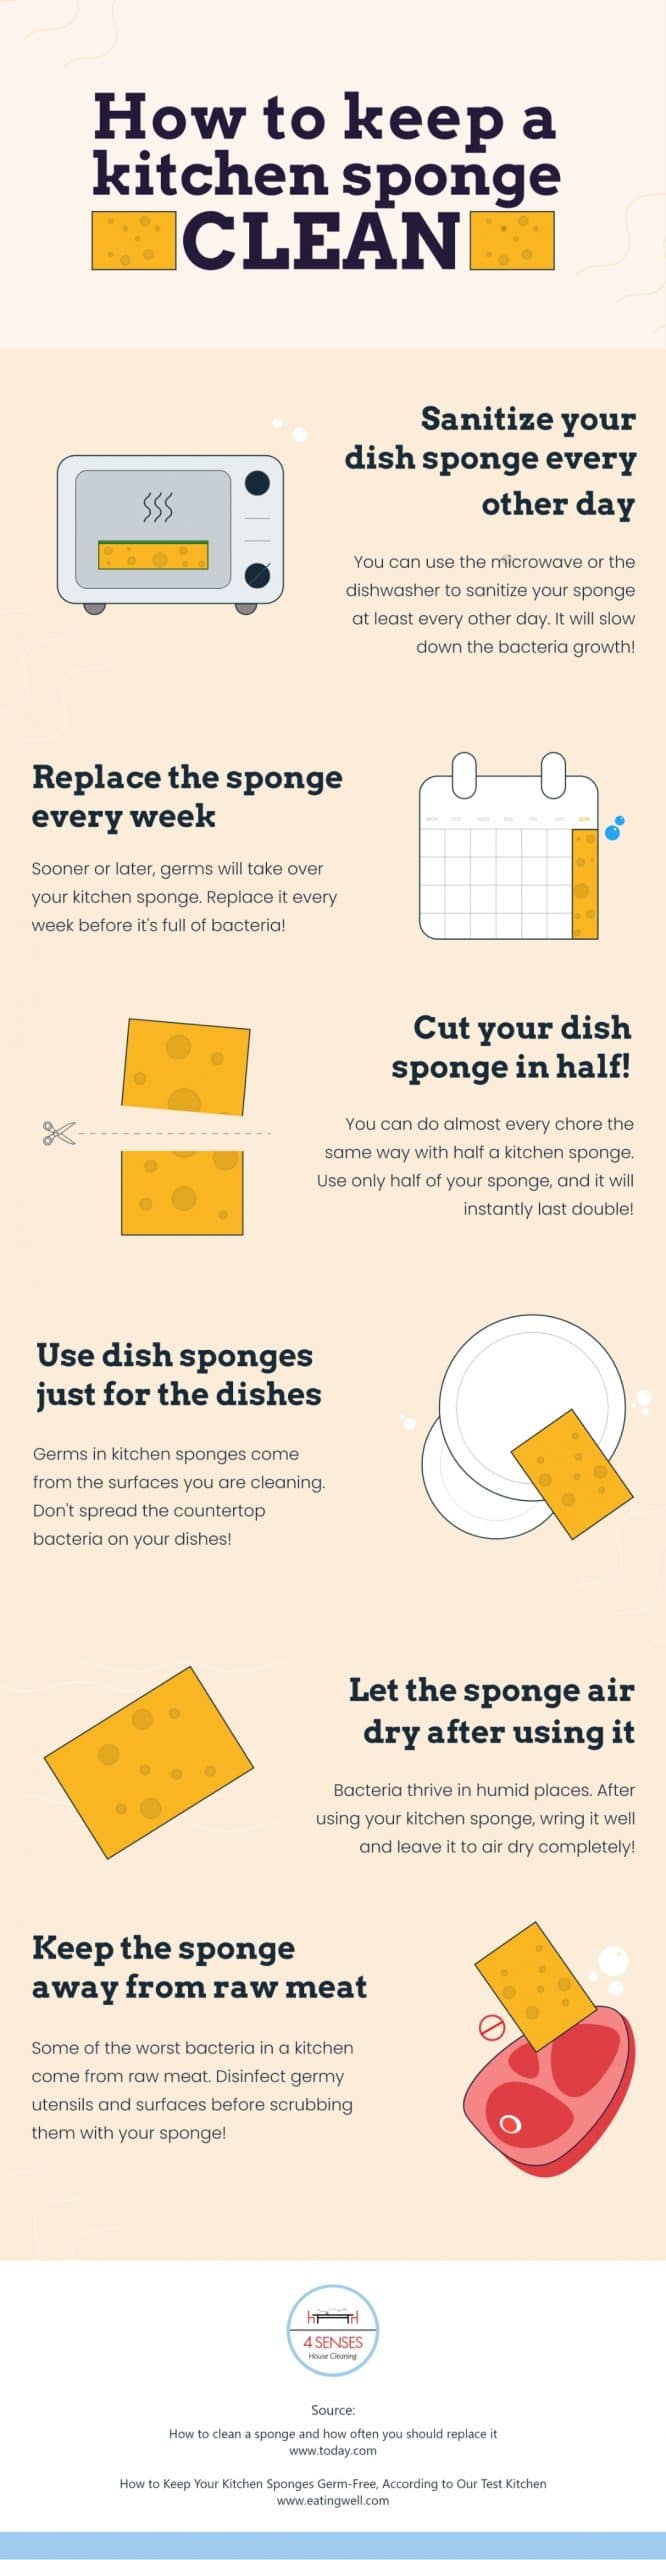
Image Source: 4senseshousecleaning.com
Why Your Sponge Needs Regular Cleaning
Kitchen sponges are porous. This means they have many tiny holes. These holes trap food particles, moisture, and bacteria. Think of it like a microscopic jungle where germs thrive. Studies have found numerous types of bacteria on kitchen sponges, including E. coli and Salmonella. These can cause food poisoning. Regularly cleaning your sponge helps prevent the spread of these harmful germs. It also helps to prolong sponge life.
Bacteria Hotspots in Your Kitchen
- Sink: Often damp and holding food bits.
- Countertops: Can have invisible traces of raw meat or other contaminants.
- Cutting Boards: Especially after cutting raw meat.
- Dishcloths: Similar to sponges, they hold moisture and germs.
Your sponge touches all these surfaces. Without regular cleaning, it can move bacteria around your kitchen. This makes your kitchen a riskier place for foodborne illnesses.
Effective Ways to Sanitize Your Sponge
There are several effective methods to disinfect sponge materials and sanitize sponge effectively. Each method uses heat or specific cleaning agents to kill germs.
Method 1: Microwaving Your Sponge
This is one of the fastest and most effective ways to kill germs.
How to Microwave a Sponge:
- Rinse the sponge: Thoroughly rinse the sponge with water. Make sure there are no food particles left.
- Place in microwave: Put the wet sponge on a microwave-safe plate.
- Microwave on high: Heat the sponge on high power for 1 to 2 minutes. The heat and steam will kill most bacteria.
- Cool down: Carefully remove the hot sponge using tongs. Let it cool completely before handling.
Important Note: Never microwave a dry sponge. It can catch fire. Also, avoid microwaving sponges with metal scrubbers. They can spark.
Method 2: Boiling Your Sponge
Boiling is another excellent way to sanitize sponge items. The high temperature of boiling water effectively kills bacteria and other microorganisms.
How to Boil a Sponge:
- Boil water: Fill a pot with enough water to fully submerge the sponge. Bring the water to a rolling boil.
- Submerge the sponge: Carefully place the wet sponge into the boiling water using tongs.
- Boil for 5 minutes: Let the sponge boil for at least 5 minutes. This ensures thorough sterilization.
- Cool down: Remove the sponge with tongs. Let it cool down completely on a clean surface before using it again.
Method 3: Using Vinegar for a Vinegar Sponge Clean
Vinegar is a natural cleaning agent with antibacterial properties. A vinegar sponge clean can help remove some germs and odors.
How to Use Vinegar:
- Soak the sponge: Fill a bowl with white vinegar. Make sure it’s enough to cover the sponge.
- Soak for 5 minutes: Let the sponge soak in the vinegar for at least 5 minutes.
- Rinse thoroughly: After soaking, rinse the sponge very well with clean water. This removes the vinegar smell and any loosened debris.
- Squeeze and dry: Squeeze out excess water and let the sponge air dry.
While vinegar can help, it might not kill all types of bacteria as effectively as heat methods.
Method 4: Baking Soda Sponge Clean
Baking soda is a mild abrasive and a natural deodorizer. It can help clean and freshen up a sponge. A baking soda sponge routine can remove food particles and odors.
How to Use Baking Soda:
- Make a paste: Mix baking soda with a little water to create a paste.
- Scrub the sponge: Rub the paste all over the damp sponge, focusing on any dirty areas.
- Rinse well: Rinse the sponge thoroughly with water until all baking soda is gone.
- Squeeze and dry: Squeeze out excess water and let it air dry.
Baking soda is more for cleaning and deodorizing than deep sterilization. It’s best used in combination with other methods or for light cleaning.
Method 5: Dish Soap Sponge Clean
Using dish soap sponge clean methods is a daily practice. It removes food particles and surface grime.
How to Use Dish Soap:
- Wash thoroughly: Lather the sponge with plenty of dish soap.
- Scrub and rinse: Scrub the sponge well, working up a good lather. Rinse it under hot running water.
- Squeeze out water: Squeeze out as much water as possible.
While dish soap cleans off visible dirt and some germs, it doesn’t truly disinfect sponge materials. It’s a good start for daily cleaning but needs to be paired with other methods for true sanitation.
The Best Way to Clean Sponge & Natural Options
When we talk about the best way to clean sponge, it often comes down to what’s most effective and convenient for you. For killing the most germs, heat methods like microwaving or boiling are generally considered the best.
For those who prefer clean sponge naturally, vinegar and baking soda are good options for regular cleaning and freshening. However, for deep germ-killing, they may not be as powerful as heat.
Here’s a comparison of common cleaning methods:
| Method | Germ Killing Effectiveness | Deodorizing | Food Particle Removal | Natural Option | Time Required |
|---|---|---|---|---|---|
| Microwaving | Very High | Yes | Good | No | 2-3 minutes |
| Boiling | Very High | Yes | Good | Yes | 10 minutes |
| Vinegar Soak | Moderate | Good | Fair | Yes | 5+ minutes |
| Baking Soda Scrub | Low | Excellent | Good | Yes | 2-3 minutes |
| Dish Soap Wash | Low | Fair | Excellent | Yes | 1-2 minutes |
Combining Methods for Maximum Cleanliness
You can combine methods for a truly clean sponge. For example:
- Daily: Wash your sponge with dish soap after each use to remove food bits.
- Weekly: Sanitize your sponge using the microwave or boiling method.
- As needed: Use the vinegar soak to combat odors.
This layered approach ensures your sponge stays both clean and hygienic.
How Often Should You Clean Your Sponge?
For optimal hygiene, aim to sanitize sponge items at least every 1-2 days. This frequent sanitizing is crucial because sponges are constantly exposed to moisture and food debris, creating an ideal environment for bacteria to multiply.
Consider cleaning your sponge more often if:
- It’s been used to clean up raw meat juices.
- It smells unpleasant.
- It looks visibly dirty or discolored.
When to Replace Your Sponge
Even with regular cleaning, sponges don’t last forever. They wear out and can harbor invisible germs.
Signs it’s time to replace your sponge:
- It has a persistent foul odor that cleaning doesn’t remove.
- It looks worn out, frayed, or is falling apart.
- It doesn’t absorb water as well as it used to.
- You can’t remember the last time you replaced it (a general rule of thumb is every 1-2 weeks).
Replacing your sponge regularly is just as important as cleaning it.
Tips to Prolong Sponge Life and Maintain Hygiene
Keeping your sponge in good condition and free from excessive germs can be achieved with a few simple habits. These tips will help you maintain a cleaner kitchen and extend the usability of your sponges.
Proper Rinsing and Squeezing
- Rinse Immediately: After each use, rinse your sponge thoroughly under hot running water. This removes food particles and debris.
- Squeeze Dry: Squeeze out as much water as possible after rinsing. The less moisture left, the slower bacteria can grow.
Air Drying is Key
- Elevate: Don’t leave your sponge sitting in a pool of water in the sink or a damp dish.
- Use a Sponge Holder: A sponge holder or a caddy that allows air to circulate around the sponge is ideal. This helps it dry out between uses.
- Avoid Damp Cloths: Don’t lay your wet sponge on a damp dishcloth.
Dedicated Sponges for Different Tasks
To prevent cross-contamination, consider using separate sponges for different cleaning tasks:
- One for dishes: Used for washing plates, cups, and utensils.
- One for countertops: Used for wiping down kitchen surfaces.
- One for the sink: Used for cleaning the sink itself.
This practice helps isolate germs and reduces the risk of transferring harmful bacteria from one area to another.
Regular Deep Cleaning and Replacement Schedule
- Daily Cleaning: Rinse and squeeze dry thoroughly.
- Weekly Sanitizing: Use a heat method (microwave or boiling) at least once a week.
- Bi-Weekly Replacement: Aim to replace your kitchen sponges every two weeks, or sooner if they show signs of wear or odor.
By following these steps, you can ensure your kitchen sponge is a tool for cleanliness, not a source of contamination.
Frequently Asked Questions (FAQ)
Q1: Can I use bleach to clean my sponge?
A1: While bleach can kill germs, it’s generally not recommended for cleaning kitchen sponges due to potential health risks. Bleach can leave behind harmful chemical residues that might transfer to food or surfaces. Furthermore, bleach can degrade the sponge material over time. The heat-based methods are safer and more effective for sanitizing.
Q2: How do I know if my sponge is too old and needs replacing?
A2: You’ll know it’s time to replace your sponge if it develops a persistent, unpleasant odor that cleaning doesn’t fix. Other signs include visible wear and tear, such as fraying or tearing, and a reduced ability to absorb water. If you can’t recall the last time you replaced it, it’s likely time. A good rule of thumb is to replace sponges every 1 to 2 weeks.
Q3: Is it better to use sponges or dishcloths?
A3: Both sponges and dishcloths can harbor bacteria if not cleaned and replaced regularly. Sponges, due to their porous nature, can sometimes hold more moisture and bacteria. However, dishcloths can spread germs quickly if used for multiple purposes without washing. The key with both is diligent cleaning, frequent sanitizing, and timely replacement.
Q4: Can I put my sponge in the dishwasher?
A4: Yes, you can put your sponge in the dishwasher. Running it on a hot cycle with a heated dry setting can help to sanitize the sponge. Place it on the top rack, preferably in a small basket or mesh bag to prevent it from getting caught. However, make sure it’s only the sponge itself, not any sponges with metal components. This is a good alternative to microwaving or boiling if you have a dishwasher.
Q5: Why does my sponge smell bad even after cleaning?
A5: A persistent bad smell often indicates that the cleaning method wasn’t thorough enough to kill all the bacteria, or that new bacteria have already started to colonize the sponge. It could also mean that the sponge material itself is breaking down, trapping odors within its structure. If the smell persists after a deep clean or sanitizing, it’s best to replace the sponge.
By consistently applying these cleaning and replacement strategies, you can ensure your kitchen sponge remains an effective and hygienic tool in your daily kitchen routine.