
Image Source: cdn.apartmenttherapy.info
How To Wash Kitchen Cabinets Easily For Shine & Safety: A Complete Guide
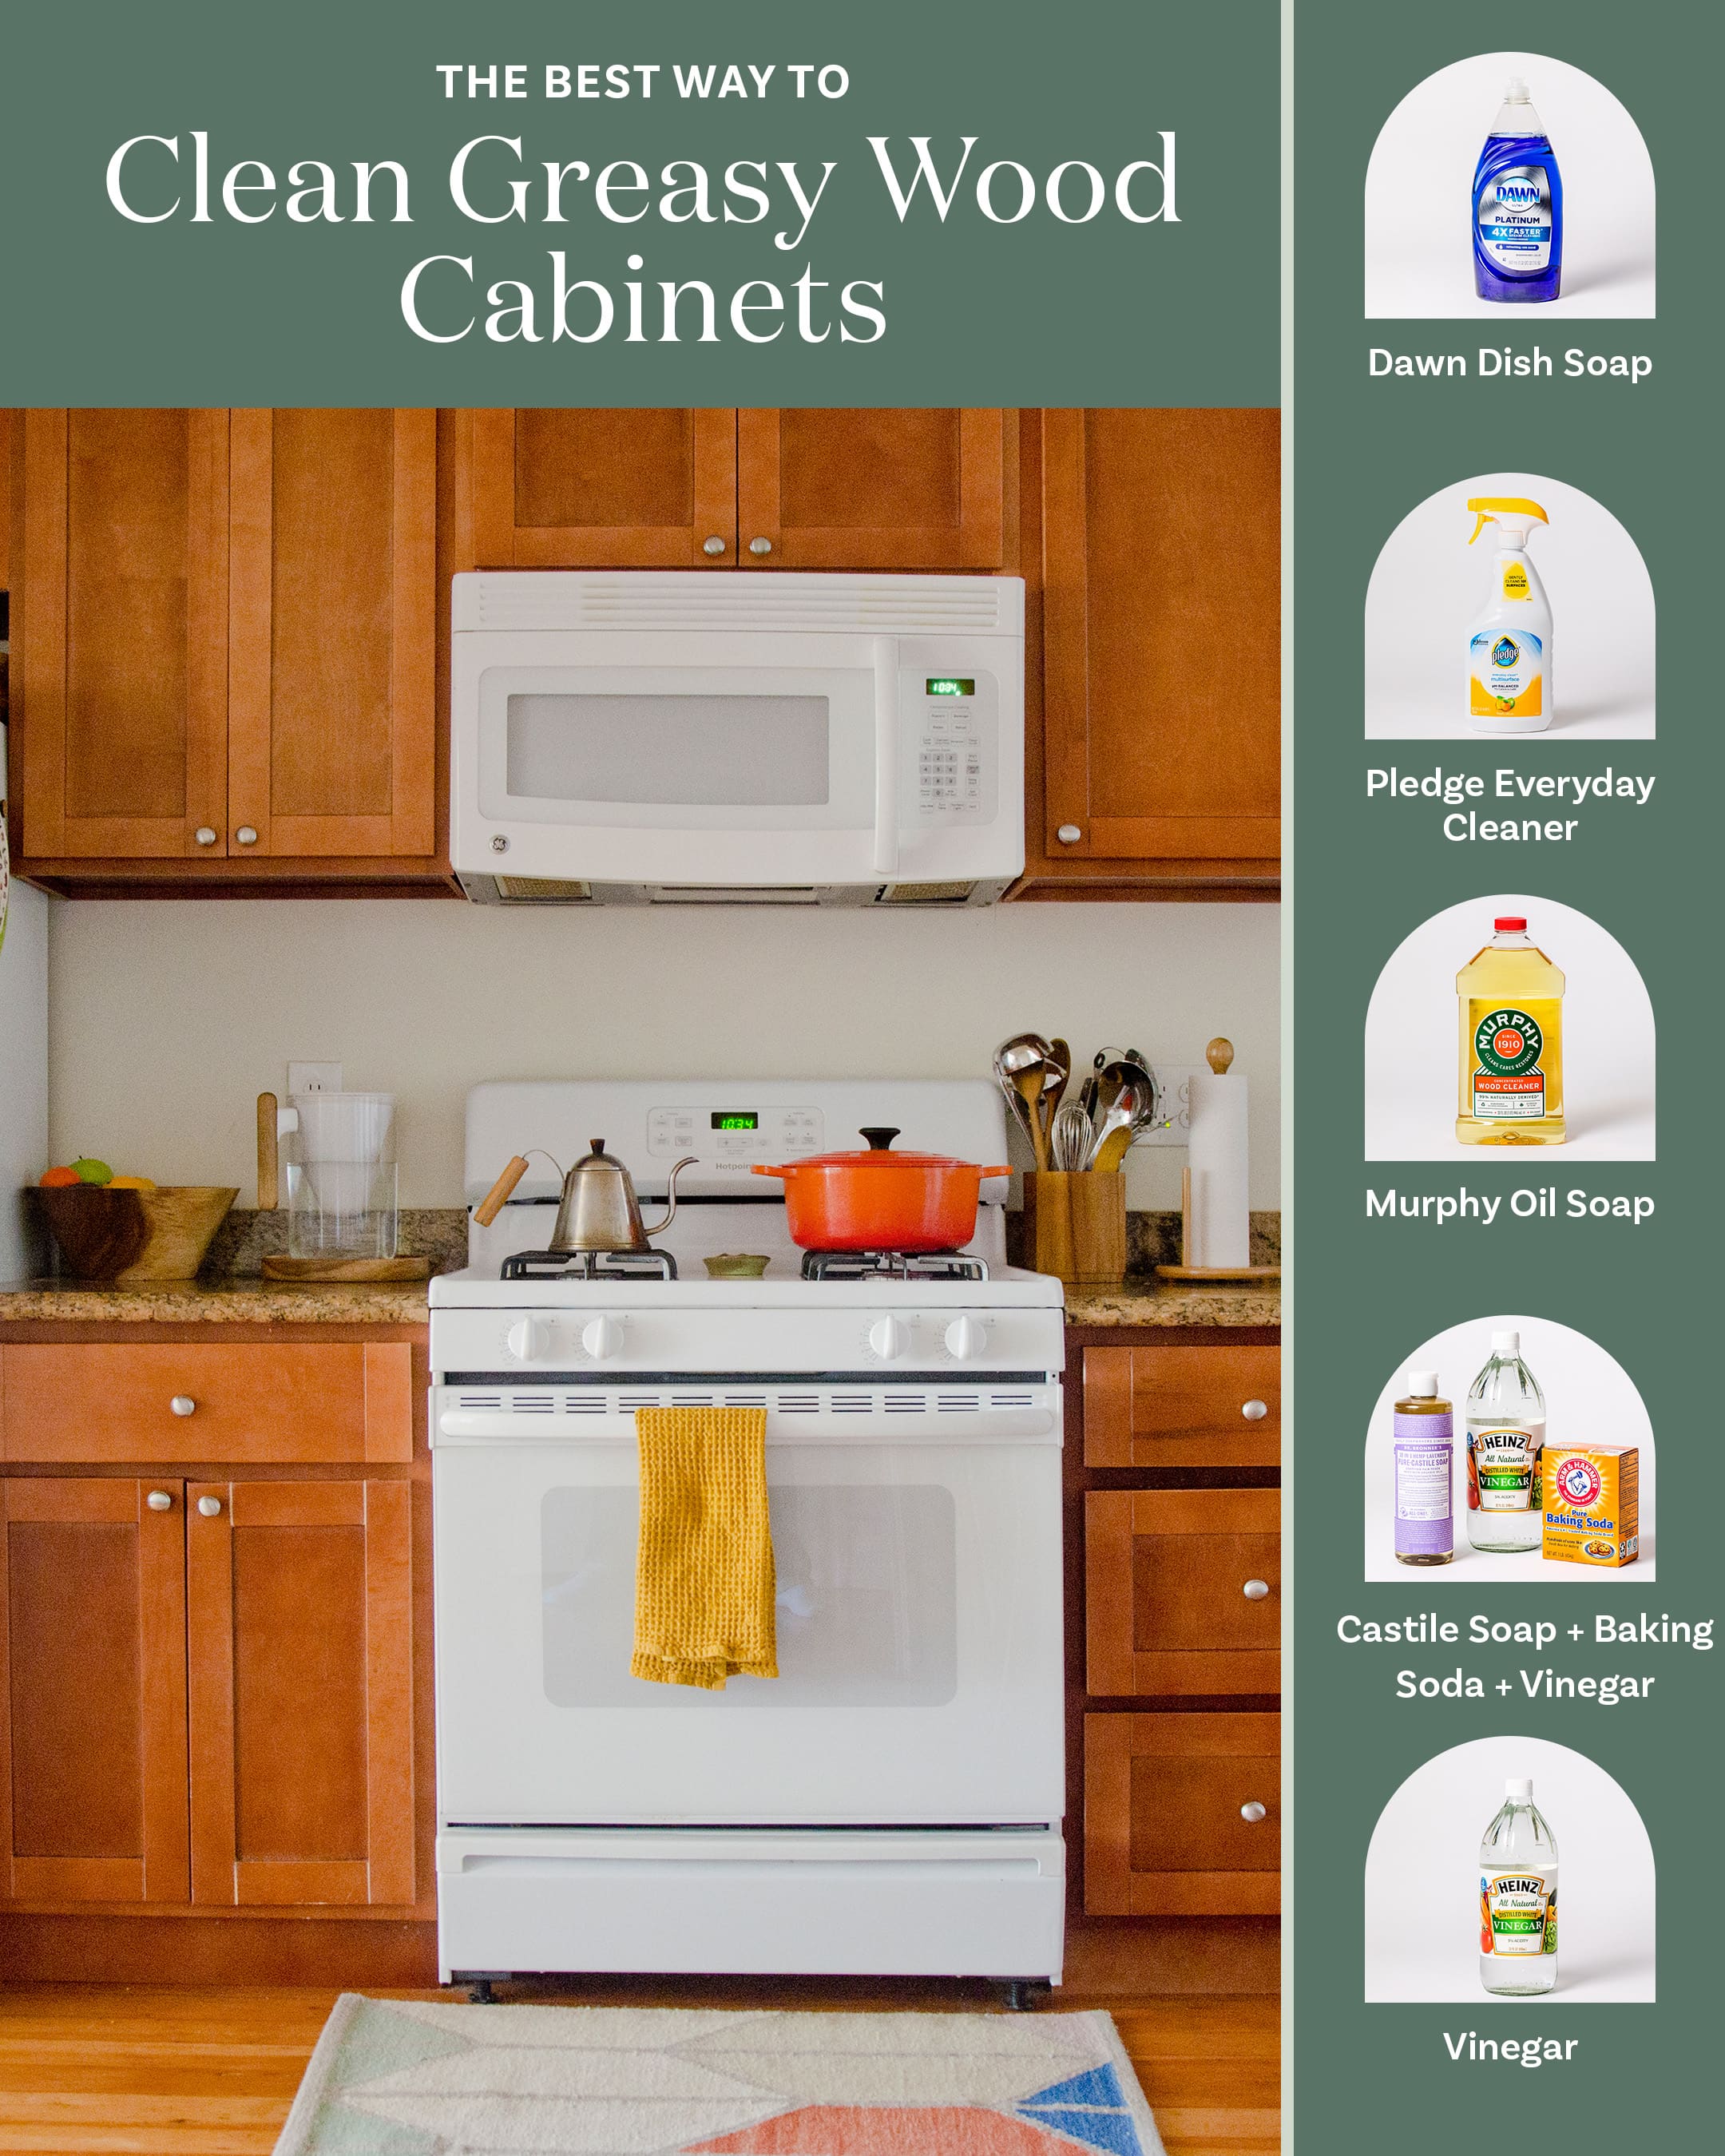
Can I use dish soap to clean kitchen cabinets? Yes, diluted dish soap is a safe and effective option for most kitchen cabinet surfaces.
Keeping your kitchen cabinets clean is more than just a cosmetic endeavor; it’s crucial for both the longevity of your cabinetry and the hygiene of your kitchen. Grimy, sticky surfaces can harbor bacteria and detract from the overall appeal of your cooking space. This comprehensive guide will walk you through the easiest and most effective methods for washing kitchen cabinets, ensuring a sparkling finish and a healthier kitchen environment. We’ll cover various cabinet materials, common cleaning challenges, and tips for maintaining that beautiful shine.
Preparing Your Kitchen Cabinets for Cleaning
Before you start washing, a little preparation goes a long way. This ensures you work efficiently and protect your cabinets from accidental damage.
Clearing the Decks: What to Remove
- Remove everything from cabinet shelves and drawers. This prevents items from getting wet or knocked over.
- Take down any decorative items or hardware. If your knobs and handles are easily removable, consider taking them off to clean them separately and to get a more thorough clean on the cabinet doors themselves.
Protecting Your Kitchen
- Lay down old towels or newspapers on the countertop and floor. This will catch drips and prevent spills from damaging your surfaces.
- Consider covering nearby appliances. A light covering can protect them from overspray.
General Kitchen Cabinet Cleaning: The Everyday Approach
For regular maintenance and light grime, a gentle approach is usually best. This method is suitable for most cabinet finishes, including painted and laminate surfaces.
Essential Supplies for General Cleaning
- Two clean microfiber cloths: One for washing, one for drying.
- Warm water: The core of your gentle cleaning solution.
- Mild dish soap: A small amount is all you need.
- A bucket or basin: To hold your cleaning solution.
The Step-by-Step General Cleaning Process
- Mix your cleaning solution: Fill your bucket with warm water. Add just a few drops of mild dish soap. You want a lightly sudsy solution, not an overly foamy one. Too much soap can leave a residue.
- Dampen, don’t soak, your cloth: Dip one microfiber cloth into the solution and wring it out thoroughly. The cloth should be damp, not dripping wet. Excess water can damage wood finishes.
- Wipe in the direction of the grain: For wood cabinets, always wipe in the direction of the wood grain. This prevents streaking and helps lift dirt effectively.
- Clean one cabinet at a time: Work in small sections. This allows you to wipe the surface dry before the moisture has a chance to sit.
- Rinse the cloth frequently: As you clean, dirt and grime will build up on your cloth. Rinse it in clean water (or a separate bucket of plain water) often to avoid spreading dirt.
- Dry immediately with a clean cloth: Use your second dry microfiber cloth to buff the cabinet dry. This prevents water spots and ensures a streak-free shine.
Tackling Tougher Grime: Degreasing Kitchen Cabinets
Kitchens are prone to grease buildup, especially around the stovetop and sink areas. Degreasing kitchen cabinets requires a slightly stronger approach, but it’s still important to be gentle.
Supplies for Degreasing
- Warm water
- Mild dish soap (a bit more than for general cleaning)
- White vinegar (optional, for extra degreasing power)
- Baking soda (for stubborn spots)
- Soft-bristle brush (like an old toothbrush for crevices)
- Microfiber cloths
Degreasing Techniques
- For moderate grease: Increase the amount of dish soap in your warm water solution. You can also add a 1:1 ratio of warm water and white vinegar to your bucket. Vinegar is a natural degreaser.
- For stubborn grease spots: Make a paste of baking soda and water. Apply this paste to the greasy spot and let it sit for a few minutes. Gently scrub with a damp microfiber cloth or an old toothbrush. Wipe away the residue with a clean, damp cloth and then dry thoroughly.
Important Note: Always test any cleaning solution on an inconspicuous area of your cabinets first to ensure it doesn’t damage the finish.
Specific Cabinet Material Care
Different cabinet materials require slightly different cleaning approaches. Knowing your cabinet type is key to effective and safe cabinet care.
Wood Cabinet Maintenance
Wood cabinets are beautiful but can be sensitive to moisture and harsh chemicals. Proper wood cabinet maintenance is vital for their longevity.
- Oiled or Waxed Wood: These finishes are more susceptible to damage from strong cleaners. Stick to a very mild soap solution or specialized wood cleaners.
- Stained or Varnished Wood: Generally more durable. The general cleaning method using diluted dish soap is usually effective.
- Avoid excessive water: Never spray water directly onto wood cabinets. Always apply your cleaner to a cloth first.
- Polish periodically: After cleaning, consider using a furniture polish designed for wood to restore shine and protect the finish.
Laminate Cabinet Cleaning
Laminate cabinets are durable and easy to clean, making them a popular choice. Laminate cabinet cleaning is straightforward.
- Gentle is best: While durable, abrasive cleaners or scrubbing pads can scratch laminate.
- Mild soap and water: This is usually sufficient.
- Avoid soaking: Wipe up spills immediately. Do not let water sit on the edges or seams of laminate, as it can seep in and cause damage.
- For sticky residue: A bit more dish soap or a paste of baking soda and water can be used. Wipe clean with a damp cloth and dry well.
Painted Cabinet Care
Painted cabinets offer a fantastic way to update your kitchen’s look. Painted cabinet care requires attention to prevent chipping or dulling the paint.
- Choose mild cleaners: Harsh chemicals can strip paint or leave a dull finish.
- Test your cleaner: Always test in a hidden spot.
- Soft cloths: Avoid abrasive sponges or scrubbers.
- Water and mild soap: This is your go-to solution.
- For stubborn marks: A paste of baking soda and water can be effective, but use a very soft cloth and gentle pressure.
- Avoid ammonia-based cleaners: These can be too harsh for painted surfaces.
- Touch-ups: Keep a small amount of your cabinet paint on hand for any nicks or scratches.
Stainless Steel Cabinet Cleaning
Stainless steel appliances and cabinets offer a modern look but can show smudges and water spots easily. Stainless steel cabinet cleaning requires specific techniques.
- Clean in the direction of the grain: Just like with wood, stainless steel has a grain. Find it and wipe along it.
- Use a microfiber cloth: This is essential for preventing scratches.
- Mild soap and water: A good starting point for regular cleaning.
- Specialized stainless steel cleaner: For a streak-free shine and extra protection, use a cleaner specifically designed for stainless steel.
- Vinegar solution: A mixture of water and white vinegar (1:1) can also be effective for degreasing and adding shine. Spray it onto the cloth, not directly onto the cabinet.
- Buff to a shine: After cleaning, buff with a dry microfiber cloth to remove any remaining moisture and enhance the shine.
Natural Cabinet Cleaning Options
For those who prefer to avoid commercial cleaning products, natural cabinet cleaning is a viable and effective option.
Baking Soda Paste
- Ingredients: Baking soda and water.
- Uses: Great for tackling greasy buildup and stubborn spots.
- How to use: Mix baking soda with water to form a paste. Apply to the affected area, let it sit for a few minutes, then gently scrub with a damp cloth. Wipe clean with a damp cloth and dry.
Vinegar Solution
- Ingredients: White vinegar and water (1:1 ratio).
- Uses: An excellent natural degreaser and disinfectant.
- How to use: Mix equal parts white vinegar and water in a spray bottle. Lightly spray onto a microfiber cloth and wipe down cabinets. For stronger odors, you can add a few drops of essential oil like lemon or tea tree oil.
Lemon Juice
- Ingredients: Fresh lemon juice.
- Uses: Adds a fresh scent and has mild degreasing properties.
- How to use: Mix a few tablespoons of lemon juice with water. Use a damp cloth to wipe down cabinets. Be cautious with prolonged exposure on certain finishes, as the acidity can be strong.
Dealing with Specific Kitchen Cabinet Problems
Beyond general cleaning and degreasing, you might encounter other issues.
Sticky Residue
Often caused by cooking splatters or hand oils.
- Method: A slightly warmer water solution with a bit more dish soap can usually dissolve sticky residue. For tough spots, try the baking soda paste method described earlier.
Water Stains
Usually occur on unfinished wood or if water is left to sit.
- Method: For light water spots on wood, a dry microfiber cloth buffed vigorously might work. For tougher stains, a very mild furniture polish or a paste of fine steel wool (0000 grade) and mineral oil, rubbed gently in the direction of the grain, can sometimes lighten the stain. Always test this in an inconspicuous area first.
Scuff Marks
Commonly found on painted cabinets.
- Method: Try a magic eraser (use very gently and test first), a pencil eraser, or a small amount of baking soda paste applied with a soft cloth.
Maintaining the Shine: Long-Term Cabinet Care
Consistent care will keep your kitchen cabinets looking their best.
Regular Wiping
- Daily or weekly: A quick wipe-down with a dry microfiber cloth can remove dust and light smudges, preventing buildup.
Deep Cleaning Schedule
- Monthly or quarterly: Depending on your kitchen’s usage, a more thorough wash using the methods described above.
Protecting Finishes
- Avoid harsh chemicals: Steer clear of abrasive cleaners, scouring pads, and ammonia-based products.
- Wipe spills immediately: Don’t let liquids sit on your cabinet surfaces.
- Consider cabinet protectors: For areas prone to heavy grease or steam, like around the stovetop, you can use cabinet protectors or even temporary coverings.
When to Consider Cabinet Refinishing
If your cabinets are heavily damaged, worn out, or you simply want a new look, cabinet refinishing might be the answer. This can involve:
- Restaining: For wood cabinets to refresh their color or deepen the hue.
- Repainting: A great way to completely change the look of your kitchen.
- Refacing: Replacing the door and drawer fronts while keeping the existing cabinet boxes.
- Professional cleaning: Sometimes, a professional deep clean can revive older cabinets, making them look almost new without the cost of refinishing.
Frequently Asked Questions (FAQ)
Q1: How often should I clean my kitchen cabinets?
A1: For general upkeep, wiping down daily or weekly with a dry cloth is ideal. A thorough wash should be done monthly or quarterly, depending on cooking habits and kitchen usage.
Q2: Can I use bleach to clean my kitchen cabinets?
A2: It is generally not recommended to use bleach on kitchen cabinets, especially wood or painted finishes, as it can damage or discolor the surface. Stick to milder cleaning solutions.
Q3: My cabinets feel greasy. What’s the best way to degrease them?
A3: For greasy buildup, a solution of warm water with a bit more mild dish soap or a 1:1 mixture of water and white vinegar is highly effective. A baking soda paste can be used for very stubborn spots.
Q4: What’s the best way to clean cabinet hardware like knobs and handles?
A4: Most hardware can be cleaned with a mild soap and water solution. For stainless steel, use a specialized cleaner or a vinegar solution. For brass or other metals, check specific cleaning recommendations to avoid tarnishing.
Q5: Can I use furniture polish on all types of cabinets?
A5: Furniture polish is generally safe for wood cabinets. However, for laminate, painted, or stainless steel cabinets, it’s best to use cleaners specifically designed for those materials. Always test in an inconspicuous area first.
By following these guidelines, you can easily keep your kitchen cabinets looking clean, shiny, and well-maintained for years to come. Regular kitchen cabinet cleaning is an investment in the beauty and hygiene of your home.