
What is the best way to clean wooden kitchen cupboards? The best way to clean wooden kitchen cupboards involves using gentle, appropriate cleaners and techniques to avoid damage, preserve the finish, and effectively tackle everyday grime, grease, and stains.
Wooden kitchen cupboards are the heart of many kitchens, but they often bear the brunt of cooking splatters, fingerprints, and daily wear. Keeping them clean and looking their best requires a mindful approach. This comprehensive guide will walk you through the safest and most effective methods for kitchen cabinet cleaning, ensuring your wooden surfaces remain beautiful for years to come. We’ll cover everything from everyday dusting to tackling stubborn grease removal and even how to handle different finishes.
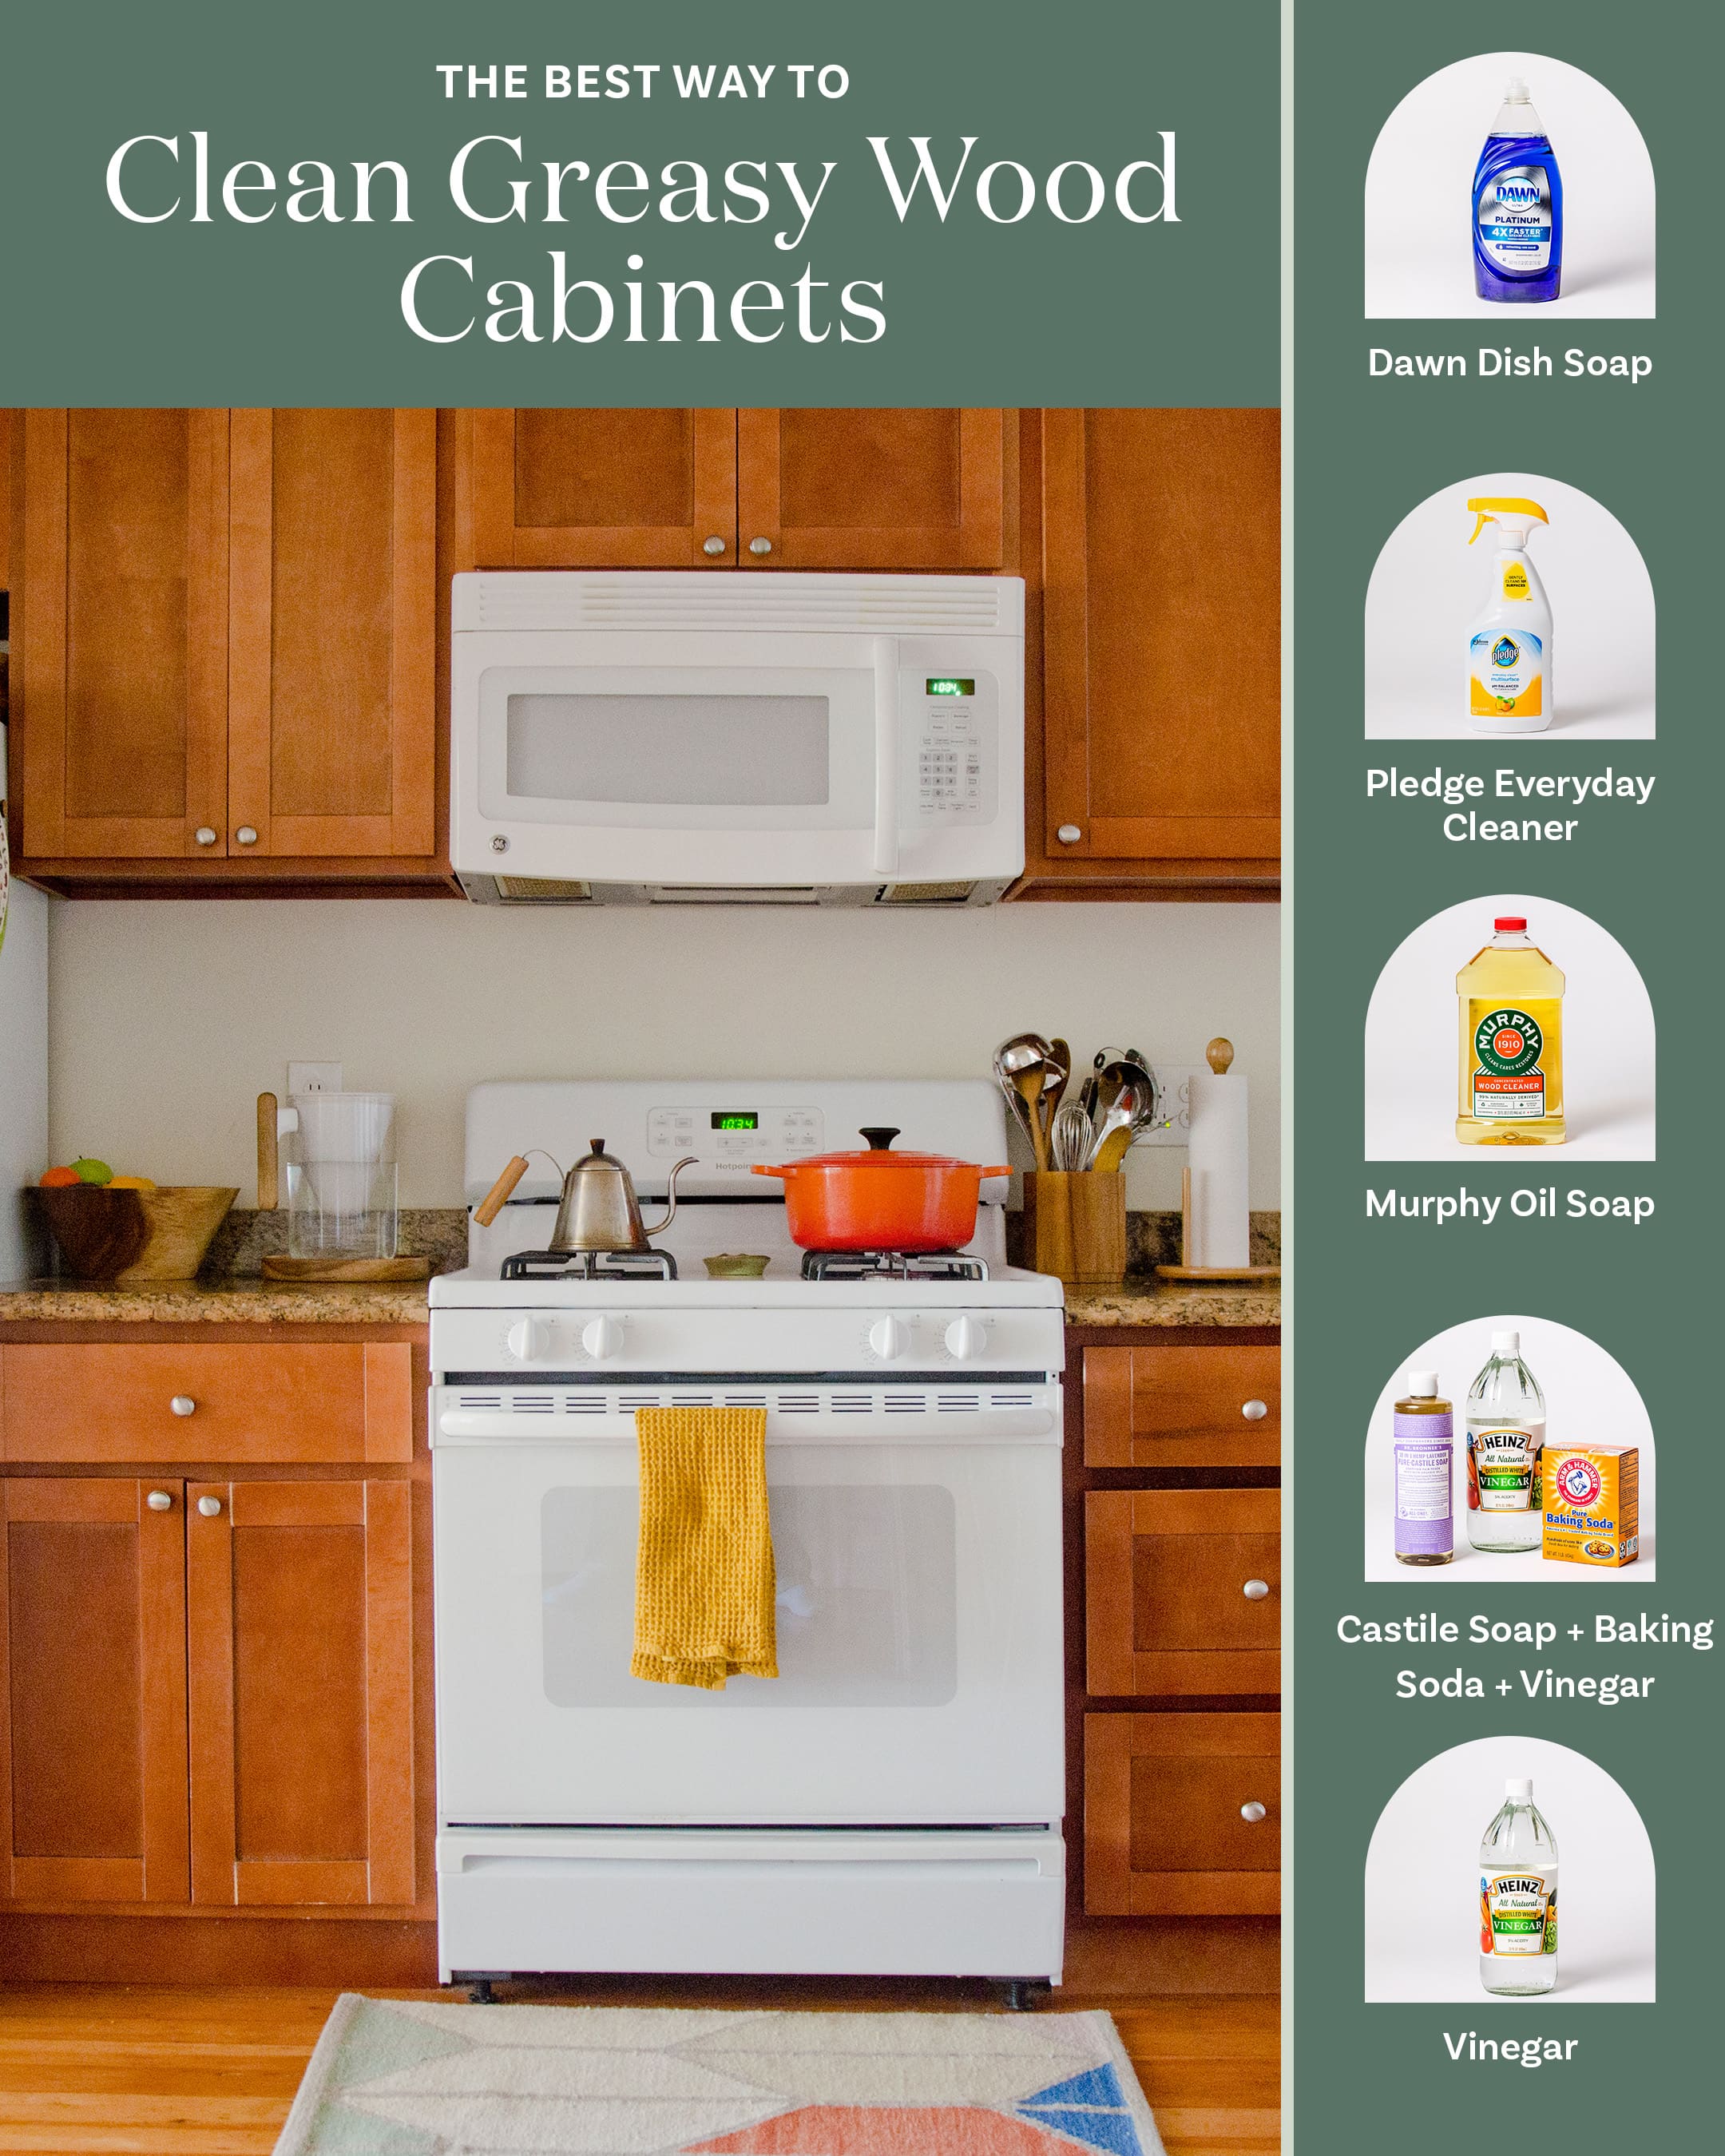
Image Source: cdn.apartmenttherapy.info
Decoding Your Cabinet Finish: The First Step to Safe Cleaning
Before you grab any cleaning product, it’s crucial to know what kind of finish your wooden kitchen cabinets have. Different finishes require different care. This knowledge is key to cleaning wooden surfaces without causing damage.
Common Wooden Cabinet Finishes:
- Natural Wood (Unfinished or Oiled): This is rare in kitchens as it’s very susceptible to stains and moisture. If you have this, extreme caution is needed.
- Varnished or Lacquered: These are durable, protective coatings. They are generally resistant to most mild cleaners.
- Painted: Paint offers a solid barrier but can chip or scratch if harsh cleaners are used.
- Stained: Stain colors the wood but is often protected by a topcoat (like varnish or lacquer). The topcoat is what you’ll be cleaning.
- Laminate or Vinyl Wrapped: While not solid wood, these often mimic the look of wood and have their own cleaning needs. It’s important to distinguish these from solid wood to avoid damage from products meant for real wood.
How to Identify Your Finish:
- Test an inconspicuous area: Try a small amount of water in a hidden spot. If it beads up, it’s likely sealed (varnish, lacquer, polyurethane). If it soaks in quickly, it might be unfinished or have a very thin seal.
- Rub gently with a cloth: If color comes off on the cloth, it could be a painted finish or a stain that isn’t well-sealed.
- Check manufacturer information: If possible, consult the original builder or manufacturer’s instructions for your cabinets.
Everyday Cleaning: Keeping Grime at Bay
Regular, gentle cleaning is the best way to prevent build-up and make deeper cleaning less frequent. This is your first line of defense against dirt and dust.
Daily Habits for Sparkling Cupboards:
- Wipe down surfaces: After cooking, quickly wipe down the cabinets nearest the stove and sink with a dry microfiber cloth. This removes minor splatters before they set.
- Dust regularly: A soft microfiber cloth is excellent for daily dusting. It traps dust without scratching the finish.
- Address spills immediately: Don’t let spills sit. Wipe them up with a damp cloth as soon as they happen.
Tackling Everyday Grime and Fingerprints
For most daily dirt, dust, and smudges, simple solutions are often the most effective and safest.
The Gentle Wipe-Down Method:
- Gather your supplies:
- Two clean microfiber cloths
- Lukewarm water
- A mild dish soap (optional, for slightly tougher grime)
- Prepare the cleaning solution:
- For general dusting and light smudges, dampen one microfiber cloth with plain water. Wring it out thoroughly so it’s just damp, not wet.
- For slightly dirtier areas, add a tiny drop of mild dish soap to a bowl of lukewarm water. Stir to create a very dilute solution.
- Wipe the cabinets: Gently wipe down the cabinet surfaces with the dampened cloth. Work in the direction of the wood grain. Don’t oversaturate the wood.
- Rinse (if using soap): If you used a soapy solution, use the second, clean microfiber cloth dampened with plain water to wipe away any soap residue. Again, wring the cloth out well.
- Dry thoroughly: Immediately follow up with a dry microfiber cloth to buff the cabinets dry. This prevents water spots and streaks.
Important Note: Always use microfiber cloths. They are soft, absorbent, and less likely to scratch than paper towels or rougher cloths.
Mastering Grease Removal: The Kitchen Cabinet Challenge
Kitchen cabinets, especially those near the stove, are prone to accumulating greasy residue from cooking fumes. This requires a more targeted approach to grease removal.
Effective Grease Removal Techniques:
When soap and water aren’t enough, you need a slightly stronger, yet still safe, approach.
Method 1: Dish Soap Power
Mild dish soap is formulated to cut through grease, making it an excellent choice for cabinet cleaning.
- Supplies:
- Two clean microfiber cloths
- Warm water
- Mild dish soap (e.g., Dawn)
- Procedure:
- Mix a few drops of mild dish soap with a bowl of warm water.
- Dampen one microfiber cloth in the solution and wring it out very well. The cloth should be damp, not dripping.
- Wipe the greasy areas, following the wood grain. You might need to apply gentle pressure.
- Immediately rinse the area with a second microfiber cloth dampened with plain, clean water. Ensure all soap residue is removed.
- Buff dry with a third clean, dry microfiber cloth.
Method 2: Vinegar Solution (Use with Caution)
White vinegar is a natural degreaser and disinfectant. However, its acidity can dull some finishes if used too frequently or too concentrated. Always dilute it and test it first.
- Supplies:
- Spray bottle
- White vinegar
- Water
- Microfiber cloths (at least three)
- Procedure:
- Mix equal parts white vinegar and water in a spray bottle. (For very delicate finishes, try a 1:2 ratio of vinegar to water).
- Lightly spray the solution onto a microfiber cloth – never directly onto the cabinets.
- Wipe the greasy areas, following the wood grain.
- Quickly wipe the area with a damp cloth (plain water) to neutralize the vinegar.
- Dry thoroughly with a clean, dry microfiber cloth.
Method 3: Baking Soda Paste (For Stubborn Spots)
Baking soda is a gentle abrasive that can help lift stubborn grease.
- Supplies:
- Baking soda
- Water
- Small bowl
- Soft cloth or sponge
- Microfiber cloths
- Procedure:
- Mix baking soda with a small amount of water to create a thick paste.
- Apply the paste directly to the stubborn greasy spots using a soft cloth or sponge.
- Let it sit for a few minutes.
- Gently rub the paste in the direction of the wood grain.
- Wipe away the paste with a damp microfiber cloth.
- Rinse the area with a clean, damp cloth.
- Dry thoroughly with a clean, dry microfiber cloth.
Important Note: Always test any degreasing solution in an inconspicuous spot first, especially on painted or stained cabinets, to ensure it doesn’t affect the finish.
Natural Wood Cleaners: Gentle on Your Cabinets and the Environment
For those who prefer to avoid commercial cleaning products, natural wood cleaners offer effective and eco-friendly solutions. Many of these are simple household items.
DIY Cupboard Cleaner Recipes:
These DIY cupboard cleaner options are budget-friendly and use readily available ingredients.
Recipe 1: Olive Oil and Lemon Juice Polish/Cleaner
This classic combination cleans and shines. Lemon juice helps cut through grime, while olive oil nourishes the wood.
- Ingredients:
- 1/4 cup olive oil
- 2 tablespoons lemon juice (freshly squeezed is best)
- Instructions:
- Mix the olive oil and lemon juice in a small bowl.
- Dip a clean microfiber cloth into the mixture and wring it out well.
- Wipe down your cabinets, following the grain.
- Use a separate clean, dry cloth to buff the cabinets to a shine.
Recipe 2: Water and a Drop of Essential Oil
For very light cleaning and a fresh scent, plain water with a tiny amount of essential oil can work.
- Ingredients:
- Lukewarm water
- 1-2 drops of essential oil (e.g., lemon, orange, lavender)
- Instructions:
- Fill a spray bottle with lukewarm water.
- Add 1-2 drops of your chosen essential oil. Do not overdo it, as oils can leave residue.
- Shake the bottle gently.
- Lightly mist a microfiber cloth and wipe the cabinets.
- Dry with a clean cloth.
Caution: While natural, always test these DIY cleaners in an inconspicuous area first, especially on delicate finishes. Avoid using essential oils directly on antique or very sensitive wood.
Cleaning Laminate Kitchen Cabinets: A Different Approach
If your kitchen cabinets have a laminate kitchen cabinets finish (often a vinyl wrap or melamine), they require a slightly different cleaning strategy than solid wood. The goal is to clean the surface without damaging the laminate or its adhesive.
Best Practices for Laminate Cabinet Cleaning:
- Avoid excess moisture: Laminate can delaminate or swell if it gets too wet. Always use a well-wrung-out cloth.
- Gentle cleaners are key: Harsh chemicals can damage the laminate surface or the printed wood grain pattern.
- No abrasives: Avoid abrasive cleaners, scouring pads, or steel wool, as they will scratch the surface.
Cleaning Laminate:
- For general dirt and fingerprints: Use a soft microfiber cloth dampened with lukewarm water. Wipe clean and dry immediately with a dry microfiber cloth.
- For tougher grime or grease: Mix a few drops of mild dish soap with warm water. Dampen a microfiber cloth, wring it out thoroughly, wipe the cabinets, rinse with a water-dampened cloth, and dry immediately.
- For sticky residue (like price tags): A mild all-purpose cleaner or a bit of rubbing alcohol on a cloth can work. Apply to the cloth, not directly to the laminate, and rub gently. Wipe with a damp cloth and dry.
Restoring Wood Cabinets: Bringing Back the Shine
Over time, wood cabinets can lose their luster, appearing dull or showing minor wear. Restoring wood cabinets is about revitalizing their appearance.
Revitalizing Your Wooden Surfaces:
- Deep Cleaning: Start with a thorough cleaning using one of the methods described above to remove all accumulated grime and grease.
- Touch-up minor scratches: For very minor surface scratches, you can sometimes use a furniture repair crayon or marker that matches your cabinet color. Gently rub it into the scratch.
- Conditioning the Wood: For solid wood cabinets that feel dry, a good quality furniture polish or a dedicated wood conditioner can help.
Using Furniture Polish or Wood Conditioner:
- Choose the right product: Select a polish or conditioner designed for wood furniture. Look for products that don’t leave a greasy residue.
- Test first: Always test the product on an inconspicuous area to ensure it doesn’t alter the color or finish.
- Apply sparingly: Apply a small amount of polish or conditioner to a clean, soft cloth.
- Rub in gently: Rub the polish into the cabinets following the wood grain.
- Buff to a shine: Use a separate clean, dry cloth to buff the cabinets until they have a soft sheen.
Important Note: Avoid silicone-based polishes if you plan to refinish or paint your cabinets in the future, as they can interfere with adhesion.
Polishing Wood Cupboards: The Finishing Touch
Polishing wood cupboards is the final step to enhance their natural beauty and protect the finish.
Achieving a Lustrous Polish:
- Choose Your Polish:
- Paste Wax: Offers a durable, long-lasting finish and can fill in tiny imperfections. Requires buffing.
- Liquid Polish: Easier to apply and often contains conditioning oils.
- DIY Options: The olive oil and lemon juice mixture can also act as a polish.
- Application:
- Ensure cabinets are clean and dry.
- Apply a thin, even coat of your chosen polish with a soft cloth, working in the direction of the grain.
- Allow the polish to dry according to the product’s instructions (usually a few minutes).
- Buff the surface vigorously with a clean, dry microfiber cloth until you achieve a desired shine.
Frequency: Polishing is typically done every 3-6 months, or as needed, to maintain the wood’s appearance and protection.
Specialized Cleaning Situations
Sometimes, you encounter specific issues that require tailored solutions.
Stubborn Stains:
- Water Spots: For light water spots, try buffing with a clean, dry cloth. For tougher marks, a very mild solution of baking soda and water paste might help, followed by rinsing and drying.
- Food Stains: For most food stains, a mild dish soap solution should suffice. For very set-in stains, a paste of baking soda and water might be necessary.
- Ink or Marker Stains: For painted or heavily lacquered cabinets, a small amount of rubbing alcohol on a cotton swab can sometimes lift ink. Be very careful and test first, as alcohol can strip paint or finishes.
Dealing with Hardware:
Don’t forget your cabinet knobs and handles!
- Metal Hardware: Clean metal hardware separately. For brass, use a brass cleaner. For stainless steel, a specialized cleaner or a damp cloth followed by a dry buff is best. For painted hardware, clean gently with a damp cloth.
What NOT to Do When Cleaning Wooden Kitchen Cupboards
To ensure you don’t damage your beautiful cabinets, here are some common mistakes to avoid:
- Never oversaturate: Excess water can warp wood, peel veneer, and damage finishes.
- Avoid harsh chemicals: Bleach, ammonia, abrasive cleaners, and strong solvents can strip finishes, discolor wood, or cause permanent damage.
- Don’t use abrasive tools: Steel wool, scouring pads, and abrasive sponges will scratch and dull the finish.
- Skip the steam cleaner: The high heat and moisture from steam cleaners can damage wood finishes and the wood itself.
- Avoid silicone-based products (if refinishing): As mentioned, these can create adhesion problems for future finishes.
Cleaning Schedule: Maintaining Your Cabinets
A consistent cleaning schedule will keep your cabinets looking their best with minimal effort.
Recommended Cleaning Routine:
| Frequency | Task | Products/Tools |
|---|---|---|
| Daily | Wipe down surfaces near cooking areas | Dry microfiber cloth |
| Dust | Dry microfiber cloth | |
| Weekly | Wipe down all cabinet fronts | Damp microfiber cloth (water or diluted mild soap) |
| Dry and buff | Dry microfiber cloth | |
| Monthly | Tackle greasy areas | Diluted mild dish soap solution or vinegar/water mix (tested) |
| Clean hardware | Appropriate cleaner for hardware material | |
| Every 3-6 Months | Polish or condition | Furniture polish, wood conditioner, or paste wax |
| As Needed | Address spills and stains immediately | Appropriate gentle cleaner |
Frequently Asked Questions (FAQ)
Here are some common questions about cleaning wooden kitchen cupboards:
Q1: Can I use furniture polish on my kitchen cabinets?
A1: Yes, many furniture polish products are suitable for cleaning wooden surfaces and cabinets. Always choose one specifically designed for wood and test it in an inconspicuous area first to ensure compatibility with your cabinet’s finish.
Q2: What if my cabinets have a matte finish? Will polish make them shiny?
A2: Some polishes can add a slight sheen. If you have a matte finish and prefer to keep it that way, opt for a non-glossy wood conditioner or a wax-based polish that buffs to a matte sheen. Always test first.
Q3: How do I clean white painted kitchen cabinets?
A3: White painted cabinets can be cleaned with a soft cloth dampened with mild soap and water. For tougher spots, a paste of baking soda and water can be effective. Avoid harsh chemicals or abrasive cleaners that could scratch or dull the paint. Always dry thoroughly to prevent water spots.
Q4: My cabinets have veneer. How should I clean them?
A4: Veneer is a thin layer of wood. Treat veneer cabinets with extra care. Use minimal moisture, and never oversaturate the surface. Stick to gentle cleaning methods like a slightly damp microfiber cloth with water or diluted mild soap. Avoid harsh scrubbing or abrasive cleaners, which can easily damage the veneer.
Q5: Is it safe to use all-purpose cleaners on my wooden cabinets?
A5: Many all-purpose cleaners are too harsh for wood finishes. It’s generally safer to use solutions specifically designed for wood or mild DIY cleaners like diluted dish soap or vinegar solutions. If you must use an all-purpose cleaner, ensure it’s a very mild formula and test it first in a hidden spot.
By following these guidelines, you can confidently tackle kitchen cabinet cleaning and keep your wooden cupboards looking beautiful and well-maintained, ensuring they remain a highlight of your kitchen for years to come.