
Replacing your kitchen faucet is a common home improvement task that many homeowners can tackle themselves. If you’re wondering what is involved in replacing a kitchen faucet, it primarily includes shutting off the water supply, disconnecting the old faucet, cleaning the sink area, installing the new faucet, and reconnecting the water lines. Can I replace my kitchen faucet myself? Absolutely! With the right tools and a little patience, a DIY kitchen faucet replacement is very achievable. For those asking who typically replaces a kitchen faucet, it’s often homeowners or handymen, but it’s a skill you can learn.
A worn-out or leaky kitchen faucet can be more than just an annoyance; it can waste water and money. Knowing how to change a kitchen faucet empowers you to handle this maintenance task, saving you the cost of hiring a plumber. This guide will walk you through the entire process, from gathering your tools to enjoying your sparkling new faucet.
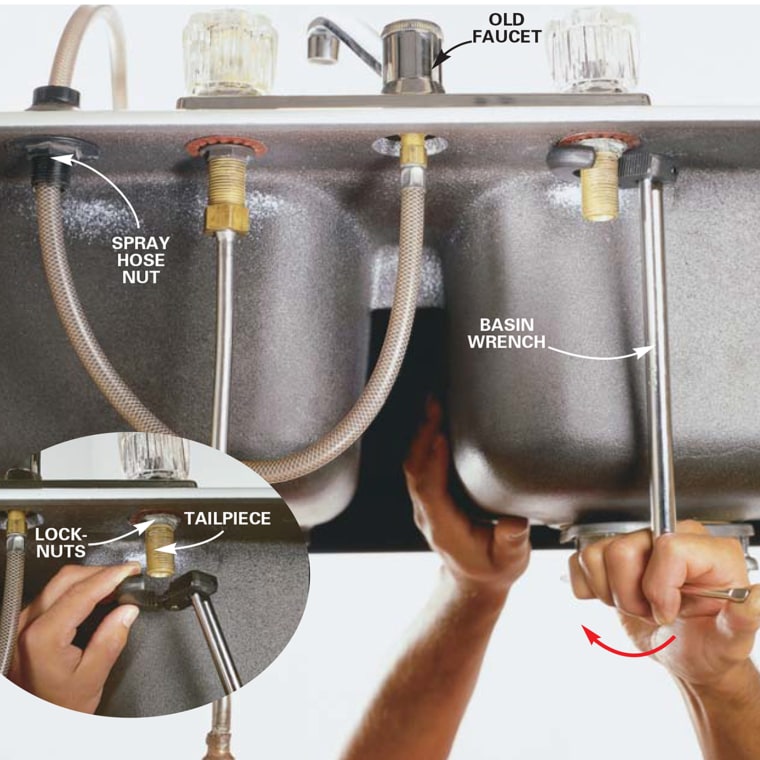
Image Source: media-cldnry.s-nbcnews.com
Preparing for Your Kitchen Faucet Replacement
Before you dive in, proper preparation is key to a smooth and successful DIY faucet replacement. This involves selecting your new faucet, gathering necessary tools, and understanding the steps involved.
Choosing Your New Kitchen Faucet
The market offers a vast array of kitchen faucets, catering to different styles, functionalities, and budgets. Considering your needs and the existing setup of your kitchen sink is crucial.
Types of Kitchen Faucets
- Single Handle Faucets: These are the most common and offer easy control over both water temperature and flow with a single lever. They are great for convenience, especially when your hands are full. They are also a popular choice for single handle faucet replacement.
- Double Handle Faucets: These have separate handles for hot and cold water. They offer precise temperature control but can be less convenient with only one free hand.
- Pull-Down Faucets: Featuring a spray head that pulls directly from the spout, these are excellent for rinsing dishes and cleaning the sink.
- Pull-Out Faucets: Similar to pull-down, but the spray head pulls straight out from the spout.
- Commercial/Professional Style Faucets: These often have a high arc, a pull-down sprayer with a spring, and a robust design, adding a professional look to your kitchen.
- Touchless Faucets: Activated by motion, these offer superior hygiene and convenience, perfect for busy kitchens.
Factors to Consider When Buying
- Mounting Holes: Check how many holes your sink or countertop has. Faucets are designed for one, two, three, or four holes. You might need a faucet with an integrated base plate (escutcheon) to cover unused holes.
- Reach and Height: Ensure the faucet’s spout has enough reach to comfortably access all parts of your sink basin and enough height to accommodate large pots and pans.
- Style and Finish: Match the faucet’s style and finish to your kitchen décor. Common finishes include chrome, brushed nickel, stainless steel, matte black, and oil-rubbed bronze.
- Brand Reputation: Research best kitchen faucet brands known for durability, customer service, and warranty. Brands like Moen, Delta, Kohler, and Pfister are highly regarded.
- Features: Consider features like a sprayer, water filtration, or integrated soap dispensers.
Gathering Your Tools and Materials
Having all the necessary tools and materials readily available will make the process much smoother. Here’s a comprehensive list:
Essential Tools
- Adjustable Wrench: For loosening and tightening nuts and fittings.
- Basin Wrench: A specialized tool for reaching nuts in tight spaces under the sink. This is often indispensable for kitchen sink faucet removal.
- Pipe Wrench: For gripping pipes and fittings, though often an adjustable wrench is sufficient.
- Plumber’s Tape (Teflon Tape): For creating watertight seals on threaded connections.
- Bucket: To catch any residual water when disconnecting lines.
- Towels or Rags: For drying up spills and keeping the work area clean.
- Safety Glasses: To protect your eyes from debris or water.
- Flashlight or Headlamp: To see clearly in the dark space under the sink.
- Screwdriver Set: Phillips and flathead, as some faucet components might be secured with screws.
- Putty Knife or Scraper: To remove old sealant or plumber’s putty.
- Wire Brush: To clean threads and mounting surfaces.
- Penetrating Oil (e.g., WD-40): For loosening stubborn nuts and bolts.
Necessary Materials
- New Kitchen Faucet: Ensure it’s compatible with your sink’s configuration.
- Plumber’s Putty: A pliable sealant used to create a watertight seal between the faucet base and the sink deck. This is a crucial material for preventing leaks, especially when dealing with under sink plumbing.
- Replacement Supply Lines: It’s highly recommended to replace old supply lines when installing a new faucet, as they can degrade over time. Ensure you get the correct length and thread size.
- Old Toothbrush or Small Brush: For cleaning tight spots.
Step-by-Step Guide to Replacing Your Kitchen Faucet
Now that you’re prepared, let’s get to the hands-on part of how to replace a kitchen faucet.
Step 1: Shut Off the Water Supply
This is the most critical first step to prevent flooding.
- Locate the Shut-Off Valves: Under your kitchen sink, you’ll find two valves connected to the water supply lines. One is for hot water (usually on the left), and the other is for cold water (usually on the right).
- Turn Off the Valves: Turn both valve handles clockwise until they are fully closed.
- Test the Water Flow: Turn on your old faucet to drain any remaining water in the lines and to confirm that the water is indeed shut off. Let the water run until it stops dripping.
Step 2: Disconnect the Old Faucet
This stage involves carefully detaching the existing faucet from the sink and water lines.
- Place a Bucket: Position a bucket or container directly under the water supply connections to catch any residual water.
- Disconnect Supply Lines: Using an adjustable wrench, loosen the nuts connecting the hot and cold water supply lines to the shut-off valves. Be prepared for a small amount of water to drip out.
- Disconnect Sprayer Hose (if applicable): If your faucet has a sprayer, disconnect its hose from the faucet body. There might be a quick-connect fitting or a threaded connection.
- Loosen Mounting Nuts: Look under the sink where the faucet connects to the sink deck. You’ll find mounting nuts or screws securing the faucet. Use your basin wrench or adjustable wrench to loosen and remove these. This can be a tricky part of kitchen sink faucet removal, as the nuts are often in tight, awkward spaces.
- Remove the Old Faucet: Once all connections are loose and removed, you should be able to lift the old faucet assembly straight up and out from the top of the sink.
Step 3: Clean the Sink Area
A clean surface ensures a good seal for the new faucet and a professional finish.
- Remove Old Sealant: Use a putty knife or scraper to carefully remove any old plumber’s putty or sealant residue from the sink deck where the old faucet was mounted.
- Clean the Surface: Wipe down the area with a damp cloth to remove dust and grime. A clean surface is essential for the proper adhesion of the new faucet’s sealant. You can use a bit of cleaner if needed, but ensure it’s completely dry afterward.
- Clean Mounting Holes: If there are any debris or old mineral deposits in the mounting holes, use a wire brush or an old toothbrush to clean them out.
Step 4: Install the New Faucet
This is where your new kitchen faucet begins to take shape.
- Prepare the New Faucet: Most new faucets come with clear instructions. Follow them carefully.
- Apply Plumber’s Putty: Roll a rope of plumber’s putty and place it around the base of the faucet or its escutcheon plate if it doesn’t come with a pre-attached gasket. This creates a watertight seal between the faucet and the sink.
- Position the Faucet: Carefully insert the faucet shanks through the appropriate holes in the sink deck. Ensure the faucet is centered and facing the correct direction.
- Secure the Faucet from Below:
- Install Washers and Nuts: From underneath the sink, slide the provided rubber washers and then the mounting nuts onto the faucet shanks.
- Tighten the Nuts: Hand-tighten the nuts first. Then, use your basin wrench or adjustable wrench to snug them up. Be careful not to overtighten, which could damage the sink or faucet. Ensure the faucet remains straight and centered as you tighten.
- Connect Supply Lines:
- Attach to Faucet: Connect the new flexible supply lines to the corresponding hot and cold water inlets on the new faucet. Hand-tighten these first, then use a wrench to give them a quarter to half turn.
- Attach to Shut-Off Valves: Connect the other ends of the supply lines to the shut-off valves. Again, hand-tighten first, then use a wrench to snug them up. Make sure you connect the hot line to the hot valve and the cold line to the cold valve.
- Connect Sprayer Hose (if applicable): Follow the manufacturer’s instructions to connect the sprayer hose to the faucet body.
- Install Deck Plate (if applicable): If your faucet came with a deck plate to cover extra holes, ensure it’s properly positioned and secured with its own nuts or mounting hardware, usually with plumber’s putty underneath.
Step 5: Test for Leaks and Finish Up
The final steps involve checking your work and ensuring everything is functioning correctly.
- Turn On Water Supply: Slowly open the hot and cold water shut-off valves by turning the handles counter-clockwise.
- Check for Leaks: Carefully inspect all connections under the sink for any signs of dripping or leaks. Pay close attention to where the supply lines connect to the faucet and the shut-off valves, and where the faucet mounts to the sink.
- Test Faucet Operation: Turn on the new faucet. Check the hot and cold water flow, the sprayer function (if applicable), and ensure the handles move smoothly.
- Tighten if Necessary: If you find any minor leaks, try gently tightening the connection slightly with your wrench.
- Clean Up: Wipe away any excess plumber’s putty that may have squeezed out around the faucet base. Remove your tools and materials from under the sink. Dispose of the old faucet properly.
Troubleshooting Common Issues During Installation
Even with careful planning, you might encounter a few hiccups. Here’s how to handle them:
Stubborn Nuts and Connections
- Problem: Nuts or fittings are difficult to loosen or tighten due to corrosion or grime.
- Solution: Apply a penetrating oil like WD-40 to the threads and let it sit for 15-30 minutes. You might need to gently tap the fitting with a wrench to help the oil penetrate. Use the correct wrench size to avoid stripping the nuts. A basin wrench is invaluable for reaching these tight spots.
Leaks After Installation
- Problem: You see drips from connections or the faucet base after turning the water back on.
- Solution:
- Connection Leaks: Ensure supply lines are properly seated and that the nuts are tightened sufficiently (but not overly so). If the leak persists, you might need to disconnect, reapply plumber’s tape to the threads, and reconnect.
- Base Leaks: This often means the plumber’s putty or gasket seal isn’t forming a good watertight barrier. You might need to shut off the water again, loosen the faucet mounting nuts, add more plumber’s putty, and re-tighten.
- Internal Faucet Leaks: If water is dripping from the spout when the faucet is off, the internal cartridges or seals within the faucet might be faulty. This is less common with new faucets but can happen. Check your warranty.
Faucet Not Level or Centered
- Problem: The faucet isn’t straight on the sink.
- Solution: You likely need to loosen the mounting nuts from underneath, reposition the faucet on top of the sink, and then retighten the nuts while holding the faucet in place.
Wrong Size Supply Lines
- Problem: The new supply lines don’t fit the shut-off valves or faucet inlets.
- Solution: Double-check the thread sizes on your shut-off valves and faucet connections. Most modern fixtures use standard 3/8″ compression fittings for the valves, but faucet inlets can vary (often 1/2″ or 3/8″ IPS). Purchase the correct size supply lines. It’s often easier to buy new ones specifically designed for your faucet model.
Maintaining Your New Kitchen Faucet
Once your new faucet is installed, a little regular maintenance will keep it looking and functioning great.
- Regular Cleaning: Wipe down the faucet regularly with a soft, damp cloth to prevent water spots and mineral buildup. Avoid abrasive cleaners that can scratch the finish.
- Check for Leaks: Periodically check under the sink for any signs of leaks from the supply lines or connections.
- Aerator Cleaning: The aerator at the tip of the spout can become clogged with mineral deposits over time, reducing water flow. Unscrew the aerator and soak it in a vinegar solution to dissolve mineral buildup. Rinse thoroughly before screwing it back on. This is a simple step for maintaining good flow from your kitchen faucet installation.
Frequently Asked Questions About Kitchen Faucet Replacement
Q1: How long does it take to replace a kitchen faucet?
A1: For a DIYer with basic tools and some experience, replacing a kitchen faucet typically takes between 1 to 3 hours. If it’s your first time, or if you encounter stubborn old fittings, it could take a bit longer.
Q2: What is plumber’s putty used for?
A2: Plumber’s putty is a soft, pliable sealant used to create a watertight seal between plumbing fixtures (like faucets, drains, and strainers) and the surface they are mounted on (like a sink or countertop). It prevents water from leaking down into the cabinet.
Q3: Do I need to replace my supply lines when replacing a faucet?
A3: It’s highly recommended. Old supply lines can become brittle, kinked, or develop small leaks. Replacing them at the same time as the faucet is a proactive measure that prevents future problems and ensures a reliable connection for your new faucet. This is especially important when dealing with under sink plumbing.
Q4: My sink has 3 holes, but my new faucet only needs 1. What do I do?
A4: Most new single-handle faucets come with an optional deck plate or escutcheon. This decorative plate covers the unused holes in your sink, providing a clean and finished look. Make sure you get a faucet that either includes a deck plate or that you purchase one separately that is compatible with your faucet and sink.
Q5: What are the best kitchen faucet brands?
A5: Some of the best kitchen faucet brands known for quality, durability, and customer service include Moen, Delta, Kohler, Pfister, and Kraus. Researching specific models within these brands based on your needs and budget is advisable.
Q6: My old faucet is really stuck. What can I do?
A6: If the mounting nuts are corroded and won’t budge, try applying a penetrating oil (like WD-40) and letting it soak in. Sometimes, a few gentle taps with a hammer on the wrench can help break the corrosion. If all else fails, you might need a specialized tool called a “faucet remover” or, in extreme cases, you may need to cut the old nuts off, being very careful not to damage the sink itself.
Q7: How do I fix a leaky kitchen faucet without replacing it?
A7: If you have a leaky kitchen faucet repair scenario and don’t want to replace the whole unit, the issue is often with the internal cartridges, O-rings, or seals. You’ll need to identify the type of faucet you have, purchase the correct replacement parts, and follow a guide specific to your faucet model for disassembly and repair. This can be more complex than a full replacement for some DIYers.
Replacing your kitchen faucet is a rewarding DIY project that can update the look and functionality of your kitchen. By following these detailed steps, you can confidently tackle this task and enjoy your new faucet for years to come. Remember to work safely and methodically, and don’t hesitate to consult your faucet’s manual for specific instructions.