
Thinking about replacing your kitchen cabinets? Yes, you can do it yourself! While it’s a significant undertaking, with careful planning and the right approach, replacing kitchen cabinets is a rewarding DIY project that can dramatically transform your kitchen. This guide will walk you through every step, from initial decisions to the final touches.
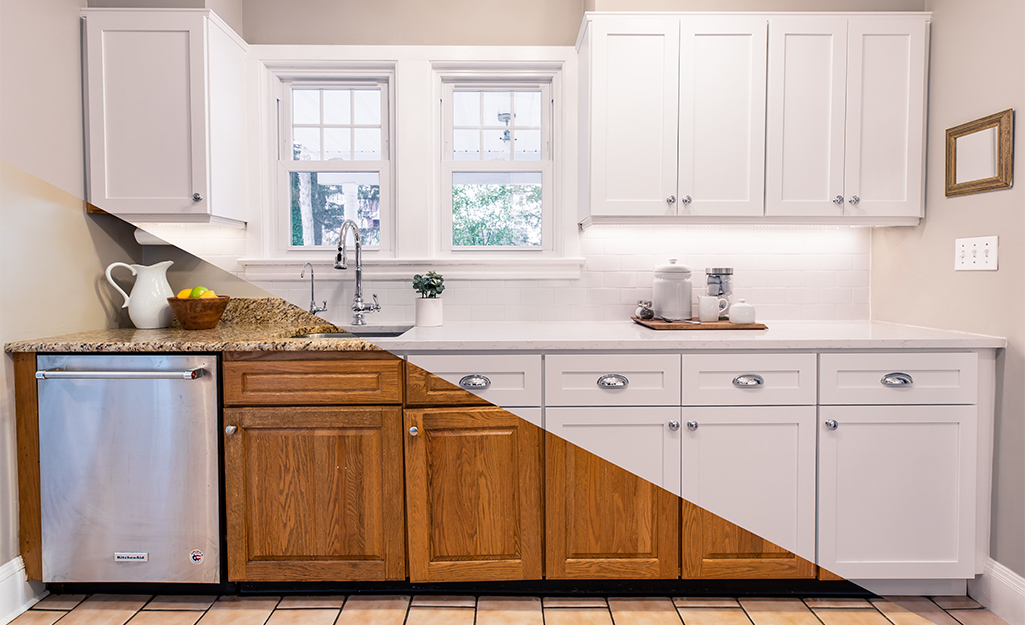
Image Source: contentgrid.homedepot-static.com
Planning Your Kitchen Cabinet Replacement
Before you even think about touching a screwdriver, extensive planning is key. This stage involves making critical decisions about the style, material, layout, and budget for your new kitchen.
Deciding on the Scope of Your Project
Will you be doing a full cabinet replacement, or are you considering cabinet refacing? Cabinet refacing involves keeping your existing cabinet frames and replacing the doors, drawer fronts, and applying a new veneer to the visible parts of the cabinet boxes. This is often a less expensive and less labor-intensive option than a complete cabinet replacement cost. However, if your existing cabinets are in poor condition, warped, or the layout no longer suits your needs, then a full kitchen remodel cabinets with new units is the way to go. This guide focuses on full kitchen cabinet installation.
Budgeting for Your DIY Kitchen Cabinets
Setting a realistic budget is paramount. Cabinet replacement cost can vary wildly depending on the materials you choose, whether you opt for stock, semi-custom, or custom cabinets, and the complexity of your kitchen’s layout.
Typical Cost Breakdown for Cabinet Replacement:
| Item | Estimated Cost Range (USD) | Notes |
|---|---|---|
| Stock Cabinets | $100 – $400 per linear ft | Basic options, limited styles and finishes. |
| Semi-Custom Cabinets | $150 – $750 per linear ft | More choices in style, material, and finish. |
| Custom Cabinets | $500 – $1,200+ per linear ft | Fully customizable, high-quality materials and craftsmanship. |
| Hardware | $5 – $25+ per piece | Knobs, pulls, hinges, drawer slides. |
| Countertops | $25 – $100+ per sq ft | If replacing simultaneously. |
| Installation Labor | $50 – $150+ per hour | If hiring help for parts of the project. |
| Tools & Supplies | $200 – $1,000+ | Saws, drills, fasteners, safety gear, etc. |
Remember to factor in a contingency fund (10-20%) for unforeseen expenses.
Choosing Your New Kitchen Cabinets
This is where your kitchen’s style truly comes to life.
Material Matters
- Plywood: Durable, resistant to moisture, and a good choice for cabinet boxes.
- Particleboard/MDF: More budget-friendly but less durable and susceptible to moisture damage.
- Solid Wood: The most durable and aesthetically pleasing, but also the most expensive. Common woods include oak, maple, cherry, and birch.
Cabinet Styles
- Framed Cabinets: Have a visible face frame around the cabinet opening. They are generally stronger and less expensive.
- Frameless Cabinets (European style): Doors attach directly to the cabinet box, offering a sleeker look and more accessible interior space.
Door and Drawer Styles
- Shaker: A classic style with a simple, flat center panel and a raised frame.
- Slab/Flat Panel: A modern, minimalist look with a completely flat surface.
- Raised Panel: Features a central panel that is raised, adding depth and dimension.
- Recessed Panel: Similar to Shaker but with a slightly recessed center panel.
Finish Options
- Painted: Offers a wide range of color options.
- Stained: Enhances the natural grain of wood.
- Varnished/Lacquered: Provides a protective, often glossy, finish.
Measuring Your Kitchen
Accurate measurements are non-negotiable for a successful kitchen cabinet installation.
- Measure Wall Lengths: Measure all wall sections where cabinets will be installed.
- Note Window and Door Openings: Mark their exact locations and dimensions.
- Identify Appliance Locations: Measure spaces for your refrigerator, oven, dishwasher, etc.
- Account for Utilities: Note the location of plumbing, electrical outlets, and vents.
- Ceiling Height: Measure from the floor to the ceiling for all relevant walls.
- Baseboard and Crown Molding: Measure their dimensions if you plan to reuse or replace them.
Pro Tip: Draw a detailed floor plan of your kitchen. Use graph paper or design software. Label all dimensions, windows, doors, and appliance locations. This will be invaluable when planning your cabinet layout and ordering.
Preparing for Cabinet Removal
Before you can start installing new cabinets, you must safely and effectively remove the old ones. This stage requires patience and a systematic approach.
Gathering Your Tools and Supplies
- Safety Gear: Safety glasses, work gloves, dust mask.
- Pry Bars: Various sizes for gentle persuasion.
- Screwdrivers: Phillips and flathead, both manual and electric.
- Utility Knife: For scoring caulk and paint.
- Putty Knife/Scraper: For removing adhesive and debris.
- Hammer: For tapping pry bars.
- Stud Finder: To locate wall studs.
- Drill/Driver: With various bits.
- Reciprocating Saw (optional): For stubborn sections, use with caution.
- Buckets/Bags: For debris.
- Drop Cloths: To protect your flooring.
Shutting Off Utilities
Crucially, before you begin removing any cabinets, turn off the water supply to your kitchen and shut off the electricity to the kitchen circuits at your breaker box. This prevents water damage and electrical hazards.
Removing Cabinet Contents and Doors
- Empty Everything: Remove all items from inside the cabinets and drawers.
- Remove Doors and Drawer Fronts:
- Open each cabinet door and drawer.
- Locate the hinges. They usually have screws attaching them to the cabinet frame.
- Carefully unscrew the hinges, supporting the door as you go.
- For drawers, they may slide out or have clips that need to be released.
- Label each door and drawer front with its corresponding cabinet location (e.g., “Upper Left,” “Base Drawer 2”) using painter’s tape and a marker. This will be helpful if you plan to reuse any parts or simply for organization.
Detaching Cabinets from the Wall
- Score Caulk and Paint: Use a utility knife to score any caulk or paint lines where the cabinets meet the wall or ceiling. This prevents paint from peeling off your walls.
- Locate Mounting Screws: Cabinets are typically attached to wall studs through the back or through the cabinet frame itself. Use your stud finder to identify the stud locations behind the cabinets.
- Unscrew: Use your drill/driver to remove all mounting screws. You may need to remove shelves or drawer slides to access all screws.
- Pry Gently: Once all screws are removed, use a pry bar and a piece of scrap wood (to protect the wall) to gently pry the cabinet away from the wall. Start at the top and work your way down. Be cautious not to damage the drywall excessively.
- Support and Remove: Have a helper support the cabinet as you remove the last few screws. Lower it carefully.
- Repeat for All Cabinets: Work your way through each cabinet systematically.
Dealing with Stubborn Connections
Sometimes cabinets are glued or heavily caulked. If screws are not the only thing holding them, a sharp putty knife or even a reciprocating saw (used with extreme care and only as a last resort) might be needed to break these bonds. Always prioritize safety and avoid cutting into plumbing or electrical lines hidden within walls.
Installing New Kitchen Cabinets: The DIY Process
This is the core of your project. Installing new cabinets requires precision, patience, and a keen eye for level and plumb.
Preparing the Space for New Cabinets
- Clean the Area: Remove all debris, dust, and old adhesive from the walls and floors.
- Repair the Walls: Patch any holes or damage caused during cabinet removal. Sand and prime the repaired areas if necessary.
- Check for Level and Plumb: Use a level to ensure your walls and floors are as level and plumb as possible. Minor imperfections can often be compensated for during installation, but significant issues may require more extensive wall preparation.
Laying Out Your New Cabinet Placement
Refer to your kitchen design plan. Use a chalk line or pencil to mark the desired placement of your base cabinets and upper cabinets on the walls. This will serve as a guide for ensuring cabinets are straight and properly positioned.
Installing Base Cabinets
Base cabinets are typically installed first.
- Start in a Corner: Begin installation in a corner of your kitchen. This provides a solid starting point.
- Position the First Cabinet: Place the first base cabinet in its designated corner.
- Level and Plumb: Use your level to ensure the cabinet is perfectly level from front to back and side to side, and plumb (vertically straight).
- Shim as Needed: If the floor or wall is not perfectly level, use shims (small wedges of wood) behind the cabinet to adjust it.
- Secure to the Wall:
- Locate the studs in the wall behind the cabinet.
- Drill pilot holes through the back of the cabinet or through the cabinet’s hanging rail (if applicable) into the wall studs.
- Use sturdy wood screws (e.g., 2.5-inch or 3-inch screws) to attach the cabinet to the wall. Drive the screws securely, but avoid overtightening, which can strip the wood or damage the cabinet.
- Install Adjacent Cabinets:
- Position the next base cabinet next to the first.
- Ensure it’s level and plumb.
- Join Cabinets Together: Use clamps to hold the two cabinets tightly together. Drill pilot holes through the face frames of the adjacent cabinets and secure them with wood screws (usually 1.25-inch or 1.5-inch screws). This creates a unified, sturdy cabinet bank.
- Continue Around the Kitchen: Repeat this process for all base cabinets, ensuring each is level, plumb, and securely attached to the wall and adjacent cabinets.
Installing Upper Cabinets
Upper cabinets are usually installed after the base cabinets.
- Determine Height: Decide on the desired height for your upper cabinets (standard is typically 18 inches above the countertop). Mark a level line on the wall to guide placement.
- Use Support: Upper cabinets are heavy. It’s highly recommended to use a cabinet jack or temporarily support them with scrap wood secured to the wall studs.
- Position the First Upper Cabinet: Place the first upper cabinet on your support, aligning it with your marked line.
- Level and Plumb: Ensure the cabinet is perfectly level and plumb. Shim behind it if necessary to achieve this.
- Secure to the Wall:
- Locate wall studs.
- Drill pilot holes through the cabinet’s hanging rail (usually at the top and bottom) into the studs.
- Use appropriate screws to attach the cabinet firmly to the wall.
- Install Adjacent Upper Cabinets:
- Position the next upper cabinet next to the first.
- Ensure it’s level and plumb.
- Clamp the two cabinets together tightly.
- Drill pilot holes through the face frames and secure them with wood screws.
- Continue Around: Install all upper cabinets in this manner.
Installing Doors and Drawers
Once the cabinet boxes are securely in place:
- Attach Hinges to Doors: If your hinges came separate, attach them to the cabinet doors first according to the manufacturer’s instructions.
- Mount Doors: Hang the cabinet doors on the installed cabinets, attaching the hinges to the cabinet frames. Most hinges are adjustable, allowing you to fine-tune the door alignment.
- Install Drawer Slides: If your drawers don’t come pre-assembled with slides, install the slides onto the cabinet boxes and the drawer boxes according to the manufacturer’s instructions.
- Insert Drawers: Slide the assembled drawers into their respective openings.
Cabinet Hardware Replacement
This is a simple but impactful step in your kitchen cabinet upgrade.
- Mark Pilot Holes: Decide where you want your knobs or pulls to be. Use a measuring tape and pencil to mark the exact spot for drilling. For consistency, especially on doors, use a template or a jig if available.
- Drill Pilot Holes: Use a drill bit slightly smaller than the screw size to drill pilot holes.
- Attach Hardware: Screw in your new knobs and pulls.
Final Touches and Inspection
Your new cabinets are up! Now it’s time to ensure everything looks and functions as it should.
Adjusting Doors and Drawers
Most cabinet hinges and drawer slides have adjustment screws. Use these to:
- Align Doors: Ensure doors are straight, hang evenly, and have consistent gaps between them.
- Level Drawers: Make sure drawers open and close smoothly and sit flush with the cabinet fronts.
Installing Shelves
Place adjustable shelves into the cabinet interiors. If you have fixed shelves, they would have been installed during the cabinet box assembly.
Cleaning Up
- Remove Protective Film: Peel off any protective film from cabinet surfaces and hardware.
- Clean Surfaces: Wipe down all cabinet doors, drawers, and frames to remove fingerprints and dust.
- Clean the Work Area: Sweep and vacuum the floor, dispose of all debris, and remove all tools.
Inspecting Your Work
Walk around your kitchen and inspect every cabinet.
- Check for Stability: Gently push on cabinets to ensure they are firmly attached.
- Verify Alignment: Look at the gaps between doors and drawers.
- Test Functionality: Open and close all doors and drawers to ensure they operate smoothly.
Frequently Asked Questions (FAQ)
Q1: How long does it take to replace kitchen cabinets?
A: The time it takes to replace kitchen cabinets can vary greatly. For a DIYer, it can take anywhere from a few days to a couple of weeks, depending on the size of your kitchen, your experience level, and how much time you can dedicate each day. Hiring professionals can typically reduce this to 1-3 weeks for installation alone.
Q2: Can I reuse my old cabinet doors if I replace the cabinet boxes?
A: You might be able to, but it’s not always practical. If your old doors are in excellent condition and the new cabinet boxes have the same hinge placement and dimensions, it’s possible. However, most people find that when doing a full replacement, they opt for new doors that match the style of their new cabinets for a cohesive look. This is where cabinet refacing becomes an appealing alternative.
Q3: What is the most important tool for installing cabinets?
A: While many tools are essential, a good quality level (both a 2-foot and a 4-foot level are recommended) and a reliable drill/driver are arguably the most critical for kitchen cabinet installation. Precision in leveling and securing cabinets is key to a professional-looking and long-lasting result.
Q4: Do I need to remove countertops before replacing cabinets?
A: It depends on the type of countertop. If you have laminate countertops that are glued to the cabinets, you will likely need to remove them. For heavier materials like granite or quartz, it’s often possible to leave them in place, though they will need to be supported during the removal of the base cabinets to prevent damage. If you are replacing countertops as part of your kitchen remodel, removing them beforehand is necessary.
Q5: What’s the difference between framed and frameless cabinets?
A: Framed cabinets have a solid wood frame attached to the front of the cabinet box, to which the doors are attached. This provides structural support. Frameless cabinets, also known as European-style cabinets, do not have a face frame; the doors are attached directly to the cabinet box. This design offers a more modern look and can provide slightly more accessible interior space. When considering DIY kitchen cabinets, the installation process for both can differ slightly.
Q6: How do I handle plumbing and electrical during cabinet replacement?
A: It’s crucial to shut off all utilities before you start. If your new cabinet layout requires moving plumbing or electrical outlets, it’s highly recommended to hire licensed professionals for this work. Attempting to do it yourself without proper knowledge can be dangerous and may lead to costly mistakes or code violations. Even if the layout remains the same, be very careful when drilling or screwing to avoid damaging existing lines.
Q7: Is cabinet refacing a good alternative to full replacement?
A: Yes, cabinet refacing can be a great alternative, especially if your existing cabinet boxes are in good structural condition and you like your current kitchen layout. It’s generally less expensive and less disruptive than a full replacement. The process involves replacing doors, drawer fronts, and applying a new veneer or laminate to the cabinet frames. It’s a significant kitchen cabinet upgrade that can dramatically change your kitchen’s appearance.
Q8: How do I ensure my new cabinets are sturdy?
A: Sturdiness comes from proper installation. Ensure you are attaching cabinets directly into wall studs using appropriate length screws. For base cabinets, ensure they are well-shimmed and secured to each other. For upper cabinets, using cabinet jacks for support during installation and securing them firmly to studs is essential. A well-executed kitchen cabinet installation makes all the difference.
Q9: What are the most common mistakes DIYers make when replacing kitchen cabinets?
A: Common mistakes include inaccurate measuring, not checking for level and plumb during installation, failing to secure cabinets to studs properly, and not adequately supporting upper cabinets. Rushing the process and skipping important preparation steps can also lead to problems. Even a small oversight in cabinet frame replacement can cause issues down the line.
Q10: When should I consider a full cabinet replacement versus cabinet refacing or refinishing?
A: A full cabinet replacement is best when your current cabinets are structurally unsound, significantly outdated in style, or if you want to change the kitchen layout. Cabinet refacing is a good option when the boxes are solid and you want a new look without the cost and disruption of a full replacement. Refinishing (sanding and repainting/restaining) is the most budget-friendly option, suitable when cabinets are in good condition but simply need a cosmetic refresh. It’s a good step before a major kitchen remodel cabinets project if you are on a tight budget.