
Image Source: i.ytimg.com
How To Redo Cabinets In Kitchen: Easy DIY Guide
Can you redo kitchen cabinets yourself? Yes, you absolutely can redo your kitchen cabinets yourself! With a little patience and the right approach, you can transform your kitchen’s look without a huge expense. This guide will walk you through the most popular and effective ways to update your cabinets, from a simple refresh to a complete overhaul. We’ll cover everything you need to know to tackle this rewarding DIY project.
The Appeal of a Kitchen Cabinet Update
Your kitchen cabinets are often the focal point of your kitchen. Their condition and style significantly impact the overall aesthetic and feel of the room. Over time, cabinets can become worn, outdated, or simply don’t match your current taste. Redoing them is a fantastic way to:
- Boost Home Value: A modern, updated kitchen is a major selling point.
- Enhance Aesthetics: A fresh look can make your kitchen feel brighter, larger, and more inviting.
- Improve Functionality: New finishes or hardware can make cabinets easier to use.
- Save Money: DIY cabinet redo projects are significantly cheaper than professional replacements.
- Express Your Style: Customize your kitchen to perfectly reflect your personal taste.
This guide focuses on practical, achievable DIY methods for giving your kitchen cabinets a new lease on life. We’ll explore techniques like cabinet refinishing, cabinet resurfacing, and DIY cabinet painting, as well as discuss options like cabinet refacing and cabinet door replacement.
Planning Your Cabinet Redo Project
Before you grab a paintbrush or a sander, a little planning goes a long way. This ensures your project runs smoothly and you get the results you desire.
Deciding on Your Approach
There are several popular methods for redoing kitchen cabinets, each with its pros, cons, and required effort.
- Cabinet Cleaning and Polishing: The simplest option. Good for cabinets that are generally in good shape but just need a bit of TLC.
- Cabinet Staining: Ideal for updating the color of wood cabinets without covering the natural grain. Requires stripping existing finishes.
- DIY Cabinet Painting: A very popular choice. Allows for a wide range of color possibilities and can hide imperfections in the wood.
- Cabinet Refinishing: A broader term that can encompass stripping, sanding, and applying a new stain or clear coat.
- Cabinet Resurfacing: This typically involves applying a new layer of material (like laminate or veneer) over the existing cabinet surface. It’s more involved than painting but less so than full replacement.
- Cabinet Refacing: This involves replacing the visible cabinet doors and drawer fronts, and applying a matching veneer or laminate to the existing cabinet boxes. It offers a completely new look.
- Cabinet Door Replacement: The most direct way to change the style of your cabinets if the boxes are in good condition.
Assessing Your Current Cabinets
Take a good look at your existing cabinets.
- Material: Are they solid wood, plywood, particleboard, or laminate? This will affect the best redo method. Solid wood and plywood are generally best for painting or staining. Laminate or particleboard might be better suited for painting or resurfacing.
- Condition: Are they structurally sound? Are there any damaged areas that need repair?
- Existing Finish: What kind of finish is currently on them? Paint, stain, varnish? This determines the prep work needed.
Setting a Budget
DIY saves money, but costs still add up. Consider the price of:
- Sanding supplies (sandpaper, sanding sponges)
- Cleaning supplies (degreaser, tack cloths)
- Primers and paints or stains
- Topcoats (polyurethane, varnish)
- Brushes, rollers, and trays
- Drop cloths and painter’s tape
- New cabinet hardware replacement (knobs, pulls)
- Replacement doors (if opting for cabinet door replacement)
Gathering Your Tools and Materials
Make a comprehensive list based on your chosen method. It’s better to have too much than too little.
Method 1: Cabinet Cleaning and Polishing (The Quick Refresh)
If your cabinets are solid wood and just look a bit dull, a thorough cabinet cleaning and polishing might be all they need.
What You’ll Need:
- Mild dish soap
- Warm water
- Soft cloths (microfiber is excellent)
- Degreaser (e.g., TSP substitute or a specialized kitchen degreaser)
- Wood polish or furniture wax
- Gloves
Steps:
- Empty and Clean: Remove everything from your cabinets.
- Degrease: Mix a degreasing solution according to product instructions. Wipe down all cabinet surfaces, paying attention to areas around the stove and sink where grease buildup is common. Rinse with a damp cloth and dry thoroughly.
- Gentle Wash: Mix a small amount of mild dish soap with warm water. Use a damp cloth to wipe down all surfaces. Avoid soaking the wood.
- Rinse and Dry: Wipe down with a clean, damp cloth to remove soap residue. Immediately dry all surfaces with a clean, dry cloth to prevent water damage.
- Polish: Once completely dry, apply a good quality wood polish or furniture wax according to the product directions. This will restore shine and protect the wood.
This method is the least labor-intensive and best for cabinets that are already in great shape.
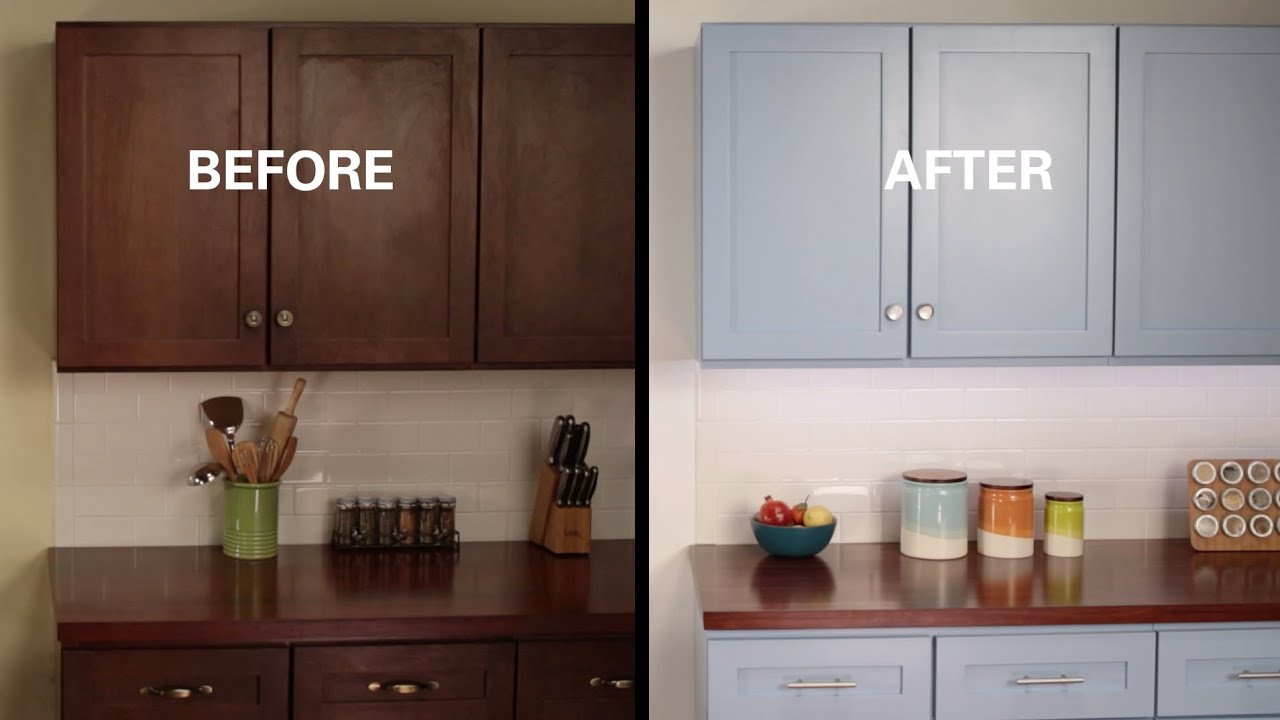
Method 2: DIY Cabinet Painting (The Popular Transformation)
DIY cabinet painting is a fantastic way to achieve a dramatic kitchen update. It’s accessible to most DIYers and offers endless color possibilities.
What You’ll Need:
- Screwdriver (for removing doors and hardware)
- Sandpaper (120-grit and 220-grit) or orbital sander
- Sanding sponges
- Painter’s tape
- Drop cloths
- Degreaser
- Tack cloths
- Wood filler (if needed)
- Primer (specifically for cabinets, e.g., oil-based or shellac-based)
- Paint (high-quality enamel, latex, or oil-based)
- Brushes (angled sash brushes are good for detail)
- Rollers (foam rollers for smooth finishes)
- Paint trays
- Optional: HVLP sprayer for a professional finish
Steps for DIY Cabinet Painting:
-
Preparation is Key: This is the most crucial step for a lasting, beautiful finish.
- Empty Cabinets: Remove all contents.
- Remove Doors and Hardware: Unscrew hinges and knobs. Store them in labeled bags to ensure you can reattach them correctly. Take photos if needed.
- Clean Thoroughly: Use a degreaser to remove all grease, grime, and food splatters. This is vital for paint adhesion. Rinse and dry well.
- Repair Imperfections: Fill any holes or gouges with wood filler. Let it dry, then sand smooth.
- Sand Surfaces: Lightly sand all cabinet surfaces (boxes and doors) with 120-grit sandpaper. This scuffs the surface, allowing primer and paint to adhere. If cabinets have a glossy finish, sanding is essential. If you have a lot of cabinets, an orbital sander can save time. Follow up with 220-grit for a smoother feel.
- Clean Dust: Use a vacuum with a brush attachment to remove sanding dust. Then, wipe everything down with a tack cloth to pick up any remaining fine dust particles.
- Tape Off: Use painter’s tape to protect any areas you don’t want painted (e.g., countertops, backsplash, inside of cabinet frames).
-
Prime the Cabinets:
- Apply a thin, even coat of a high-quality cabinet primer. An oil-based or shellac-based primer is generally recommended for cabinets as it offers excellent adhesion and stain blocking.
- Allow the primer to dry completely according to the manufacturer’s instructions. Lightly sand with 220-grit sandpaper after drying for an ultra-smooth finish. Wipe away dust with a tack cloth.
-
Apply Paint:
- First Coat: Apply a thin, even coat of your chosen cabinet paint. Avoid applying too much, as this can lead to drips and an uneven finish. Use a high-quality brush for corners and edges and a foam roller for flat surfaces.
- Drying Time: Let the first coat dry completely. Check the paint can for recommended drying times between coats.
- Second Coat: Apply a second thin coat. Again, ensure even coverage and avoid drips.
- Third Coat (if needed): Many cabinets will benefit from a third thin coat for full coverage and durability.
- Drying: Allow the final coat to dry thoroughly. This can take 24-72 hours, depending on the paint type and humidity.
-
Optional: Topcoat:
- For added durability, especially in high-traffic areas like kitchens, consider a clear topcoat (polyurethane or a cabinet-specific topcoat). Apply 2-3 thin coats, allowing each to dry and lightly sanding with 320-grit sandpaper between coats for a super-smooth finish.
-
Reassemble:
- Once the paint (and topcoat, if used) is fully cured, reattach the hinges and cabinet hardware replacement.
- Hang the cabinet doors back onto the boxes.
- Put your items back inside.
Tips for a Flawless Paint Finish:
- Work in a Well-Ventilated Area: Open windows or use fans.
- Use Quality Brushes and Rollers: This makes a big difference in the final look.
- Apply Thin Coats: It’s always better to do multiple thin coats than one thick, drippy one.
- Be Patient: Allow adequate drying time between coats.
- Consider a Sprayer: If you have access to an HVLP sprayer and are comfortable using it, you can achieve a factory-smooth finish. This requires more prep work for masking.
Method 3: Cabinet Staining (Enhancing Wood’s Natural Beauty)
If you have solid wood cabinets and love the natural grain, cabinet staining is an excellent option to refresh their color and bring out their beauty. This process involves stripping the old finish.
What You’ll Need:
- Screwdriver
- Chemical paint stripper or heat gun (use with caution)
- Scrapers (putty knife, plastic scraper)
- Medium-grit sandpaper (80-100 grit)
- Fine-grit sandpaper (150-220 grit)
- Sanding sponges
- Tack cloths
- Mineral spirits or denatured alcohol (for cleaning)
- Wood conditioner (especially for soft woods like pine)
- Wood stain (oil-based or water-based)
- Applicator pads or lint-free cloths
- Polyurethane or other clear topcoat (satin, semi-gloss)
- Brushes for topcoat
- Gloves, safety glasses, respirator
Steps for Cabinet Staining:
-
Preparation is Paramount:
- Remove Doors and Hardware: As with painting, remove all doors, drawers, and hardware.
- Clean: Degrease and clean all surfaces as described in the painting section.
-
Strip the Old Finish: This is the most critical and often the most challenging step.
- Chemical Stripper: Apply a chemical stripper according to the product’s instructions. Wear gloves, safety glasses, and a respirator. Work in a well-ventilated area. Let the stripper soften the finish, then use scrapers to remove it.
- Heat Gun: A heat gun can also be used, melting the finish for removal with a scraper. Be very careful not to scorch the wood.
- After Stripping: Once the bulk of the finish is removed, sand the surfaces.
-
Sand to Bare Wood:
- Start with medium-grit sandpaper (80-100 grit) to remove any remaining finish and smooth out imperfections.
- Follow up with fine-grit sandpaper (150-220 grit) to create a smooth surface ready for staining.
- Pay attention to sanding the wood grain.
- Clean off all sanding dust thoroughly with a vacuum and tack cloths.
-
Apply Wood Conditioner (Recommended):
- Softwoods can absorb stain unevenly, leading to blotchiness. A wood conditioner helps ensure an even stain application. Apply it according to the manufacturer’s instructions and let it penetrate for the recommended time.
-
Apply the Stain:
- Test First: Always test your stain on a scrap piece of wood from your cabinets or an inconspicuous area to ensure you like the color.
- Application: Apply the stain evenly using an applicator pad, lint-free cloth, or brush. Work in the direction of the wood grain.
- Wipe Off Excess: Allow the stain to penetrate for the time recommended on the can (usually 5-15 minutes). Then, wipe off the excess stain with a clean, lint-free cloth, again working with the grain.
- Second Coat (if desired): For a darker color, you can apply a second coat of stain after the first has dried for the time specified on the can. Wipe off the excess as before.
-
Apply a Protective Topcoat:
- Once the stain is completely dry (this can take 24-72 hours), apply a clear protective topcoat. Polyurethane (oil-based or water-based), lacquer, or varnish are common choices.
- Apply thin, even coats using a good quality brush.
- Allow each coat to dry thoroughly. Lightly sand with 320-grit sandpaper between coats for a smoother finish. Wipe away dust with a tack cloth.
- Apply 2-3 coats for good durability.
-
Reassemble:
- Once the topcoat is fully cured, reattach hardware and hang doors.
Method 4: Cabinet Refacing (A Significant Style Change)
Cabinet refacing is a more involved process than painting or staining, but it can give your kitchen a completely new look without the cost of full replacement. It’s ideal if your cabinet boxes are structurally sound but you want to change the style of the doors and drawer fronts.
What It Involves:
- New Doors and Drawer Fronts: You order new doors and drawer fronts in your desired style and material.
- Veneer or Laminate Application: The visible exterior surfaces of your existing cabinet boxes (face frames) are covered with a matching veneer or laminate to give them a cohesive look with the new doors.
- New Hardware: This is the perfect time to update your cabinet hardware replacement.
Is Cabinet Refacing a DIY Project?
While some aspects can be DIY (like hardware replacement and possibly applying veneers if you’re experienced), ordering and fitting custom doors and drawers can be complex. Many homeowners opt for professional cabinet refacing services. However, if you’re adventurous and have good measurement and cutting skills, you can tackle parts of it.
DIY Steps (Partial):
- Order New Doors/Drawer Fronts: Carefully measure your existing doors and drawer fronts. Order replacements from a cabinet door supplier.
- Remove Old Doors/Drawer Fronts: Unscrew them from the cabinet boxes.
- Apply Veneer/Laminate to Boxes: This is the tricky part for DIY. You’ll need to carefully measure, cut, and adhere veneer or laminate to the face frames of your cabinet boxes. This requires precise cutting and often specialized adhesives or spray adhesives.
- Install New Hardware: Attach new hardware to the new doors and drawer fronts.
- Attach New Doors/Drawer Fronts: Screw the new doors and drawer fronts onto the cabinet boxes.
Method 5: Cabinet Door Replacement (A Targeted Update)
If your cabinet boxes are in excellent condition and you simply dislike the style of your current doors and drawer fronts, cabinet door replacement is a straightforward option.
What You’ll Need:
- Screwdriver
- New cabinet doors and drawer fronts (pre-drilled for hinges and handles, if desired)
- New hinges (if changing style or size)
- New cabinet hardware replacement (knobs, pulls)
- Drill and drill bits (if not pre-drilled)
- Measuring tape
Steps for Cabinet Door Replacement:
- Measure Accurately: Measure your existing doors and drawer fronts precisely. Measure width, height, and thickness. Note hinge placement and type if you plan to reuse them.
- Order New Doors: Order replacement doors and drawer fronts from a cabinet supplier. You can choose from various styles, materials, and finishes. You can order them unfinished to paint or stain yourself, or pre-finished.
- Remove Old Doors and Hardware: Carefully unscrew the old doors and drawer fronts. Remove the old hardware.
- Prepare New Doors (if unfinished): If you ordered unfinished doors, now is the time to paint or stain them following the methods described earlier. Allow them to dry/cure completely.
- Install New Hardware: Attach your new knobs or pulls to the new doors and drawer fronts.
- Install New Hinges (if necessary): If you’re changing the hinge type or size, install the new hinges on the doors and the cabinet boxes. Ensure they are aligned correctly.
- Attach New Doors and Drawer Fronts: Mount the new doors and drawer fronts onto the cabinet boxes. Adjust hinges as needed to ensure doors hang straight and close properly.
Updating Cabinet Hardware: The Finishing Touch
A simple cabinet hardware replacement can make a surprisingly big difference in the overall look of your kitchen cabinets. It’s an easy and affordable way to modernize or update the style.
Considerations for Hardware:
- Style: Match your hardware to your kitchen’s overall aesthetic (modern, rustic, traditional, etc.).
- Finish: Popular finishes include brushed nickel, chrome, matte black, brass, and oil-rubbed bronze.
- Type: Knobs, pulls, and cup pulls all offer different looks and functionalities.
- Hole Spacing: If replacing existing hardware, measure the distance between the screw holes on your current pieces to ensure the new hardware will fit without drilling new holes.
Steps for Hardware Replacement:
- Remove Old Hardware: Use a screwdriver to unscrew the old knobs and pulls.
- Clean the Area: Wipe down the cabinet door or drawer front where the old hardware was located to remove any grime.
- Install New Hardware: Position the new hardware and screw it into place. If you’re changing the hole spacing, you may need to fill old holes with wood filler and drill new ones.
Common Mistakes to Avoid
- Skipping Preparation: Not cleaning, degreasing, or sanding properly will lead to paint or stain that peels or wears off quickly.
- Applying Thick Coats: This causes drips, runs, and an uneven finish.
- Not Using Primer: Primer is essential for good adhesion and a smooth, even color, especially when painting.
- Rushing the Drying Time: Not allowing adequate drying between coats compromises the durability of the finish.
- Using the Wrong Materials: Using interior paint on cabinets, for example, won’t hold up to the wear and tear.
- Improper Sanding: Using too coarse of sandpaper can scratch the wood, and not sanding enough prevents adhesion.
- Forgetting to Test: Always test paint colors, stains, and finishes on a hidden area first.
Frequently Asked Questions (FAQ)
Q1: How long does it take to redo kitchen cabinets?
A1: The time commitment varies greatly depending on the method and the size of your kitchen. DIY cabinet painting can take anywhere from a weekend for a small kitchen with simple colors to several days or a week for a larger kitchen with multiple coats and drying time. Cabinet staining often takes longer due to the stripping process. Cabinet refacing and cabinet door replacement are usually quicker if professionally done, but DIY versions can take longer.
Q2: What is the best paint finish for kitchen cabinets?
A2: For cabinets, a satin, semi-gloss, or gloss finish is generally recommended. These finishes are more durable, easier to clean, and more resistant to moisture and grease than a flat or matte finish.
Q3: Can I paint over stained cabinets?
A3: Yes, you can paint over stained cabinets, but proper preparation is crucial. You’ll need to clean, degrease, lightly sand the stained surface to create a “tooth” for the primer to adhere to, and then apply a high-quality primer before painting.
Q4: What’s the difference between cabinet refinishing and cabinet refacing?
A4: Cabinet refinishing typically involves cleaning, sanding, and applying a new stain or protective coating to the existing cabinet surfaces. Cabinet refacing involves replacing the cabinet doors and drawer fronts and applying a veneer or laminate to the visible cabinet boxes. Refacing offers a more dramatic style change than refinishing.
Q5: Do I need to remove the doors to paint my cabinets?
A5: While you can paint cabinet doors while they are attached, it is highly recommended to remove them. Removing the doors allows for easier access to all surfaces, prevents paint from getting on hinges and frames, and allows you to lay doors flat for a much smoother, drip-free finish.
Q6: How do I clean grease off kitchen cabinets?
A6: A good degreaser is your best friend. You can use a commercial kitchen degreaser, a solution of TSP (trisodium phosphate) substitute and water, or even a mixture of white vinegar and water. Always rinse the surface with a clean, damp cloth after degreasing and dry thoroughly.
Q7: Can I just replace the cabinet doors instead of the whole cabinet?
A7: Absolutely! If your cabinet boxes are structurally sound, cabinet door replacement is a highly effective way to update the look of your kitchen without a complete remodel.
By following these detailed steps and tips, you can confidently undertake a kitchen cabinet redo project and achieve beautiful, lasting results. Happy DIYing!