
Image Source: cdn.apartmenttherapy.info
How To Clean Greasy Wooden Kitchen Cabinets: Simple Tips
Can you clean greasy wooden kitchen cabinets? Yes, you can easily clean greasy wooden kitchen cabinets using simple, often natural, cleaning solutions. This guide will walk you through the most effective methods for grease removal wood cabinets, ensuring your kitchen looks its best.
Kitchens are the heart of many homes, and the cabinets often bear the brunt of cooking. Over time, a sticky film of grease and grime can build up, dulling the finish and making your wooden kitchen cabinets look tired. Fret not! Tackling this common issue is simpler than you might think. This post will delve into the best ways to achieve degreasing kitchen cabinets, cleaning oily wood surfaces, and ultimately restoring greasy wood cabinets to their former glory. We’ll explore both effective commercial products and natural cabinet cleaner grease options, along with DIY cabinet cleaner grease recipes. Let’s get those cabinets sparkling again!
Why Do Kitchen Cabinets Get Greasy?
Before we dive into the how-to, let’s briefly touch upon the why. Cooking, especially frying or baking, releases tiny oil particles into the air. These particles settle on every surface in your kitchen, with cabinets being a prime target due to their proximity to the stovetop and oven. Over time, this airborne grease combines with dust and other kitchen debris, creating a sticky, hard-to-remove residue. This layer not only looks unsightly but can also degrade the cabinet finish if left untreated for too long. Regular kitchen cabinet maintenance grease is key to preventing stubborn build-up.
Prepping Your Cabinets for Cleaning
Before you grab your cleaning supplies, a little preparation goes a long way. This ensures a smoother and more effective cleaning process.
Clearing the Cabinets
- Empty your cabinets: It’s much easier to clean the exterior of your cabinets when they are empty. Take everything out, and consider this a good opportunity to declutter.
- Remove hardware: If your cabinet doors have knobs or handles, it’s best to remove them. This prevents water from getting trapped behind them and ensures you can clean every nook and cranny without obstruction. A screwdriver is usually all you need.
Protecting Your Kitchen
- Lay down drop cloths or old towels: Protect your countertops and floor from any cleaning drips.
- Ensure good ventilation: Open windows and turn on your kitchen fan, especially if you’re using stronger cleaning solutions.
Choosing Your Cleaning Solution
The best cleaning solution depends on the type of wood finish you have and the severity of the grease build-up. Here are some of the most effective options, from gentle to more powerful.
Gentle Cleaning Options for Light Grease
For light grease or routine cleaning, gentler solutions are often sufficient.
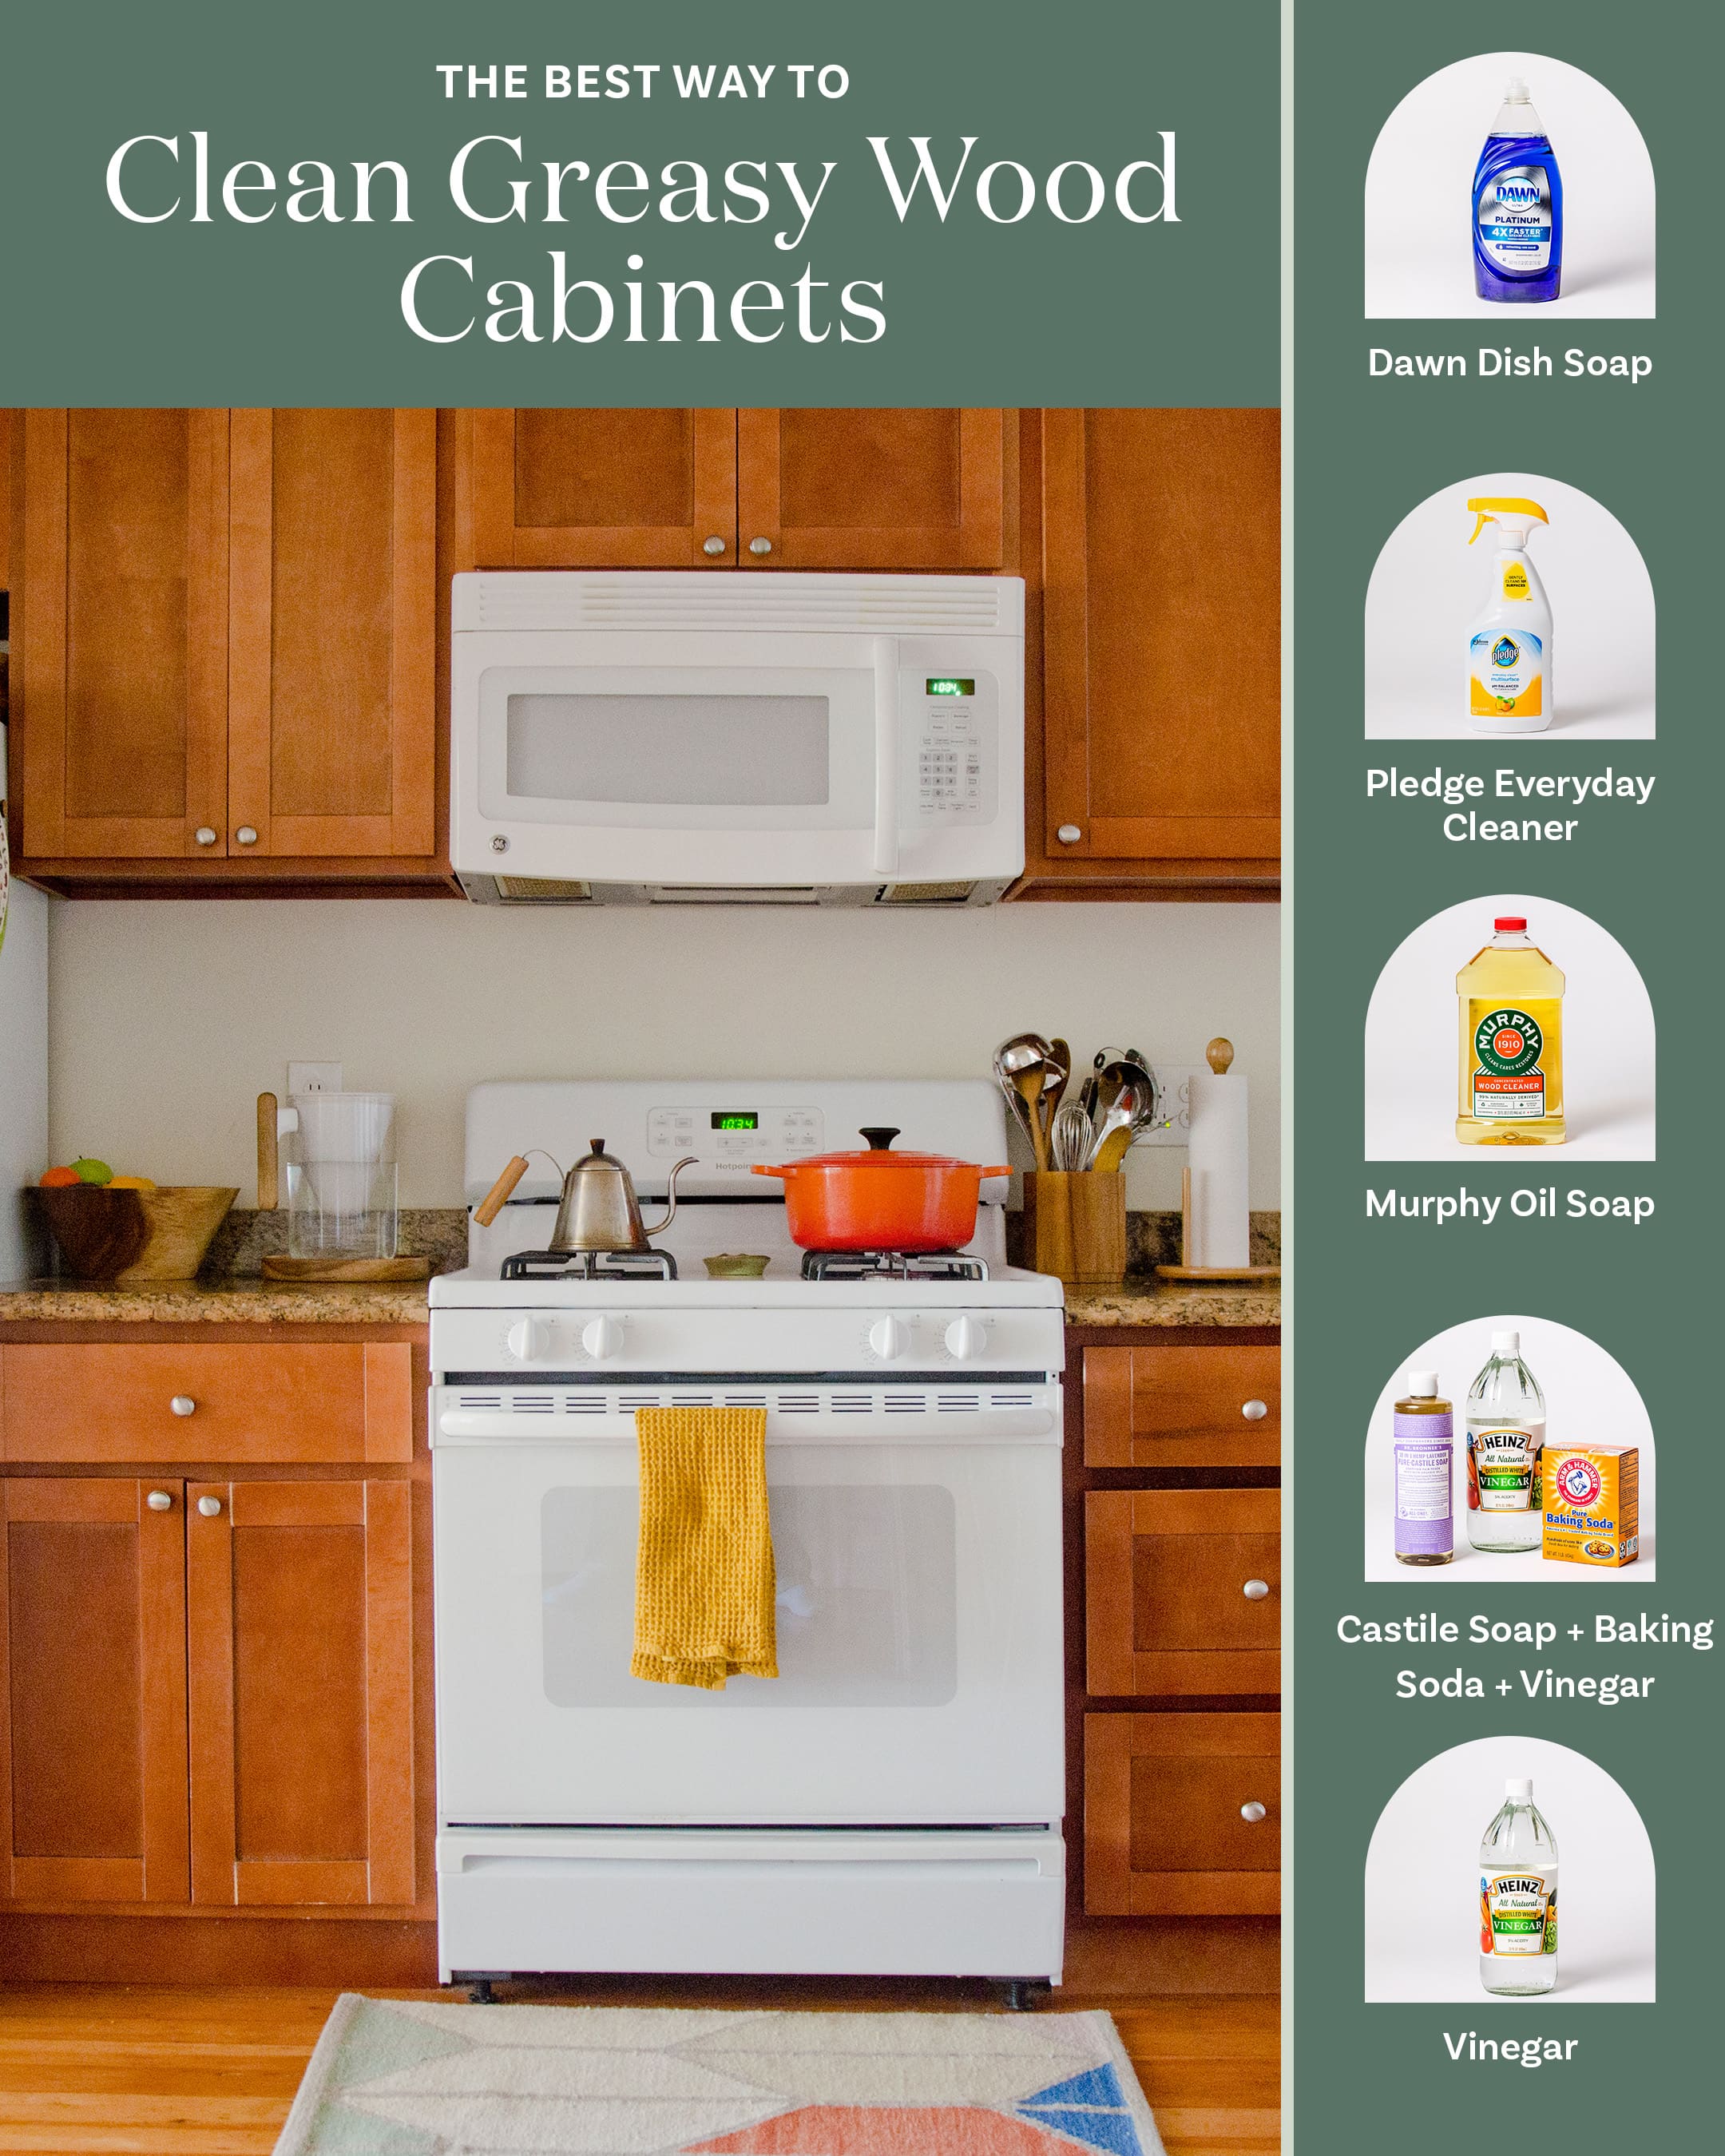
- Dish Soap and Warm Water: This is a classic for a reason. Dish soap is designed to cut through grease.
- Method: Mix a few drops of mild dish soap with warm water in a bucket or spray bottle.
- Application: Dampen a soft, lint-free cloth with the solution. Wring out the cloth thoroughly so it’s not dripping wet. Wipe down the cabinet surfaces. Follow up with a clean, damp cloth to rinse, and then immediately dry with a soft cloth.
- Vinegar Solution (Diluted): White vinegar is a natural degreaser and disinfectant.
- Method: Mix equal parts white vinegar and warm water in a spray bottle.
- Application: Lightly mist the cabinet surface or spray onto a cloth. Wipe the greasy areas. Vinegar can sometimes be too harsh for certain finishes, so always test in an inconspicuous spot first. Rinse with a damp cloth and dry thoroughly.
Stronger Solutions for Stubborn Grease
When dish soap and water aren’t cutting it, you’ll need something a bit more robust. This is where degreasing kitchen cabinets really comes into play.
- Baking Soda Paste: Baking soda is a mild abrasive and a fantastic deodorizer, effective for removing cooking oil cabinets.
- Method: Mix baking soda with a small amount of water to create a paste. The consistency should be like toothpaste.
- Application: Apply the paste directly to the greasy areas using a soft cloth or sponge. Let it sit for a few minutes to work on the grease. Gently scrub in the direction of the wood grain. Wipe away with a damp cloth and dry immediately. Be cautious not to scrub too hard, as baking soda can be abrasive.
- All-Purpose Kitchen Cleaners: Many commercial kitchen cleaners are formulated for grease removal wood cabinets. Look for products specifically labeled as safe for wood or finished surfaces.
- Method: Follow the product instructions carefully.
- Application: Typically, you spray the cleaner onto a cloth and then wipe the cabinets. Avoid spraying directly onto the wood, as this can lead to excess moisture. Always test in an inconspicuous area first.
- Specialized Wood Cabinet Cleaners/Degreasers: These products are formulated to be safe and effective for wooden surfaces. They are often considered the best degreaser wooden cabinets for maintaining the finish.
- Method: Again, always read and follow the manufacturer’s instructions.
- Application: These can be sprays or wipes. Ensure you use a product that doesn’t strip the finish.
Natural & DIY Cabinet Cleaner Grease Options
Many homeowners prefer using natural ingredients for their cleaning needs. These options are effective and budget-friendly.
- Lemon Juice and Baking Soda: This combination provides a good degreasing action with a fresh scent.
- Method: Mix lemon juice with baking soda to form a paste.
- Application: Apply to greasy spots, let it sit for a few minutes, and then gently wipe away with a damp cloth. Rinse and dry. The acidity of the lemon juice helps break down grease, while baking soda offers mild abrasion.
- Olive Oil and Baking Soda: This might seem counterintuitive, but olive oil can actually help lift grease.
- Method: Mix a small amount of olive oil with baking soda to create a paste.
- Application: Apply to greasy areas and gently scrub. The oil helps loosen the grime, and the baking soda lifts it away. Wipe with a damp cloth and then follow with a mild dish soap solution to remove any oily residue. This method can also help shine wooden cabinets grease has dulled.
The Cleaning Process: Step-by-Step
Now that you have your chosen solution, let’s get to cleaning.
Step 1: Apply the Cleaning Solution
- Dampen, Don’t Soak: Whichever solution you choose, apply it to a soft cloth, not directly to the cabinets. Wring out the cloth so it’s just damp. This prevents excess moisture from damaging the wood or finish.
- Work in Sections: Clean one cabinet door or drawer at a time. This allows you to manage the process and ensures you don’t miss any spots.
- Follow the Grain: Always wipe in the direction of the wood grain. This helps to lift the grease more effectively and prevents microscopic scratches.
Step 2: Gently Scrub Greasy Areas
- Use a Soft Cloth or Sponge: Avoid abrasive scrubbers or steel wool, which can scratch the finish. A microfiber cloth is ideal.
- Apply Gentle Pressure: For most grease build-up, gentle pressure is enough. If you encounter stubborn spots, you might need to let the cleaner sit for a minute or two, or use a slightly firmer (but still gentle) circular motion.
- For Tough Spots: If a specific area is particularly greasy, you might need to repeat the application of your chosen cleaner or try a stronger solution. For restoring greasy wood cabinets with heavy build-up, patience is key.
Step 3: Rinse the Cabinets
- Use a Clean, Damp Cloth: Dip a clean, soft cloth in plain warm water, wring it out thoroughly, and wipe down the cleaned sections. This removes any cleaning solution residue.
- Rinse the Cloth Frequently: Make sure to rinse your cleaning cloth regularly in the water to avoid spreading grease and cleaner back onto the cabinets.
Step 4: Dry the Cabinets Immediately
- Use a Dry, Soft Cloth: This is a crucial step. Immediately after rinsing, use a clean, dry, lint-free cloth to thoroughly dry the cabinet surface.
- Prevent Water Spots: Drying prevents water spots and potential damage from lingering moisture. This step is vital for the longevity of your wooden kitchen cabinets.
Step 5: Reinstall Hardware
- Once the cabinets are clean and completely dry, reattach the knobs or handles you removed earlier.
What About the Interior of Cabinets?
While this guide focuses on the exterior, it’s worth mentioning the interior. If your cabinet interiors are also greasy, you can use the same mild dish soap and water solution. For tougher interior stains, a baking soda paste or a diluted vinegar solution can be effective. Just be sure to wipe down with a clean, damp cloth afterward and dry thoroughly.
Restoring the Shine and Protection
After cleaning, you might want to restore the shine and add a layer of protection. This is especially true when you’ve been removing cooking oil cabinets with more potent cleaners.
Wood Polish or Cabinet Cream
- After cleaning and drying, you can apply a good quality wood polish or a specialized cabinet cream. These products can help to restore the luster, provide a protective barrier, and enhance the natural beauty of the wood.
- Application: Apply a small amount of polish or cream to a clean, soft cloth and rub it into the wood surface using circular motions, following the grain. Buff off any excess with another clean cloth. This step contributes to the overall kitchen cabinet maintenance grease prevention and helps shine wooden cabinets grease might have dulled.
Beeswax or Furniture Wax
- For an extra layer of protection and a beautiful sheen, consider using beeswax or furniture wax.
- Application: Apply a thin, even coat with a soft cloth, let it dry to a haze, and then buff with a clean, soft cloth. This creates a protective barrier that can make future cleaning easier.
Tips for Different Cabinet Finishes
- Laminate/Veneer Cabinets: These are generally durable but can be sensitive to excessive moisture and harsh chemicals. Stick to mild dish soap and water or a very diluted vinegar solution. Avoid soaking the surfaces.
- Painted Cabinets: For painted cabinets, use the gentlest cleaning methods possible. A soft cloth with mild soap and water is usually best. Test any cleaner in an inconspicuous area first, as some finishes can be sensitive.
- Stained or Sealed Wood: Most of the methods discussed are suitable for stained and sealed wood. The key is to use a damp cloth and dry thoroughly to protect the finish.
How Often Should You Clean Greasy Cabinets?
The frequency of cleaning depends on your cooking habits and how quickly grease builds up.
- Wipe Down Regularly: Aim to wipe down your cabinet fronts with a damp cloth or a mild cleaner at least once a week, especially around the stove and sink. This prevents significant build-up.
- Deep Clean as Needed: A more thorough degreasing should be done every 1-3 months, or whenever you notice a sticky film developing. Consistent kitchen cabinet maintenance grease is the best approach.
Common Mistakes to Avoid
- Using Too Much Water: Soaking wood can cause warping, swelling, and damage to the finish. Always use a damp cloth and dry immediately.
- Using Harsh Abrasives: Steel wool, abrasive sponges, or harsh scrub brushes can scratch and damage the cabinet finish, making them more susceptible to future grease build-up.
- Using Harsh Chemicals: Ammonia, bleach, or abrasive cleaners can strip the finish from your cabinets, leading to discoloration and damage.
- Not Rinsing Thoroughly: Leaving cleaning solution residue on the cabinets can attract dirt and potentially damage the finish over time.
- Not Drying: Allowing cabinets to air dry can lead to water spots and potential damage to the wood.
Troubleshooting Stubborn Grease Stains
For those truly tenacious grease stains that seem impossible to remove:
- Repeat Applications: Sometimes, multiple applications of your chosen cleaner are necessary. Be patient.
- Slightly Stronger Solutions: If mild options aren’t working, try a slightly more concentrated vinegar solution or a dedicated wood cabinet degreaser. Always test first.
- Professional Help: If you have antique, very delicate, or elaborately finished cabinets, and you’re concerned about causing damage, consider consulting a professional cabinet restorer.
Frequently Asked Questions (FAQ)
Q1: Can I use all-purpose cleaners on my wooden kitchen cabinets?
A1: Many all-purpose cleaners can be used, but it’s essential to check the label. Look for products that are safe for finished wood surfaces. Always test in an inconspicuous area first, as some cleaners can strip or damage finishes. A diluted vinegar or dish soap solution is often a safer bet for regular cleaning.
Q2: Will vinegar damage my wood cabinets?
A2: Diluted white vinegar is generally safe for most wood cabinet finishes when used sparingly and followed by thorough drying. However, vinegar is acidic, so it’s always best to test it on a small, hidden spot first to ensure it doesn’t dull or damage the finish. Avoid using vinegar on unsealed or waxed wood.
Q3: What is the best way to remove baked-on grease from wooden cabinets?
A3: For baked-on grease, a paste made from baking soda and water is often very effective. Apply the paste to the greasy area, let it sit for a few minutes to soften the grime, and then gently scrub with a soft cloth or sponge. Rinse with a damp cloth and dry thoroughly. For very stubborn areas, a specialized wood cabinet degreaser might be necessary.
Q4: My cabinets look dull after cleaning the grease. How can I restore their shine?
A4: After thoroughly cleaning and drying your cabinets, you can restore their shine by applying a good quality wood polish or a cabinet cream. These products help to bring back the luster and can also provide a protective layer. Buffing with a clean, soft cloth after application is key to achieving a beautiful shine.
Q5: Can I use natural cleaning products for grease removal on wood cabinets?
A5: Absolutely! Natural options like a mixture of dish soap and warm water, diluted white vinegar, or a paste of baking soda and water are excellent for natural cabinet cleaner grease and are generally safe for wood. You can also try a paste of lemon juice and baking soda for an extra boost.
Q6: How do I prevent grease build-up on my kitchen cabinets in the future?
A6: Regular cleaning is the best prevention. Wipe down your cabinet fronts with a damp cloth or mild cleaner at least weekly, especially around cooking areas. Using your range hood exhaust fan while cooking also helps significantly reduce airborne grease. Proper kitchen cabinet maintenance grease protocols will keep them looking good for longer.
By following these simple tips and choosing the right cleaning solutions, you can effectively tackle grease build-up and keep your wooden kitchen cabinets looking clean, beautiful, and well-maintained. Happy cleaning!