
When choosing a new kitchen sink, knowing how to measure is crucial. What are the essential measurements you need to take? You need to know the overall sink dimensions, including its length, width, and depth, as well as the specific sink cutout size required for installation, and whether it’s an undermount sink or a topmount sink. This guide will walk you through everything you need to know about kitchen sink measurements, ensuring a perfect fit and a smooth installation.
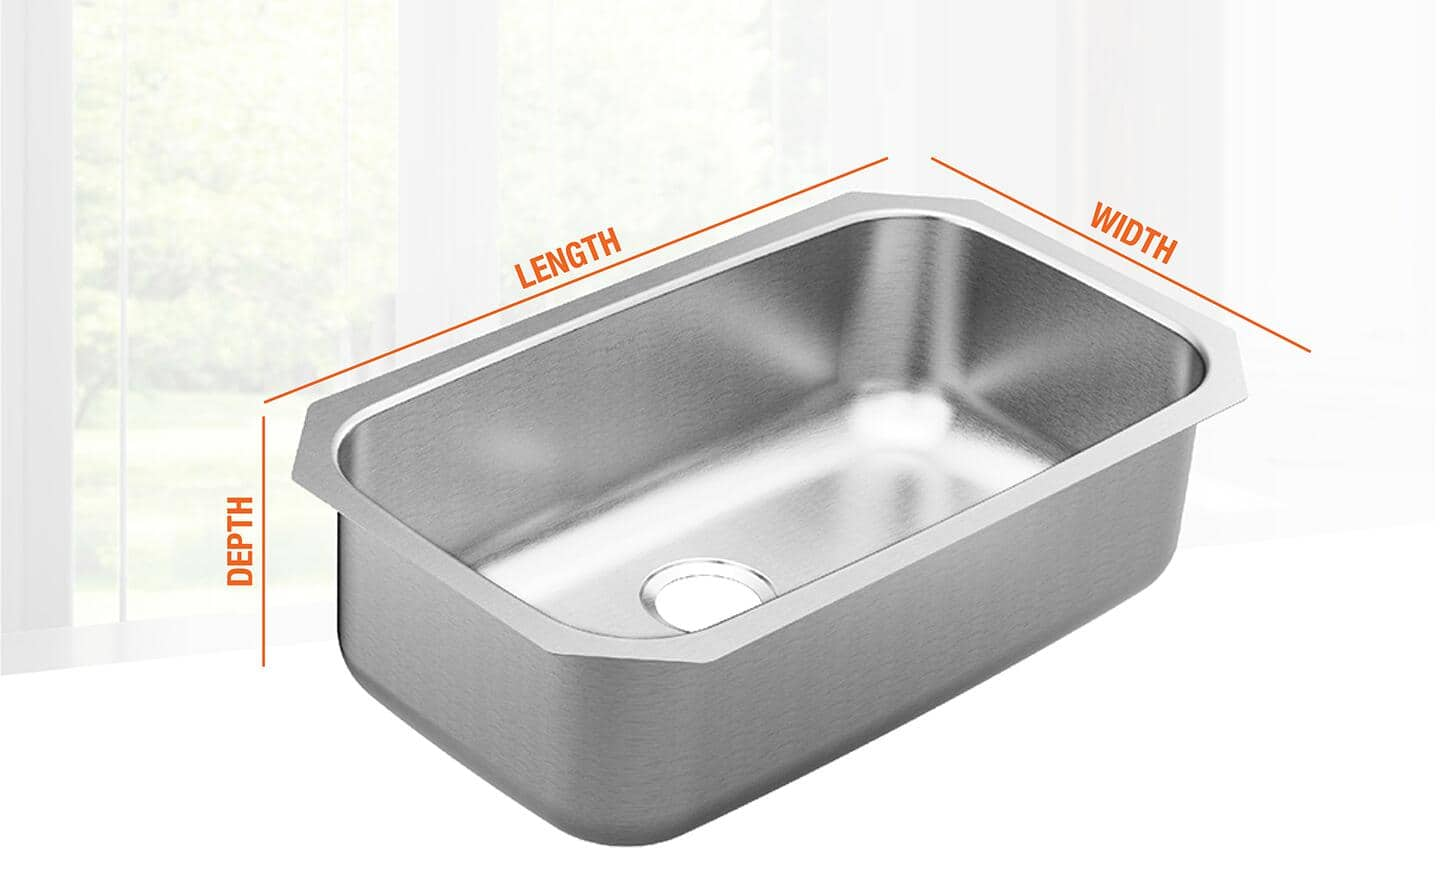
Image Source: dam.thdstatic.com
Deciphering Kitchen Sink Dimensions
The world of kitchen sinks might seem straightforward, but when it comes to measurements, a little detail goes a long way. Understanding the exact dimensions of a sink is paramount for both selecting the right one and ensuring it fits your existing countertop and cabinet space. This section will break down the core measurements that define a kitchen sink.
The Foundation: Sink Length and Width
The length and width of a kitchen sink are the most apparent measurements. These dictate how much horizontal space the sink will occupy in your countertop.
Sink Length: The Long Sweep
Sink Length refers to the measurement from the outermost edge of the sink on one side to the outermost edge on the opposite side, typically across the widest part of the sink basin. This is usually measured from left to right or right to left, depending on how you are facing the sink.
- Importance: This measurement is critical for determining if the sink will fit within the width of your cabinet base. Most sink manufacturers provide cabinet recommendations based on the sink’s length. For example, a 30-inch sink might require a 33-inch cabinet base.
Sink Width: The Deep Dive
Sink Width is the measurement from the front edge of the sink to the back edge. This is often referred to as the depth of the sink bowl itself, but in the context of overall dimensions, it’s the front-to-back span.
- Importance: This measurement is vital for ensuring the sink doesn’t protrude too far into your kitchen or clash with your backsplash or countertop overhang. It also impacts how much counter space remains around the sink.
Beyond the Surface: Sink Depth
Sink Depth is the measurement from the bottom of the sink bowl to the rim. This is an often-overlooked but very important aspect of sink measurement.
- Why Sink Depth Matters:
- Capacity: Deeper sinks can hold more dishes and larger pots, making them ideal for heavy-duty kitchen tasks.
- Ergonomics: Very deep sinks can lead to bending over further, which might be uncomfortable for some individuals.
- Plumbing Clearance: Ensure there’s enough space under the sink for plumbing, garbage disposals, and water filters. A very deep sink might require adjustments to your cabinet interior.
- Splashing: While counter-intuitively one might think deeper sinks reduce splashing, the height of the faucet relative to the sink bottom plays a bigger role.
A common sink depth ranges from 7 to 10 inches. Single bowl sinks often offer greater depth than double bowl sinks due to their uninterrupted basin.
Mastering the Sink Cutout Size
The sink cutout size is perhaps the most critical measurement for a successful sink installation. This refers to the precise dimensions of the opening in your countertop that the sink will sit within or under. It’s not the same as the sink’s overall dimensions.
Topmount Sink Measurements: The Familiar Fit
Topmount sink measurements are relatively straightforward. For a topmount (or drop-in) sink, the cutout is typically slightly smaller than the sink’s overall dimensions.
-
How it’s Measured:
- Length and Width of the Cutout: This is the opening in your countertop. Manufacturers specify this measurement.
- Rim/Flange: Topmount sinks have a rim that rests on top of the countertop. The measurement from the edge of this rim to the edge of the bowl is consistent.
- Sink’s Overall Dimensions: You’ll measure the total length and width of the sink itself, from outer edge to outer edge.
- Cutout Calculation: The cutout dimensions are usually derived from the sink’s overall dimensions by subtracting a small amount from each side to accommodate the rim. Manufacturers will provide the exact cutout size.
-
Example: A sink might have overall dimensions of 30 inches long by 20 inches wide. The manufacturer might specify a cutout size of 28.5 inches long by 18.5 inches wide. Always refer to the manufacturer’s specifications.
Undermount Sink Measurements: The Sleek Integration
Undermount sink measurements require a different approach because the sink is mounted underneath the countertop. This means the cutout is precisely the size of the sink bowl itself, or slightly larger to allow for mounting clips.
-
How it’s Measured:
- Sink Bowl Dimensions: For an undermount sink, you need to measure the dimensions of the actual bowl where the water collects. This includes the length and width of the bowl.
- Overall Sink Dimensions: You’ll still measure the entire sink, but for the cutout, it’s the bowl dimensions that are key.
- Countertop Opening: The countertop opening will be based on the sink bowl dimensions, often with a slight allowance for mounting hardware.
- Template: Most undermount sinks come with a template. This template should be used to trace the exact cutout onto your countertop material. If no template is provided, you would measure the sink’s rim edge and add a small margin for mounting hardware, but this is less precise.
-
Key Consideration for Undermount: The lip of the sink, where it attaches to the underside of the countertop, needs clearance. You must ensure there is enough space between the sink’s outer edges and any backsplash, faucet mounts, or countertop edges to allow for installation.
The Comprehensive Sink Size Guide
A sink size guide helps you navigate the vast array of available options. When selecting a sink, you’re not just picking a shape; you’re choosing a functional element that impacts your kitchen’s workflow and aesthetics.
Single vs. Double Bowl Sinks: Space Allocation
The most common distinction in sink configuration is between single and double bowl models.
Single Bowl Sinks: The Uninterrupted Workspace
- Dimensions: Single bowl sinks are characterized by one large, continuous basin. Their length and width can vary significantly, from compact 18-inch models for small kitchens or bar areas to expansive 36-inch or larger units for grand kitchens.
- Advantages:
- Accommodates large pots, pans, and baking sheets with ease.
- Offers a clean, minimalist look.
- Often deeper than double bowl sinks.
- Considerations:
- Washing large items while simultaneously needing to rinse or stack others can be a challenge.
Double Bowl Sinks: The Divide and Conquer Approach
Double bowl sinks divide the basin into two sections, typically with one larger bowl and one smaller bowl, or two equal-sized bowls.
- Dimensions: The overall length and width will be similar to single bowl sinks, but these dimensions are now shared between two basins. For example, a 33-inch double bowl sink might have one bowl measuring 19 inches long by 18 inches wide and the second bowl measuring 13 inches long by 18 inches wide.
- Advantages:
- Allows for multitasking: wash dishes in one bowl while rinsing or drying in the other, or use one for dirty dishes and the other for clean ones.
- The smaller bowl is useful for washing produce or disposing of food scraps if you don’t have a garbage disposal.
- Considerations:
- Neither bowl is usually large enough for very big pots or pans.
- The dividing divider can sometimes hinder the cleaning of large items.
Corner Sinks: Maximizing Awkward Spaces
Corner sinks are designed to fit into the corner of your countertop, utilizing often-underused space.
- Dimensions: These sinks often have a triangular or L-shaped configuration. Their dimensions are measured along the two sides that meet at the corner. They might also have a larger central basin.
- Considerations:
- Require specialized cabinet and countertop modifications.
- Can sometimes feel less ergonomic to reach into.
Specialty Sinks: Beyond the Basics
This category includes bar sinks, prep sinks, and workstation sinks, each with specific measurement needs.
- Bar/Prep Sinks: Typically smaller, ranging from 10 to 20 inches in diameter or length/width. They are designed for secondary tasks.
- Workstation Sinks: Often long and narrow, these feature integrated accessories like cutting boards, colanders, and drying racks. Their overall length can be substantial (30-40 inches or more), but the bowl itself might be shallower. The length and configuration of these accessories are key measurement considerations.
Sink Installation Measurements: The Practical Application
Sink installation measurements are about ensuring the sink fits not only the countertop opening but also the surrounding cabinetry and plumbing.
Cabinet Compatibility: The Crucial Link
The cabinet base is what supports your sink and countertop.
- Cabinet Width: This is the most critical cabinet measurement. The sink’s length (for topmount) or the sink’s overall footprint (for undermount, considering the bowl and mounting space) must be compatible with the cabinet width.
- Rule of Thumb: For topmount sinks, the sink length is typically 2-3 inches smaller than the cabinet width. For undermount sinks, the sink bowl should be about 3-4 inches smaller than the cabinet width to allow for mounting and edge support.
- Cabinet Depth: Ensure the sink’s front-to-back measurement (width) and its depth don’t interfere with cabinet doors, drawers, or any internal shelving.
- Clearing Obstructions: Check for plumbing pipes, the garbage disposal unit, and any other fixtures that might occupy space within the cabinet and could conflict with the sink’s installation.
Faucet and Accessory Placement: The Functional Layout
Don’t forget to measure for your faucet, soap dispenser, and other accessories.
- Faucet Holes: Sinks come with pre-drilled holes for faucets. You need to ensure the number and spacing of these holes match your chosen faucet.
- Common Configurations:
- Single Hole: For faucets with integrated sprayers or European-style faucets.
- 3 Hole (4-inch centers): For widespread faucets where the handles and spout are separate but closer together.
- Widespread (8-inch centers): For faucets with handles and spout further apart.
- Apron/Farmhouse Sinks: These often have no pre-drilled holes, allowing complete customization of faucet placement.
- Common Configurations:
- Backsplash Clearance: For topmount sinks, measure the distance from the sink rim to the backsplash. For undermount sinks, measure the distance from the sink bowl edge to the backsplash to ensure adequate space for mounting.
Measuring for Different Sink Mounting Types
The method of attaching the sink to your countertop significantly influences how you take measurements.
Topmount Sink Measurements: The Drop-In Method
As discussed, topmount sink measurements are about fitting the sink into a precisely cut hole from above.
- Key Measurement: The sink’s overall length and width are used to determine the cutout size, which is always slightly smaller than the sink’s outer dimensions.
- Installation: The sink drops into the opening and is secured from underneath using clips or brackets. The rim sits on top of the counter, hiding the cutout edge.
Undermount Sink Measurements: The Sub-Counter Method
Undermount sink measurements are about precise placement under the countertop edge.
- Key Measurement: The dimensions of the sink bowl are paramount for the countertop cutout. You’ll also need to consider the sink’s total width and length to ensure it doesn’t interfere with cabinet edges or other countertop features.
- Installation: The sink is attached to the underside of the countertop using adhesive and clips. This creates a seamless look with no visible rim.
Farmhouse/Apron Sink Measurements: The Exposed Front
Farmhouse or apron sinks are characterized by their exposed front, which forms part of the sink itself.
- Key Measurement:
- Overall Length and Width: Similar to topmount, but with extra consideration for the apron front’s dimensions.
- Apron Height: The height of the exposed front panel is important for cabinet compatibility and aesthetic.
- Cabinet Cutout: The cabinet opening for an apron sink is often larger than for a standard topmount, as the sink’s front panel is exposed and needs to integrate with the cabinet face. Manufacturers provide specific cabinet modification instructions.
- Installation: These sinks often require custom cabinetry or modifications to existing cabinets to accommodate the apron front.
Practical Steps for Measuring Your Sink Space
To ensure you get the right measurements, follow these steps:
- Measure Your Existing Cabinet Base:
- Open your cabinet doors or drawers.
- Measure the width of the cabinet opening from left to right. This is your primary constraint.
- Measure the depth from the front edge of the cabinet to the back.
- Measure the height inside the cabinet to check for any obstructions.
- Measure Your Existing Countertop Opening (if applicable):
- If you have an existing sink, measure the length and width of the hole in your countertop.
- For topmount sinks, measure from the outer edge of the existing sink rim to the outer edge of the rim.
- For undermount sinks, measure the opening beneath the countertop.
- Account for Countertop Edge and Backsplash:
- Measure the thickness of your countertop edge.
- Measure the distance from your current sink rim (or countertop edge if no sink is present) to your backsplash. This is crucial for undermount sinks and for ensuring a topmount sink’s rim doesn’t clash with the backsplash.
- Consider Faucet Placement and Clearance:
- Measure the space behind the sink area to ensure you have enough room for your chosen faucet and its base plate if needed.
- Check Plumbing and Disposal Space:
- Ensure there is adequate clearance within the cabinet for any existing or planned plumbing, drain pipes, and garbage disposal units.
Tips for Accurate Sink Measurement
- Use a Metal Tape Measure: They are more rigid and easier to use for precise measurements.
- Measure Twice, Cut Once: This old adage is especially true for kitchen renovations.
- Always Refer to Manufacturer Specifications: Every sink model is slightly different. The manufacturer’s documentation will provide precise cutout dimensions and recommended cabinet sizes.
- Consider a Template: Many sinks, especially undermount models, come with a cardboard template. Use this to accurately mark your countertop for cutting.
- When in Doubt, Go Slightly Larger: For the countertop cutout, it’s often better to have an opening that is slightly too large and can be shimmed or sealed, rather than one that is too small. However, always confirm with your countertop fabricator.
Frequently Asked Questions (FAQ)
Q1: How do I measure my existing sink for replacement?
To measure your existing sink, determine its mounting type (topmount or undermount). For a topmount, measure its overall length and width from the outermost edge of the rim. For an undermount, measure the length and width of the visible sink bowl opening in the countertop. Also, measure the sink’s depth.
Q2: What is the standard size for a kitchen sink?
There isn’t one single “standard” size as kitchens and cabinets vary widely. However, common sink lengths range from 24 inches for small spaces to 33 inches for standard cabinets. Many popular double bowl sinks are around 30-33 inches long, while single bowl sinks can be found in similar lengths or larger. The depth typically ranges from 7 to 10 inches.
Q3: Can I replace my double bowl sink with a single bowl sink?
Yes, you can often replace a double bowl sink with a single bowl sink, or vice versa, but it depends on the dimensions. You need to ensure the new sink’s overall length and width are compatible with your existing countertop cutout and cabinet base. A single bowl sink might be larger overall than your current double bowl sink, meaning the existing cutout might be too small. Conversely, a smaller single bowl might leave a larger exposed countertop area if the cutout is significantly larger than the new sink’s bowl.
Q4: How much space do I need around a sink?
For a topmount sink, the rim of the sink rests on the countertop, so you need to ensure the sink’s outer dimensions fit within your cabinet base. For an undermount sink, you need to ensure there is about a 1/4-inch to 1/2-inch reveal of the countertop edge around the sink bowl for mounting. You also need adequate clearance between the sink’s outer edges and any backsplash, faucet, or countertop edge for proper installation and sealing.
Q5: What is an undermount sink measurement versus a topmount sink measurement?
An undermount sink measurement focuses on the dimensions of the sink bowl itself to determine the countertop cutout size. The sink is installed beneath the countertop. A topmount sink measurement focuses on the sink’s overall dimensions from rim to rim to determine the cutout size, which is typically slightly smaller than the sink’s outer dimensions. The sink is installed from above, with its rim resting on the countertop.