
Can I build my own kitchen cabinets? Yes, you absolutely can build your own kitchen cabinets with the right planning, tools, and a willingness to learn! Building your own kitchen cabinets is a rewarding DIY project that can save you a significant amount of money compared to custom or even many semi-custom options. This comprehensive guide will walk you through the essential steps, from initial design to the final touches, helping you create beautiful and functional DIY kitchen cabinets.
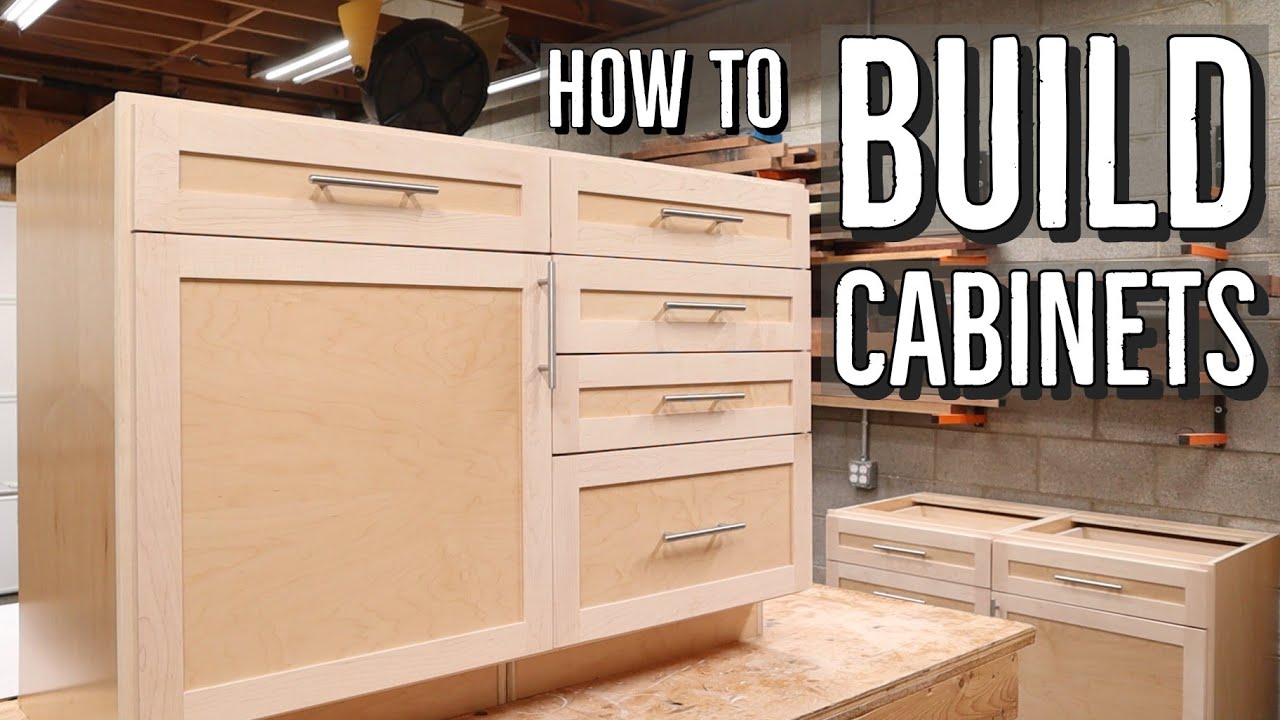
Image Source: i.ytimg.com
Deciphering Your Kitchen Cabinet Design Plans
Before you cut any wood, you need a solid plan. This is where kitchen cabinet design plans come into play. Think about the layout of your kitchen, how you use the space, and what kind of storage you need.
1. Measure Your Space Accurately
- Wall Dimensions: Measure the length and height of all walls where cabinets will be installed. Note any windows, doors, or permanent fixtures.
- Appliance Locations: Measure the space for your refrigerator, oven, dishwasher, and any other built-in appliances.
- Cabinet Placement: Decide where each cabinet will go – base cabinets, wall cabinets, pantry cabinets, etc.
- Countertop Height: Standard base cabinet height is 34.5 inches, plus a 1.5-inch countertop, for a total of 36 inches. Wall cabinets are typically hung 54 inches above the countertop, resulting in a standard height of 84 inches from the floor.
2. Sketch Your Layout
- Basic Floor Plan: Draw a simple top-down view of your kitchen. Mark walls, windows, doors, and appliance locations.
- Cabinet Elevations: Sketch side views showing how cabinets will fit on the walls. Indicate approximate dimensions for each cabinet unit (width, height, depth). Standard depths for base cabinets are 24 inches, and wall cabinets are typically 12 to 14 inches deep.
3. Consider Cabinet Types
- Base Cabinets: These sit on the floor and support your countertops. They usually have doors and sometimes drawers.
- Wall Cabinets: These hang on the wall above the counter. They are shallower than base cabinets.
- Tall Cabinets: These can be used for pantries, ovens, or refrigerators. They extend from the floor to the ceiling or close to it.
4. Create Detailed Drawings
Once you have a general layout, create detailed drawings for each cabinet. Include:
- Overall dimensions (width, height, depth).
- Internal shelf placement and adjustability.
- Drawer slide locations.
- Door style and hinge type.
Choosing Your Kitchen Cabinet Materials
The kitchen cabinet materials you choose will impact the look, durability, and cost of your project.
Popular Wood Options
- Plywood: This is the workhorse of DIY cabinet building. It’s strong, stable, and available in various grades and wood veneers.
- Cabinet-grade plywood: Look for birch, maple, or oak plywood. These have smooth, sanded faces suitable for painting or staining.
- Thickness: 3/4-inch is standard for cabinet boxes and shelves. 1/2-inch can be used for drawer bottoms or back panels.
- Solid Wood: Often used for cabinet doors, drawer fronts, and face frames.
- Hardwoods: Maple, oak, cherry, and alder are durable and take finishes well.
- Softwoods: Pine is less expensive but softer and can dent more easily.
Other Materials
- MDF (Medium-Density Fiberboard): Smooth and stable, it’s excellent for painted cabinet doors and drawer fronts. It’s not ideal for cabinet boxes as it can sag over time and doesn’t hold screws as well as plywood.
- Veneers: Thin layers of real wood glued to a substrate like plywood or MDF. This offers the look of solid wood at a lower cost.
Hardware and Adhesives
- Screws: Use wood screws for joining cabinet parts.
- Wood Glue: A strong bond is essential for cabinet construction.
- Drawer Slides: Ball-bearing or epoxy-coated slides for smooth operation.
- Hinges: Concealed (European style) or visible hinges depending on your door style.
- Handles/Knobs: For doors and drawers.
Building Cabinet Boxes: The Foundation of Your Kitchen
Build kitchen cabinet boxes using sturdy materials and solid joinery. The cabinet box, also known as the carcass, is the main structure.
The Process of Building Cabinet Boxes
- Cut Plywood: Using your kitchen cabinet design plans, cut the plywood for the sides, top, bottom, and back panels. Ensure cuts are square and precise. A table saw with a good blade is ideal for this.
- Joinery Techniques: This is crucial for strong boxes.
- Butt Joints with Screws and Glue: The simplest method. Glue the edges and secure with screws. Pre-drilling pilot holes prevents splitting.
- Dadoes and Rabbets: These create stronger, more precise joints where panels interlock. A dado is a groove cut across the grain, and a rabbet is a groove cut along the edge.
- Pocket Holes: A quick and strong way to join panels. Special jigs create angled holes for screws.
- Assemble the Box:
- Start with the sides and bottom. Apply glue to the joining edges.
- Use clamps to hold the pieces together while you screw or secure them. Ensure the box is square. A carpenter’s square is a vital tool here.
- Attach the top panel in a similar fashion.
- For added strength and to prevent racking, install a back panel. This can be 1/4-inch plywood or hardboard, often glued and stapled or screwed into a rabbet cut into the back edges of the cabinet box.
Table 1: Common Cabinet Box Joinery Methods
| Joinery Method | Description | Strength | Ease of Execution | Visual Appearance |
|---|---|---|---|---|
| Butt Joint (Screws/Glue) | Edges butted together, secured with screws and glue. | Good | Easy | Visible screws/seams |
| Dado Joint | Groove cut into one piece to receive the edge of another. | Very Good | Moderate | Hidden |
| Rabbet Joint | Groove cut along the edge of a piece to receive the edge of another. | Very Good | Moderate | Hidden |
| Pocket Hole Joinery | Angled holes drilled to accept screws, creating strong, hidden joints. | Excellent | Easy to Moderate | Hidden |
Shelving
- Fixed Shelves: Cut from 3/4-inch plywood and installed with glue and screws or dadoes.
- Adjustable Shelves: Drill shelf pin holes in the sides of the cabinet. Use a shelf pin jig for accuracy.
Mastering Cabinet Joinery Techniques
The type of cabinet joinery techniques you use will significantly impact the longevity and aesthetic of your cabinets.
Beyond Basic Screws: Advanced Techniques
- Dovetail Joints: The gold standard for drawer construction, known for incredible strength and beauty. This requires specialized jigs and practice.
- Mortise and Tenon: A strong joint where a tenon (projection) fits into a mortise (hole). Often used for door frames.
- Biscuit Joints: Small wooden biscuits are inserted into slots cut into joining edges. They help with alignment and add some strength, but are often used in conjunction with other joinery.
- Spline Joints: A thin strip of wood (spline) is inserted into grooves on both joining pieces.
Face Frames
Most DIY kitchen cabinets use face frames to provide a mounting surface for doors and hinges, and to give the cabinets a more finished look.
- Cut Frame Stock: Typically made from solid wood (1×2 or 1×4 lumber). Rip the lumber to the desired width (e.g., 1.5 inches).
- Join Corners:
- Butt Joints with Pocket Holes: The easiest and most common DIY method.
- Dovetail or Mortise and Tenon: For a more professional and stronger join.
- Attach to Cabinet Box: Glue and clamp the face frame to the front of the cabinet box. Ensure it’s flush and square.
Cabinet Door Construction: The Face of Your Kitchen
Cabinet door construction is where you can really customize the look of your kitchen.
Styles of Cabinet Doors
- Flat Panel (Slab): Simple, modern doors made from a single piece of material or joined pieces. Easiest to make.
- Recessed Panel: Features a center panel that is set back from the door frame.
- Raised Panel: The center panel has a profile or is raised higher than the door frame. More complex to make.
- Shaker Style: A timeless design with a flat center panel and a simple, square frame.
Building a Shaker Style Door (Common DIY Choice)
- Stile and Rail Construction: The door is made from vertical pieces (stiles) and horizontal pieces (rails) that form a frame.
- Cut stiles and rails from solid wood or MDF, usually 2.5 to 4 inches wide.
- Use joinery like mortise and tenon, dowels, or pocket holes to connect the stiles and rails.
- Prepare the Center Panel:
- Cut a piece of 1/4-inch plywood or MDF slightly smaller than the opening created by the stiles and rails.
- For recessed panels, you can leave it flat.
- For raised panels, use a router with a raised panel bit.
- Assemble the Door:
- Apply wood glue to the joinery of the stiles and rails.
- Slide the center panel into the groove (if using a grooved frame) or glue it to the back of the frame.
- Clamp the door together, ensuring it remains flat and square.
- Wipe away any excess glue.
Cabinet Drawer Building: Functional Storage Solutions
Cabinet drawer building requires precision for smooth operation and a good fit.
Drawer Box Construction
- Materials: 1/2-inch or 3/4-inch plywood or solid wood.
- Drawer Sides and Ends: Cut to your desired dimensions. The height of the sides will determine your drawer box height. The length of the ends will match the drawer width.
- Drawer Bottom: Typically 1/4-inch plywood or hardboard.
- Joinery:
- Butt Joints with Screws and Glue: Simple and effective for most DIYers.
- Dadoes: Cut dadoes into the drawer sides to accept the drawer bottom. This is stronger and prevents the bottom from sagging.
- Dovetail Joints: The strongest and most attractive, but also the most complex.
- Assembly:
- Glue and screw the sides and ends together.
- Slide the drawer bottom into the dadoes or attach it to the bottom edges of the drawer box.
- Ensure the drawer box is square.
Drawer Fronts
- These are usually made from solid wood or MDF.
- They are attached to the front of the drawer box after the box is assembled.
- Use screws from the inside of the drawer box into the drawer front.
- For a more professional look, you can use dowels or pocket holes for alignment.
Cabinet Finishing Tips: Protecting and Beautifying Your Cabinets
Cabinet finishing tips are crucial for durability and appearance.
Preparation is Key
- Sanding: Sand all surfaces smooth. Start with a coarser grit (e.g., 120) and progress to finer grits (e.g., 180 or 220).
- Cleaning: Wipe down all surfaces with a tack cloth or a damp cloth to remove dust.
Finishing Options
- Paint:
- Primer: Apply a good quality primer, especially on bare wood or MDF.
- Top Coat: Use multiple thin coats of high-quality paint. Enamel paints are durable for cabinets.
- Application: Brush, roll, or spray. Spraying offers the smoothest finish.
- Stain:
- Pre-Stain Conditioner: Use on soft woods like pine to prevent blotchiness.
- Apply Stain: Apply evenly with a brush or rag, wiping off excess.
- Top Coat: Apply several coats of a durable clear coat like polyurethane or lacquer.
- Clear Coat/Varnish:
- Protects the wood and provides a durable finish.
- Available in various sheens (matte, satin, semi-gloss, high-gloss).
- Apply thin, even coats, sanding lightly between coats with very fine grit sandpaper (320 or higher).
Table 2: Finishing Product Comparison
| Finish Type | Durability | Ease of Application | Appearance Options | Best For |
|---|---|---|---|---|
| Paint | High | Moderate to Easy | Any color | Painted cabinets, MDF doors |
| Stain | Moderate | Moderate | Wood tones | Highlighting wood grain |
| Polyurethane | Very High | Moderate | Clear, tinted | Durability, wood protection |
| Lacquer | High | Moderate to Hard | Clear, tinted, fast-drying | Professional spray finish |
| Varnish (Exterior) | Extremely High | Moderate | Clear, tinted | Maximum protection (not common for interiors) |
Sealing Cabinet Edges
Don’t forget to seal the exposed edges of plywood. They can absorb moisture and finish unevenly. Apply a coat of primer or thinned paint to these edges before your final coats.
Kitchen Cabinet Hardware Installation: The Final Flourish
Kitchen cabinet hardware installation includes hinges, drawer slides, and decorative pulls.
Installing Hinges
- Types of Hinges:
- Concealed (Euro) Hinges: Most common for modern DIY cabinets. They require a specific bore hole drilled into the cabinet door. Use a 35mm Forstner bit for this.
- Surface-Mounted Hinges: Simpler to install, but more visible.
- Drilling for Concealed Hinges: Use a jig to accurately drill the cup holes for the hinges on the back of the cabinet doors.
- Mounting to Cabinet: The hinge base plates mount to the inside of the cabinet box.
- Adjustments: Most concealed hinges have adjustment screws to fine-tune the door’s position (up/down, left/right, in/out).
Installing Drawer Slides
- Types of Slides:
- Ball-Bearing Slides: Offer smooth operation and higher weight capacity.
- Epoxy-Coated Slides: More budget-friendly, but can be less smooth.
- Mounting: Typically, one part of the slide mounts to the cabinet side, and the other part mounts to the drawer side. Follow the manufacturer’s instructions carefully. Ensure slides are level and parallel.
Attaching Knobs and Pulls
- Placement: Decide on the placement of your knobs or pulls.
- Drilling: Use a template or a precise measurement to drill holes for the screws.
- Attachment: Secure the hardware from the back of the door or drawer front.
Frequently Asked Questions (FAQ)
Q1: What are the most affordable materials for DIY kitchen cabinets?
A1: Plywood (specifically cabinet-grade birch or maple) for the boxes and MDF for painted doors are generally the most cost-effective options. Pine can be used for solid wood elements if you’re on a tight budget, but be aware of its softness.
Q2: How long does it typically take to build kitchen cabinets?
A2: The time it takes varies greatly depending on your skill level, the complexity of your design, and the tools you have available. For a standard kitchen, expect to spend anywhere from 50 to 200+ hours. It’s often best to build them in batches or over several weekends.
Q3: What tools are essential for building kitchen cabinets?
A3: Essential tools include a table saw (or a high-quality circular saw with a guide), a drill/driver, a router, a measuring tape, a carpenter’s square, clamps, sandpaper, a sander, safety glasses, and a dust mask. Pocket hole jigs and specialized jigs for drilling hinge cups are highly recommended.
Q4: Can I use particleboard instead of plywood?
A4: While particleboard is cheaper, it’s generally not recommended for cabinet boxes. It’s less durable, prone to sagging, and doesn’t hold screws as well as plywood. It can be used for drawer bottoms in some cases.
Q5: What is the best finish for DIY kitchen cabinets?
A5: For durability and ease of cleaning, a high-quality polyurethane or a durable enamel paint is recommended. The best finish depends on your desired look and how much wear and tear the cabinets will endure. Proper preparation and multiple thin coats are key to any good finish.
Building your own kitchen cabinets is a significant undertaking, but with careful planning, attention to detail, and the right techniques, you can create a beautiful and functional kitchen that you’ll be proud of for years to come. Enjoy the process!