
How to Add Crown Molding to Kitchen Cabinets: Enhance Your Look
Yes, you can absolutely add crown molding to your kitchen cabinets to give them a more finished and custom look. This is a fantastic way of upgrading your kitchen cabinets with molding, transforming a standard cabinet set into something that feels more bespoke and high-end. Many homeowners wonder if this is a doable DIY project, and the answer is a resounding yes, especially with the right guidance. Adding decorative molding to cabinets is a significant step towards a more elegant kitchen design.
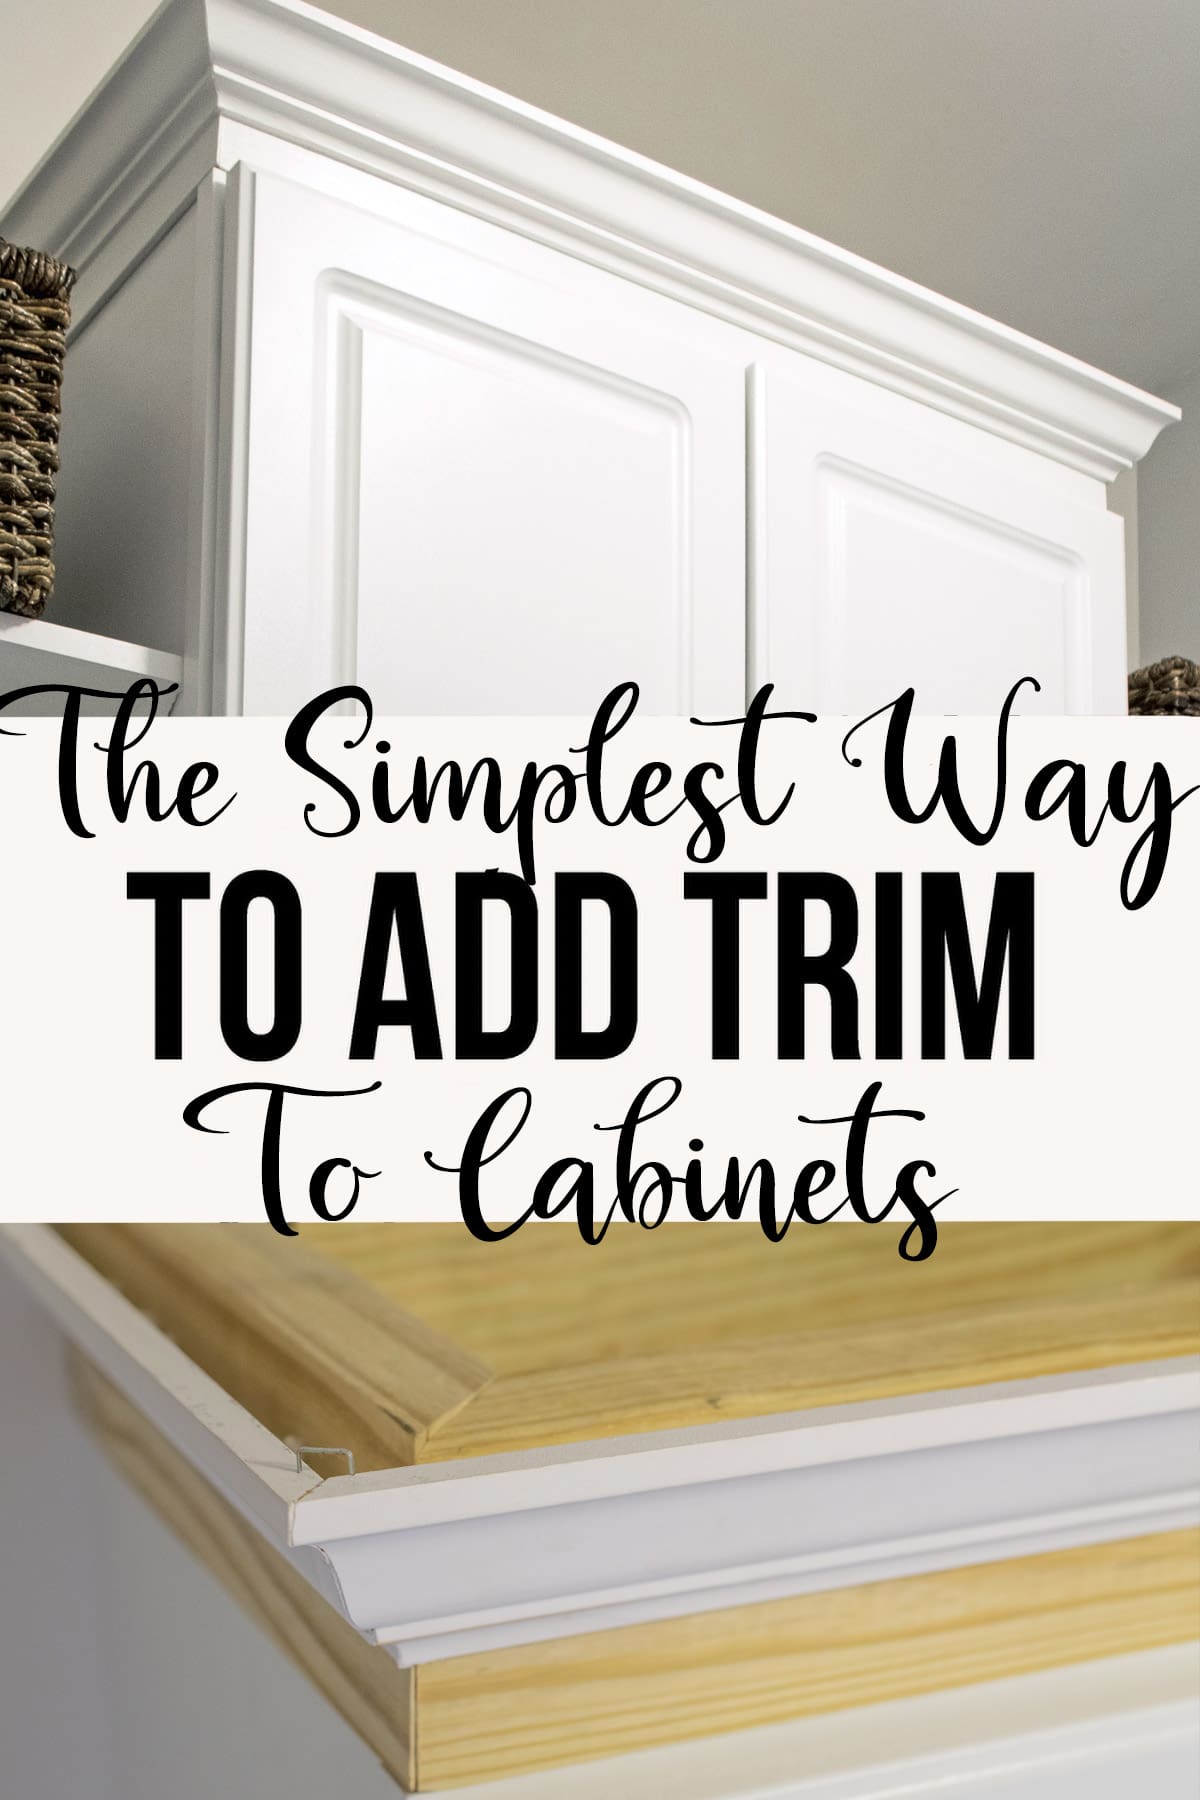
Image Source: www.cravingsomecreativity.com
Why Add Crown Molding to Kitchen Cabinets?
Crown molding, also known as cabinet cornice installation, is a decorative trim that sits at the top where your cabinets meet the ceiling. It creates a visual transition and adds a sense of grandeur and completeness to your kitchen. Here’s why it’s such a popular choice for upgrading kitchen cabinets with molding:
- Elevated Aesthetics: It instantly makes your cabinets look more custom and expensive. It bridges the gap between the cabinets and the ceiling, creating a cohesive and polished appearance.
- Hides Imperfections: Small gaps or unevenness where the cabinets meet the ceiling can be unsightly. Crown molding effectively conceals these flaws.
- Adds Character: It can introduce a specific style to your kitchen, whether it’s traditional, modern, or transitional, depending on the type of molding you choose.
- Increases Home Value: A well-executed upgrade like this can contribute to your home’s overall appeal and resale value.
Exploring Types of Kitchen Cabinet Molding
When you’re thinking about crown molding kitchen cabinet ideas, the variety of styles available is vast. The choice of molding significantly impacts the overall look and feel of your kitchen. Understanding the different types of kitchen cabinet molding is crucial for making the best selection.
Common Crown Molding Profiles
Crown molding isn’t just one style; it comes in various shapes and sizes. Here are some of the most common types you’ll find, each offering a distinct look:
- Simple Bevel: A straightforward, angled cut. It’s clean and modern, working well in contemporary kitchens.
- Ogee: Features an “S” curve. This is a classic profile that adds a touch of traditional elegance.
- Cove: A concave curve that creates a soft, rounded transition. It’s versatile and can suit various styles.
- Rake Molding: Similar to a bevel but with a steeper angle, often used where walls meet ceilings.
- Dentil: Characterized by a series of small, square blocks. This profile adds intricate detail and a formal feel.
- Fluted Molding: Features parallel grooves running vertically. It adds a classical architectural element.
- Victorian/Ornate: Highly detailed and often features carved patterns. Best for more traditional or grand kitchen designs.
When considering crown molding kitchen cabinet ideas, think about the existing style of your kitchen and cabinets. Do you have Shaker cabinets, a more traditional raised-panel design, or something sleek and modern? The molding should complement, not compete with, your cabinet style.
Material Matters
The material of your molding also plays a role:
- Wood (Pine, Poplar, Oak, Maple): This is the most traditional and versatile option. It can be painted or stained. Poplar and pine are softer and easier to work with for DIYers, while oak and maple are harder and more durable.
- MDF (Medium-Density Fiberboard): A cost-effective option, MDF is smooth and takes paint exceptionally well. However, it’s susceptible to moisture damage and can be heavier than wood.
- Polyurethane/Polystyrene: These synthetic materials are lightweight, moisture-resistant, and can be pre-primed for painting. They often mimic the look of carved wood at a lower price point and are very forgiving for DIY kitchen cabinet trim projects.
Planning Your Crown Molding Project
Proper planning is essential for a successful kitchen cabinet molding installation. This is where you start to envision your DIY kitchen cabinet trim.
Measuring Your Cabinets
Accurate measurements are critical. You’ll need to measure the length of the top of each cabinet run.
- Measure the Top Edge: For each cabinet run, measure the length along the very top edge where the molding will attach.
- Account for Corners: If you have corner cabinets or cabinets that turn a corner, measure each straight section separately.
- Add for Cuts: It’s always wise to buy a little extra molding to account for mistakes and miter cuts. A good rule of thumb is to add about 10-15% to your total measurement.
Choosing the Right Molding Size and Profile
The scale of your kitchen and cabinets should dictate the size of your crown molding.
- Small Kitchens/Standard Cabinets: A molding that is 2-4 inches wide often works best. Overly large molding can overwhelm a smaller space.
- Large Kitchens/Tall Cabinets: You might opt for wider molding, perhaps 4-6 inches, to maintain proportion.
- Ceiling Height: If you have very high ceilings, you can generally get away with wider molding. For standard 8-foot ceilings, narrower profiles are usually more suitable.
Consider the cabinet door trim as well. If your cabinet doors have detailed profiles, a simpler crown molding might be best to avoid a cluttered look. Conversely, if your cabinets are very plain, a more decorative crown molding can add a significant visual punch.
Estimating Costs
Costs will vary based on the material and style of molding chosen.
- Wood: Can range from $2-$15+ per linear foot.
- MDF: Typically $1-$5 per linear foot.
- Polyurethane: $3-$10+ per linear foot.
Don’t forget to factor in the cost of:
- Wood glue
- Brad nails (appropriate size for your molding and cabinet material)
- Wood filler or putty
- Caulk
- Primer and paint (if painting)
- Sandpaper
- Measuring tape
- Pencil
- Miter saw (essential for angled cuts)
- Coping saw (useful for inside corners)
- Nail gun (brad nailer) or hammer
- Stud finder
- Level
- Safety glasses and ear protection
The Kitchen Cabinet Molding Installation Process: A Step-by-Step Guide
This is where your DIY kitchen cabinet trim project truly takes shape. The cabinet cornice installation requires patience and precision.
Tools and Materials You’ll Need
- Your chosen crown molding
- Measuring tape
- Pencil
- Miter saw (preferably a compound miter saw for angled cuts)
- Brad nail gun (18-gauge is common) or hammer
- Brad nails (e.g., 1 1/4″ or 1 1/2″ length)
- Wood glue
- Caulk (paintable)
- Wood filler or putty
- Sandpaper (various grits: 120, 180, 220)
- Stud finder
- Level
- Safety glasses
- Gloves
- Drop cloths or old sheets
- Optional: Coping saw, coping foot for nail gun, Jigsaw
Step 1: Prepare Your Workspace and Cabinets
- Clear the Area: Remove any items from the countertops and protect your surfaces with drop cloths.
- Clean Cabinets: Ensure the top edges of your cabinets are clean, dry, and free of dust or grease.
- Locate Studs: Use a stud finder to locate wall studs above your cabinets. You will want to drive nails into these studs for a secure hold. Mark their locations lightly with a pencil. If there aren’t studs precisely where you need them, you’ll rely heavily on glue and nails into the cabinet structure itself, but studs provide the strongest anchor.
Step 2: Cutting the Crown Molding
This is the most critical step and requires accuracy. You’ll be making miter cuts (angled cuts) to join the molding pieces at corners and where cabinet runs meet.
- Inside Corners: An inside corner requires two pieces of molding cut at 45-degree angles. The longest point of the cut should go towards the outside of the corner.
- Outside Corners: For an outside corner, you’ll also make two 45-degree cuts. In this case, the longest point of the cut should go towards the outside of the corner.
Cutting Crown Molding Technique (General Rule):
When cutting crown molding on a standard miter saw, the molding is usually placed upside down and backward compared to how it sits on the cabinet.
- Set Miter Saw Angle: For a standard 45-degree corner, set your miter saw to 45 degrees.
- Inside Corner:
- Place the molding against the saw fence with the back (the part that sits against the wall) facing up, and the front (the decorative face) facing down.
- Cut one piece with the blade set to 45 degrees to the left (this will be your right-hand piece).
- Cut the second piece with the blade set to 45 degrees to the right (this will be your left-hand piece).
- The long point of the miter should extend towards the outside of the cabinet.
- Outside Corner:
- Place the molding as described above.
- Cut one piece with the blade set to 45 degrees to the left.
- Cut the second piece with the blade set to 45 degrees to the right.
- The long point of the miter should extend towards the outside of the cabinet.
Important Note: Some miter saws have special “crown molding” settings that allow you to cut the molding in its natural position. Consult your saw’s manual. If you don’t have a compound miter saw, or if your saw can’t do these specialized cuts, you might need to use a coping saw for inside corners after making a straight cut and then an angled cut on the back.
- Cutting for Straight Runs: For a straight run of cabinets, you’ll make a 90-degree (square) cut at the end of the molding piece.
Step 3: Test Fit and Make Adjustments
Before applying glue and nails, test fit each piece of molding.
- Dry Fit: Place the cut pieces where they will go. Check the fit in corners.
- Adjust Miter Angles: If there are small gaps, the miter angle might need to be slightly adjusted (e.g., 44 or 46 degrees) for a tighter fit. This is common, especially if your walls aren’t perfectly square.
- Coping for Perfect Inside Corners: For a seamless finish on inside corners, you can “cope” one of the molding pieces. This involves cutting the profile of one piece to match the profile of the other.
- Make a 45-degree miter cut on the piece that will go into the corner.
- Using a coping saw, carefully cut along the profile line you just created, essentially removing the mitered edge to leave a protruding shape that will fit snugly against the other piece.
Step 4: Attaching the Molding
Now it’s time for the permanent attachment.
- Apply Glue: Apply a thin bead of wood glue to the back of the molding where it will contact the cabinet and the wall.
- Position Molding: Place the molding piece into position.
- Nail in Place:
- Use your nail gun to secure the molding. Aim for nails to go into the cabinet frame and any wall studs you marked.
- Start with nails along the top edge, then along the bottom edge where it meets the cabinet.
- Space nails about 6-12 inches apart.
- Secure Corners: Ensure the mitered joints are pulled tightly together. You can use painter’s tape or a strap clamp to hold them while the glue dries and as you nail.
- Repeat for All Sections: Continue this process for all cabinet runs.
Step 5: Filling and Finishing
Once all molding is in place and the glue is dry, it’s time for the final touches to make your DIY kitchen cabinet trim look professional.
- Fill Nail Holes: Use wood filler or putty to fill all nail holes. Overfill them slightly, as the filler will shrink a little as it dries.
- Fill Gaps: Use paintable caulk to fill any small gaps between the molding and the cabinet, or between the molding and the ceiling/wall. For a clean line, apply a bead of caulk and then run a damp finger or caulk tool along it.
- Sand: Once the wood filler is completely dry, sand it smooth. Use fine-grit sandpaper (180-220 grit) for a smooth finish. Lightly sand any rough spots on the molding itself.
- Clean: Wipe away all dust with a tack cloth or a slightly damp cloth.
- Prime and Paint: Apply a coat of primer, followed by one or two coats of your chosen paint color. If your cabinets are painted, try to match the color closely. If they are stained, you might need to stain the molding to match or choose a contrasting color.
Custom Kitchen Cabinet Molding: Beyond the Basics
For those seeking something truly unique, custom kitchen cabinet molding is an option. This might involve:
- Specialty Molding: Ordering custom-designed profiles from a millworker.
- Combining Molding: Layering different types of molding to create a more elaborate cornice. For example, a base molding could be used with a smaller profile molding layered on top.
- Cabinet Frame Molding: This refers to adding molding directly to the cabinet doors or drawer fronts, or as a decorative element around the cabinet frames themselves. This is different from crown molding but contributes to overall cabinet trim. Many DIY kitchen cabinet trim projects focus on this type of detail.
When you’re looking at crown molding kitchen cabinet ideas, don’t be afraid to think outside the box. You can even incorporate lighting underneath the crown molding for a sophisticated effect.
Upgrading Kitchen Cabinets with Molding: Considerations and Tips
Successfully upgrading your kitchen cabinets with molding can elevate your entire kitchen’s appearance.
- Cabinet Door Trim: If you’re considering adding decorative elements, think about the kitchen cabinet door trim. Sometimes, adding a simple bead molding around the perimeter of cabinet doors can complement the crown molding beautifully.
- Consistency: Ensure the style of your crown molding aligns with your cabinet style and the overall kitchen decor.
- Proportion: As mentioned, scale is important. Don’t put chunky molding on delicate cabinets or vice versa.
- DIY vs. Professional: While this is a very achievable DIY project, if you’re not comfortable with precise cuts or using power tools, hiring a carpenter or cabinet installer for the kitchen cabinet molding installation might be a worthwhile investment.
- Pre-made Cornices: Some manufacturers offer pre-fabricated cabinet cornices that can simplify the installation process. These might be more expensive but can save time and ensure a professional look.
- Cabinet Frame Molding: Sometimes, the “molding” you add isn’t just to the top. You might add decorative trim pieces to the cabinet frames themselves or even to the cabinet doors to create a more layered, traditional look.
Frequently Asked Questions (FAQ)
Q1: Can I add crown molding to any kitchen cabinets?
A1: Yes, generally you can add crown molding to almost any kitchen cabinets, regardless of their style or age. The key is to choose a molding profile and size that complements your existing cabinets and kitchen space.
Q2: How do I measure for crown molding on kitchen cabinets?
A2: Measure the length of each cabinet run where you want to install molding. Measure along the top edge of the cabinets. It’s recommended to add an extra 10-15% to your total measurement to account for cuts and potential mistakes.
Q3: What is the best way to cut crown molding for corners?
A3: For corners, you’ll typically need to make miter cuts. For a 90-degree corner, you’ll usually set your miter saw to 45 degrees. For inside corners, the longer point of the cut faces outward; for outside corners, the longer point also faces outward. It’s often helpful to practice cuts on scrap pieces and consider coping inside corners for a perfectly seamless fit.
Q4: How do I attach crown molding to kitchen cabinets?
A4: The most common method is to use wood glue and brad nails. Apply glue to the back of the molding where it will contact the cabinet and the wall, then secure it with nails. Aim to drive nails into the cabinet frame and any wall studs above the cabinets for the most secure attachment.
Q5: What if my cabinets don’t reach the ceiling?
A5: This is a very common scenario and a prime reason to add crown molding. The molding will bridge the gap, creating a more finished look. You’ll nail the molding into the cabinet top and also into the wall above the cabinet, ideally hitting studs in the wall for maximum stability.
Q6: Do I need special tools for kitchen cabinet molding installation?
A6: A compound miter saw is highly recommended for making accurate angled cuts. A brad nailer makes the process much easier and cleaner than using a hammer and nails. You’ll also need a measuring tape, pencil, stud finder, wood glue, and finishing supplies like caulk, wood filler, and sandpaper.
Q7: How do I make crown molding look seamless?
A7: Proper miter cuts are essential. For inside corners, learning to “cope” the molding provides the most seamless look. After installation, using paintable caulk to fill any small gaps between the molding and the cabinet or wall, and then filling nail holes with wood filler, will create a smooth, professional finish.
By following these steps and tips, you can successfully add crown molding to your kitchen cabinets, significantly enhancing their appearance and giving your kitchen a polished, custom feel. This DIY kitchen cabinet trim project is a rewarding way to upgrade your home.