
Can I apply backsplash myself? Yes, most DIY enthusiasts can successfully apply a kitchen backsplash with the right preparation, tools, and techniques. This comprehensive guide will walk you through every step of the process, transforming your kitchen with a beautiful and functional backsplash.
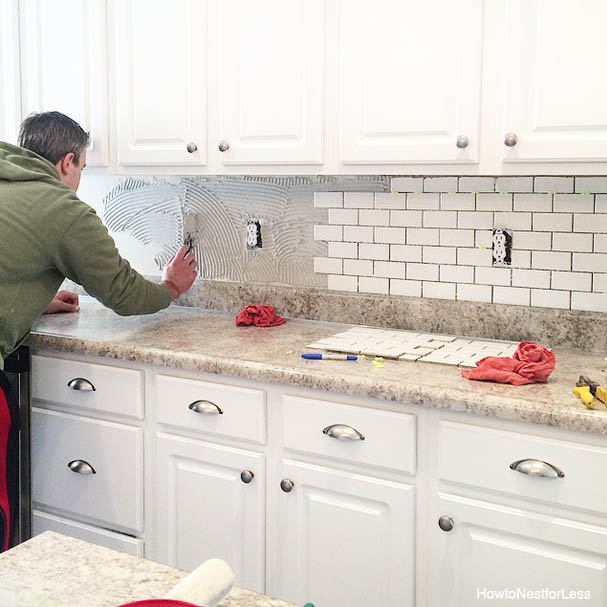
Image Source: howtonestforless.com
Getting Started: Planning Your Kitchen Backsplash Project
Before you even pick up a tool, careful planning is key to a successful kitchen backsplash installation. This is where you lay the groundwork for a professional-looking finish.
Choosing Your Backsplash Material
The world of kitchen backsplashes offers a vast array of materials, each with its own aesthetic and practical considerations.
Popular Backsplash Materials
- Ceramic Tile: A classic choice, ceramic tile is affordable, durable, and comes in endless styles, colors, and patterns. It’s relatively easy to work with for a DIY backsplash for kitchen.
- Porcelain Tile: Similar to ceramic but denser and less porous, porcelain offers superior durability and water resistance, making it ideal for kitchens.
- Glass Tile: Glass tiles add a touch of elegance and can make a kitchen feel brighter and more spacious. They are also easy to clean but can be more brittle during installation.
- Natural Stone (Marble, Granite, Travertine): These materials offer a luxurious and unique look. They are durable but can be more expensive and require sealing.
- Subway Tile: A timeless design, subway tiles are rectangular and often laid in a brick-like pattern. They are a popular choice for both traditional and modern kitchens.
- Peel-and-Stick Backsplash: For a quick and easy update, peel-and-stick options are available. While not a traditional tile backsplash installation, they offer a budget-friendly and renter-friendly solution.
Calculating How Much Backsplash You Need
Accurate measurement is crucial to avoid running out of materials or having excessive waste.
Measuring Your Space
- Measure the Height: Measure from the countertop to the underside of your upper cabinets.
- Measure the Width: Measure the length of the wall space you want to cover.
- Measure Obstructions: Account for windows, doors, outlets, and any other features that will interrupt the tile pattern.
- Calculate Square Footage: Multiply the height by the width for each section. Add these numbers together.
- Add for Waste: It’s wise to add 10-15% extra to your total square footage to account for cuts, breakage, and potential future repairs. This is especially important for patterned tiles where you need to match the design.
Gathering Your Tools and Supplies
Having all your tools ready before you begin will make the process smoother and more efficient.
Essential Tools for Backsplash Installation
- Safety Gear: Safety glasses, gloves, and knee pads.
- Measuring Tape: For accurate measurements.
- Level: To ensure your tiles are straight.
- Pencil: For marking.
- Spatula or Trowel: For applying backsplash adhesive and grout. A notched trowel is typically used for adhesive.
- Tile Saw or Wet Saw: For cutting tiles. A wet saw is best for precise cuts, especially with glass or harder stones.
- Tile Nippers: For small, intricate cuts.
- Tile Spacers: To ensure consistent grout lines.
- Grout Float: For spreading grout.
- Sponge: For cleaning excess grout.
- Buckets: For water and mixing grout.
- Clean Cloths or Rags: For wiping and polishing.
- Utility Knife: For cutting caulk or other materials.
- Caulk Gun: For applying sealant.
- Drop Cloths: To protect your countertops and floors.
Backsplash Materials Checklist
- Tiles: Your chosen backsplash material.
- Backsplash Adhesive: Specifically designed for your tile type (e.g., mastic for ceramic, thin-set mortar for stone).
- Grout: Choose a grout color that complements your tiles. Consider sanded grout for wider joints (1/8 inch or more) and unsanded grout for narrower joints.
- Grout Sealer: To protect grout from stains and moisture.
- Caulk: Color-matched to your grout or tile for sealing edges.
Preparing Your Kitchen Walls for Backsplash Installation
Proper kitchen wall prep for backsplash is as important as the installation itself. A clean, smooth, and sound surface ensures the adhesive bonds well and your backsplash looks professional.
Cleaning the Existing Surface
- Remove Old Backsplash (if applicable): Carefully pry off any existing backsplash. Use a putty knife or scraper to remove old adhesive or caulk.
- Wash the Walls: Clean the wall thoroughly with a degreaser or a mild soap and water solution. This removes grease, grime, and dust that could interfere with adhesion.
- Rinse and Dry: Rinse the walls well to remove any soap residue and allow them to dry completely.
Repairing Wall Imperfections
- Fill Holes and Cracks: Use spackling paste or joint compound to fill any holes, cracks, or gouges in the wall.
- Sand Smooth: Once the filler is dry, sand the area smooth to create an even surface.
- Prime (if necessary): If you’ve had to do significant repairs or are applying tile over a painted surface that might be slick, consider priming the wall with a tile-specific primer for better adhesion.
Removing Obstacles
- Outlet Covers and Switch Plates: Always turn off the power to the relevant outlets and switches at your breaker box. Then, remove the covers. You may need to unscrew the outlet or switch itself slightly to recess it if your new backsplash is thicker than the old one.
Applying the Backsplash: Step-by-Step
This section details the actual kitchen backsplash installation process, guiding you through each stage.
Layout and Planning
Before you mix any adhesive, it’s crucial to plan your tile layout.
Dry-Fitting Your Tiles
- Start from the Center: Often, starting from the center of your most prominent wall section and working outwards ensures a balanced look and minimizes awkward cuts at the edges.
- Plan Your Pattern: Lay out tiles on the countertop to visualize the pattern and determine where cuts will be necessary. This also helps you spot any tiles with manufacturing defects.
- Mark a Starting Line: Use your level and pencil to draw a straight horizontal line on the wall where your first row of tiles will sit. This line is critical for ensuring your backsplash is perfectly straight.
Applying the Backsplash Adhesive
The backsplash adhesive is what holds your tiles in place. Proper application is vital.
Using the Notched Trowel
- Mix Adhesive (if using thin-set): Follow the manufacturer’s instructions for mixing thin-set mortar. It should have a peanut-butter-like consistency.
- Apply Adhesive: Using the flat side of your trowel, spread a thin, even layer of adhesive onto a small section of the wall (about 2-3 square feet at a time).
- Create Ridges: Hold the notched side of the trowel at a 45-degree angle to the wall and comb the adhesive, creating uniform ridges. These ridges help the tile adhere properly and allow air to escape. Don’t over-apply; too much adhesive can squeeze out between tiles.
- Work in Small Sections: Only apply adhesive to areas you can tile within 15-20 minutes, as it can start to skin over and lose its tackiness.
Setting the Tiles
This is where your backsplash starts to take shape.
Placing Tiles and Using Spacers
- Press Tiles into Adhesive: Gently press each tile into the adhesive with a slight twisting motion to ensure good contact.
- Use Spacers: Place tile spacers between each tile to maintain consistent grout lines. For a tile backsplash installation, these are essential for a professional finish.
- Check for Level: Periodically use your level to ensure your rows are straight. Adjust tiles as needed before the adhesive sets.
- Wipe Away Excess Adhesive: If any adhesive squeezes out onto the tile surface, wipe it away immediately with a damp cloth.
Cutting Tiles
For a seamless look, you’ll need to cut tiles to fit around outlets, windows, and at the ends of your backsplash.
Backsplash Cutting Tools Explained
- Wet Saw: The most versatile tool for cutting tiles. It uses a water-cooled blade to make clean, precise cuts, including miters and curves. Essential for glass and natural stone.
- Tile Saw (Dry Saw): Uses a diamond blade to cut tiles. Can be messier than a wet saw as it doesn’t use water. Good for ceramic and porcelain.
- Tile Nippers: Used for making small, irregular cuts or notches, often around outlets or for creating unique shapes.
- Scoring Knife and Snapper: Suitable for scoring ceramic and porcelain tiles and then snapping them along the score line. Best for straight cuts.
Making Cuts
- Measure Carefully: Measure the space where the cut tile will go. Remember to account for the grout line if the cut piece is at an edge.
- Transfer Measurements: Mark your cut line on the tile with a pencil.
- Make the Cut: Use the appropriate cutting tool for your tile type and the type of cut needed. For outlet cutouts, you might need multiple straight cuts or a specialized jigsaw with a diamond blade.
- Smooth Edges: Lightly sand any rough edges with a rubbing stone.
Allowing Adhesive to Cure
- Patience is Key: After all tiles are set, allow the adhesive to cure completely according to the manufacturer’s instructions. This typically takes 24-48 hours.
- Remove Spacers: Once the adhesive is cured, carefully remove all the tile spacers.
Grouting Your Kitchen Backsplash
Grouting fills the gaps between tiles, adding structural integrity and a finished look. Proper grouting techniques are crucial for aesthetics and functionality.
Choosing the Right Grout
- Sanded vs. Unsanded: As mentioned earlier, sanded grout is for wider joints (over 1/8 inch) and unsanded for narrower joints. Using the wrong type can lead to cracking or improper curing.
- Grout Color: Select a color that complements your tiles. Contrasting grout can highlight the tile pattern, while matching grout creates a more seamless look.
Mixing and Applying Grout
- Mix Grout: Follow the manufacturer’s instructions precisely for mixing. Aim for a consistency similar to thick cake batter. Let it slake (rest) for a few minutes, then remix.
- Apply Grout: Using a grout float, spread the grout over the tiles, forcing it into the joints. Work at a 45-degree angle to the grout lines.
- Remove Excess Grout: Hold the float at a steeper angle (almost perpendicular to the wall) and sweep diagonally across the tiles to remove as much excess grout as possible.
Cleaning Grout Lines
This is where the magic happens and your tile backsplash installation truly shines.
Grouting and Cleaning Techniques
- Initial Wipe: Wait about 10-20 minutes (depending on humidity and temperature) for the grout to set slightly. Then, using a damp (not wet) sponge, gently wipe the tiles diagonally across the grout lines to remove the surface haze. Rinse the sponge frequently in clean water.
- Second Wipe: After another hour or so, repeat the damp sponging process to remove any remaining haze. Be careful not to dig into the grout lines.
- Buffing: Once the grout is dry to the touch (usually after 24 hours), use a clean, dry cloth to buff away any remaining haze.
Sealing the Grout
- Protect Your Work: After the grout has fully cured (check manufacturer recommendations, often 48-72 hours), apply a grout sealer. This is especially important for kitchen backsplashes where grease and food splatters are common.
- Application: Use a small brush or applicator to apply the sealer to the grout lines. Wipe off any excess sealer that gets on the tiles immediately.
Backsplash Finishing Touches
The final steps ensure a professional and durable finish.
Caulk the Edges
- Seal the Gaps: Apply a bead of color-matched caulk along the seam where the backsplash meets the countertop and where it meets the upper cabinets. This prevents water and dirt from getting behind the tiles and provides a clean, finished edge.
- Smooth the Caulk: Wet your finger or a damp cloth and run it along the caulk line to create a smooth, uniform seal.
Reinstall Outlet Covers
- Reattach: Once the caulk is dry, reattach your outlet covers and switch plates. You might need to purchase longer screws if your backsplash is thick.
Maintaining Your New Backsplash
Proper care will keep your DIY backsplash for kitchen looking great for years.
Cleaning Tips
- Daily Wipe-Down: Use a damp cloth with mild dish soap to wipe down the backsplash after cooking to remove grease and food splatters.
- Avoid Harsh Chemicals: For most tile and grout types, avoid abrasive cleaners or harsh chemicals that can damage the finish or the grout sealer.
- Deep Cleaning: Periodically clean grout lines with a specialized grout cleaner if they become stained.
Re-sealing Grout
- Regularly: Depending on usage and the type of sealer used, you may need to reapply grout sealer every 6-12 months to maintain its protective qualities.
Frequently Asked Questions About Kitchen Backsplashes
Q1: What is the most important step in kitchen backsplash installation?
A1: Proper wall preparation and accurate layout planning are the most crucial steps. Without a clean, flat surface and a well-planned layout, even the most skilled installer can run into problems, leading to a less-than-perfect finish.
Q2: Can I tile over existing tile backsplash?
A2: Yes, in some cases, you can tile over an existing tile backsplash, provided the old tile is securely adhered, flat, and clean. You might need to rough up the surface with sandpaper or use a special primer for the new adhesive to bond properly.
Q3: How do I clean grout haze after tiling?
A3: Grout haze is typically removed with a damp sponge and clean water. Work in small sections, wiping diagonally across the tiles. For stubborn haze, a commercial grout haze remover can be used, following the product’s instructions carefully.
Q4: What kind of adhesive should I use for my kitchen backsplash?
A4: The type of adhesive depends on your tile material. Mastic is often used for ceramic and porcelain tiles in dry areas. Thin-set mortar is generally recommended for natural stone, glass tiles, and areas prone to moisture due to its superior adhesion and water resistance. Always check the tile and adhesive manufacturer’s recommendations.
Q5: How long does it take to install a kitchen backsplash?
A5: The time it takes can vary significantly depending on the size of the area, the complexity of the tile pattern, the need for cuts, and your experience level. A simple tile backsplash installation for a small area can be done in a weekend, including drying times. More complex projects can take several days.
By following this comprehensive guide, you’ll be well-equipped to tackle your DIY backsplash for kitchen project with confidence, transforming your kitchen into a more stylish and personalized space. Enjoy the process and the beautiful results!