
Can you install a kitchen backsplash yourself? Yes, many homeowners can successfully install a kitchen backsplash with the right tools, materials, and guidance. A kitchen tile backsplash is a fantastic way to update your kitchen’s look without a massive renovation. It adds personality, protects your walls, and can be surprisingly affordable when you tackle it as a DIY project. This guide will walk you through everything you need to know to create a beautiful and durable kitchen backsplash.
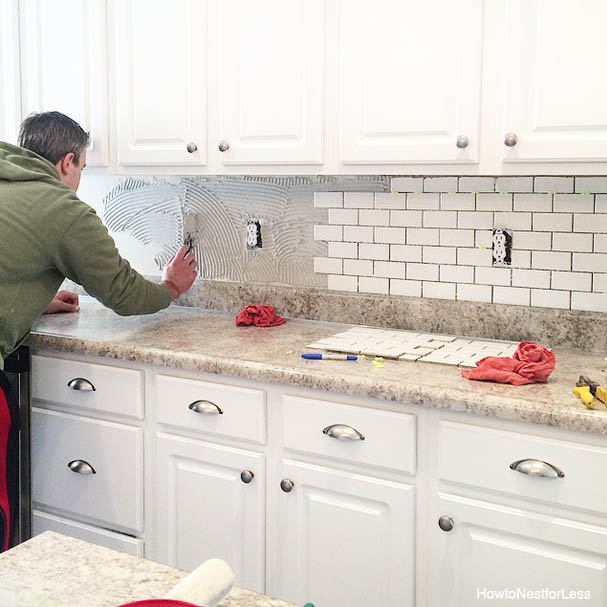
Image Source: howtonestforless.com
Planning Your DIY Backsplash Project
Before you grab your trowel, careful planning is key. This initial stage sets the foundation for a smooth and successful installation.
Why Add a Kitchen Backsplash?
- Protection: It shields your walls from splashes, stains, and grease from cooking.
- Aesthetics: It’s a major design element that can tie your kitchen together, adding color, texture, and style.
- Value: A well-done backsplash can increase your home’s appeal and resale value.
- Easy Cleaning: Most backsplash materials are easy to wipe down, keeping your kitchen looking fresh.
Choosing Your Backsplash Materials
The world of backsplash materials is vast, offering options for every style and budget.
Popular Backsplash Materials
- Ceramic Tile: Durable, affordable, and comes in endless colors, shapes, and sizes. Easy to clean.
- Porcelain Tile: Similar to ceramic but denser and less porous, making it even more durable and water-resistant.
- Glass Tile: Offers a sleek, modern look and reflects light beautifully. Can be a bit more delicate to work with.
- Natural Stone (Marble, Granite, Travertine): Luxurious and unique, but often more expensive and requires sealing to prevent staining.
- Metal Tile (Stainless Steel, Aluminum): Modern and industrial, easy to clean, but can show smudges and scratches.
- Peel and Stick Backsplash: A very popular DIY option. These are tiles or sheets with adhesive backing, making installation incredibly simple. They are great for renters or quick updates.
- Subway Tile: A classic and timeless choice. These rectangular tiles are often laid in a staggered brick pattern and come in various materials like ceramic, glass, and even stone.
Factors to Consider When Choosing Materials
- Budget: Some materials are significantly more expensive than others.
- Durability: How well will it hold up to heat, moisture, and potential impacts in your kitchen?
- Maintenance: How easy is it to clean and care for?
- Style: Does it complement your existing kitchen cabinets, countertops, and overall décor?
- Ease of Installation: Some materials are more forgiving for DIYers than others. Peel and stick backsplashes are generally the easiest.
How to Measure for Backsplash
Accurate measurements are crucial to ensure you buy the correct amount of material and avoid costly mistakes.
Steps for Measuring:
- Identify the Area: Clearly mark the boundaries of where you want the backsplash to go. This is typically the wall space between your countertops and upper cabinets.
- Measure Width: Measure the horizontal distance from one end of the countertop to the other. If you have outlets or switches, measure around them.
- Measure Height: Measure the vertical distance from the countertop surface up to the bottom of your upper cabinets or the desired end point of your backsplash.
- Account for Obstructions: Note the placement and size of outlets, switches, windows, and doors within the backsplash area. You’ll need to cut around these.
- Calculate Square Footage: Multiply your measured width by your measured height for each section. Add these areas together to get your total square footage.
- Add for Waste: Always add an extra 10-15% for cuts, mistakes, and potential future repairs. This is especially important for tile and patterned materials.
Example:
If your countertop is 10 feet long and the height to the cabinets is 18 inches:
* Width = 10 feet
* Height = 1.5 feet (18 inches / 12 inches/foot)
* Area = 10 ft * 1.5 ft = 15 square feet
* Add 15% waste: 15 sq ft * 1.15 = 17.25 square feet. You’d round up to buy approximately 18 square feet of material.
Gathering Your Backsplash Tools and Supplies
Having the right tools makes any DIY project smoother and more professional.
Essential Backsplash Tools
- Measuring Tape: For accurate measurements.
- Level: To ensure tiles are straight.
- Pencil: For marking.
- Utility Knife: For cutting and scoring.
- Putty Knife or Scraper: For removing old caulk or adhesive.
- Safety Glasses: To protect your eyes.
- Gloves: To protect your hands.
- Sponges: For cleaning.
- Drop Cloths or Old Sheets: To protect countertops and floors.
Tools for Tile Backsplashes
- Tile Saw (Wet Saw or Circular Saw with Tile Blade): For cutting ceramic, porcelain, or stone tiles. A wet saw is best for a cleaner cut.
- Tile Nippers: For small, precise cuts.
- Notched Trowel: To spread adhesive evenly. The notch size depends on the tile size.
- Grout Float: To apply and press backsplash grout into the gaps.
- Buckets: For water and grout.
- Tile Spacers: To maintain consistent gaps between tiles.
- Rubber Mallet: To gently tap tiles into place.
Supplies for Tile Backsplashes
- Tiles: Your chosen kitchen tile backsplash material.
- Tile Adhesive (Thin-set Mortar or Mastic): Choose based on tile type and location. Mastic is easier for DIYers on vertical surfaces, but thin-set is generally more durable.
- Grout: The material that fills the spaces between tiles.
- Grout Sealer: Recommended for porous grout to protect against stains.
- Caulk: For sealing edges and gaps where the backsplash meets countertops or cabinets.
- Painter’s Tape: To protect edges and create clean lines.
Supplies for Peel and Stick Backsplash
- Peel and Stick Tiles/Sheets: Your chosen material.
- Rubbing Alcohol or Degreaser: To clean the wall surface before application.
- Utility Knife or Scissors: For trimming edges.
- Straight Edge or Ruler: For precise cuts.
DIY Backsplash Installation Steps
The actual tiling a backsplash process involves several distinct stages, from preparation to the final touches.
Preparation is Key
This is perhaps the most critical step for a professional-looking result.
- Clean the Wall: Remove any grease, dirt, or old caulk from the wall area. A good degreaser is essential for proper adhesion, especially for peel and stick backsplash.
- Remove Outlet Covers: Unscrew and remove all outlet and switch plates.
- Protect Surfaces: Lay down drop cloths to protect your countertops and flooring. Use painter’s tape to mask off cabinets, countertops, and edges you don’t want to get adhesive or grout on.
- Dry Fit (Optional but Recommended): Lay out some tiles on the countertop to visualize the pattern and plan your starting point.
Tiling a Backsplash: The Process
Step 1: Laying Out the First Row
- Find the Center: For a balanced look, find the center point of your longest wall section.
- Use a Level: Draw a level horizontal line on the wall at the top edge of your first row of tiles. This line will guide your installation.
- Start Point: Often, it’s best to start in the middle and work your way out to the ends. This ensures that any cut tiles are on the outer edges, which are less noticeable. For subway tile backsplash, starting with a full tile in the center and working outwards is common.
Step 2: Applying Adhesive
- Use the Right Trowel: Select a notched trowel appropriate for your tile size. Smaller tiles need smaller notches.
- Spread Evenly: Apply a thin, even layer of tile adhesive to a small section of the wall (about 2-3 square feet at a time). Hold the trowel at a 45-degree angle to create consistent ridges. Don’t cover too much area, as the adhesive can dry out.
Step 3: Setting the Tiles
- Press Firmly: Place your first tile against the wall, pressing it firmly into the adhesive with a slight twist.
- Use Spacers: Insert tile spacers at the top and side of each tile to maintain a uniform gap for the backsplash grout.
- Work in Sections: Continue applying adhesive and setting tiles row by row, ensuring each tile is level and aligned with the spacers.
- Cutting Tiles: When you reach outlets, switches, or the end of a row, you’ll need to cut tiles. Measure carefully, mark the tile, and use your tile saw or nippers. Always wear safety glasses when cutting.
- Clean Excess Adhesive: Wipe away any excess adhesive that squeezes out with a damp sponge immediately.
Step 4: Letting the Adhesive Cure
- Follow Manufacturer Instructions: Allow the tile adhesive to cure completely according to the product’s instructions. This usually takes 24-48 hours. Do not grout before the adhesive is fully set.
Step 5: Grouting
- Remove Spacers: Once the adhesive is cured, carefully remove all tile spacers.
- Mix Grout: Mix your backsplash grout according to the package directions. It should have a consistency like peanut butter.
- Apply Grout: Use a grout float to spread the grout over the tiles, pressing it into the gaps. Work at an angle to the tile lines to ensure the grout fills the joints completely.
- Wipe Off Excess: Hold the grout float at a 45-degree angle and scrape off excess grout from the tile surfaces.
Step 6: Cleaning the Grout Haze
- First Cleaning: After about 15-30 minutes (check grout manufacturer’s instructions), use a damp (not wet) sponge to gently wipe the tile surfaces in a circular motion. Rinse the sponge frequently in a clean bucket of water. Avoid wiping too hard, which can pull grout out of the joints.
- Second Cleaning: After another hour or so, a slight haze may appear. Wipe it away with a clean, dry cloth or a slightly damp sponge.
Step 7: Sealing and Caulking
- Let Grout Cure: Allow the grout to cure fully (usually 48-72 hours) before applying sealer or caulk.
- Apply Grout Sealer: Use a brush or applicator to apply a grout sealer to the grout lines. This helps protect against stains and moisture. Wipe any excess sealer off the tiles immediately.
- Caulk Edges: Apply a bead of kitchen-appropriate caulk along the edges where the backsplash meets the countertop and cabinets. This seals the gap and prevents moisture from getting behind the tiles. Smooth the caulk with a wet finger or caulk tool for a clean finish.
Installing Peel and Stick Backsplash
This method is significantly simpler and faster.
- Prepare the Wall: Clean the wall thoroughly with a degreaser and ensure it’s completely dry.
- Measure and Cut: Measure your space and cut the peel and stick tiles or sheets to fit, accounting for outlets and edges. Use a sharp utility knife and a straight edge for clean cuts.
- Peel and Stick: Carefully peel off the backing of the first tile or sheet and align it with your starting point. Press it firmly onto the wall.
- Continue Application: Work your way across the wall, overlapping slightly if indicated by the product’s design, and pressing each piece down firmly.
- Trim Edges: Trim any excess material around outlets or the ends of cabinets with your utility knife.
Trendy Kitchen Backsplash Ideas
Beyond the practicalities, let’s explore some inspiring kitchen backsplash design trends.
Beyond the Subway Tile
While subway tile backsplash remains a beloved classic, many other styles are making waves.
- Large Format Tiles: Big tiles mean fewer grout lines, creating a sleek, modern, and easier-to-clean surface. Porcelain and stone-look tiles are popular choices.
- Geometric Patterns: Think hexagons, diamonds, chevrons, and intricate mosaics. These add a bold visual statement to your kitchen.
- Mixed Materials: Combining different materials, like a glass accent strip within a ceramic tile backsplash, adds depth and visual interest.
- Textured Tiles: Tiles with raised patterns, like wave effects or hammered metal looks, add tactile and visual dimension.
- Bold Colors and Finishes: Don’t shy away from vibrant colors or unique finishes like matte black, brushed gold, or iridescent glass.
- Backpainted Glass: A smooth, seamless surface that’s incredibly easy to clean and comes in a wide range of colors.
- Marble or Stone Look (Porcelain): Get the luxurious look of natural stone with the durability and lower maintenance of porcelain.
Design Considerations
- Countertop Complement: Your backsplash should enhance, not compete with, your countertops.
- Cabinet Style: Modern cabinets might suit sleek glass or large format tiles, while traditional cabinets pair well with classic subway tile or natural stone.
- Lighting: How will light reflect off your chosen material? Glossy finishes can brighten a space, while matte finishes offer a softer look.
- Grout Color: The color of your backsplash grout can dramatically change the look. White grout with white tiles creates a seamless look, while contrasting grout (like black grout with white tiles) makes the tile pattern pop.
Frequently Asked Questions (FAQ)
Q: How much backsplash do I need?
A: Measure the height and width of the area you want to cover and multiply them to get the square footage. Always add 10-15% extra for cuts and mistakes.
Q: Can I tile over an existing backsplash?
A: Sometimes. If the existing backsplash is smooth, flat, and well-adhered, you might be able to tile over it. However, for best results and longevity, it’s usually recommended to remove the old backsplash first.
Q: What is the easiest backsplash to install for a beginner?
A: Peel and stick backsplash options are generally the easiest for beginners. They require minimal tools and no grout. For tile, larger format tiles with simpler patterns or pre-cut mosaic sheets can also be more manageable than intricate mosaics.
Q: How far up the wall should the backsplash go?
A: Typically, a backsplash extends from the countertop up to the bottom of the upper cabinets. Some people extend it higher, to the ceiling, for a more dramatic look.
Q: Do I need to seal grout?
A: Yes, it is highly recommended to seal grout, especially in a kitchen environment where it’s exposed to grease, food splatters, and moisture. Sealing protects the grout from staining and makes it easier to clean.
Q: What kind of adhesive should I use for my kitchen tile backsplash?
A: For most wall applications, a tile mastic or a cement-based thin-set mortar is suitable. Mastic is often preferred by DIYers for vertical surfaces as it’s ready-mixed and easier to apply. Thin-set mortar is generally more durable and water-resistant, making it a good choice for areas prone to moisture. Always check the tile manufacturer’s recommendations.
Q: How do I cut tile around an electrical outlet?
A: This requires careful measurement. You’ll need to cut notches in your tiles to fit around the outlet box. A wet saw with a tile blade or a grinder with a diamond bit can be used. For smaller, more precise cuts, tile nippers can be effective. Always ensure the power is off to the outlet before starting.
Installing a kitchen backsplash is a rewarding DIY project that can significantly enhance your kitchen’s appearance. By following these steps, choosing the right materials, and taking your time, you can achieve a professional-looking finish that you’ll be proud of for years to come.