
Can you install a kitchen sink sprayer yourself? Yes, you can install a kitchen sink sprayer yourself with basic tools and a little patience. This guide will walk you through the entire process, from gathering your supplies to testing your new sprayer. Whether you need to replace an old kitchen sink sprayer or add one to your existing setup, these instructions will help you get the job done efficiently.
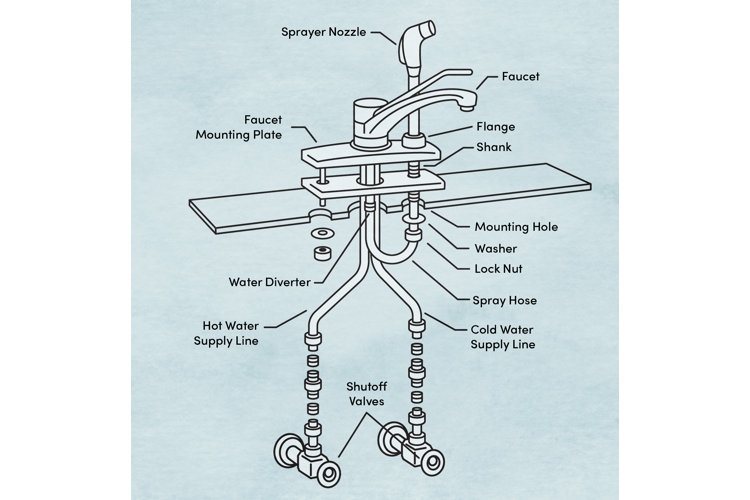
Image Source: assets.wfcdn.com
Getting Started: What You’ll Need
Before you dive into the installation, it’s crucial to have all the necessary kitchen sink sprayer parts and tools ready. This preparation will make the process smoother and prevent unnecessary trips to the hardware store.
Essential Tools
- Adjustable Wrench: This is your primary tool for tightening and loosening nuts and fittings.
- Plumber’s Tape (PTFE Tape): Used to seal threaded connections and prevent leaks.
- Bucket or Towels: To catch any residual water when disconnecting old lines.
- Screwdriver (Phillips and Flathead): May be needed for mounting the sprayer holder.
- Wire Brush (Optional): To clean threads on existing fittings if they are corroded.
- Safety Glasses: To protect your eyes from debris or water.
New Sprayer Kit Components
A typical new kitchen faucet sprayer installation kit will include:
- Sprayer Head: The part you hold and use to spray water.
- Sprayer Hose: The flexible tubing that connects the sprayer head to the faucet.
- Mounting Bracket/Holder: Where the sprayer head rests when not in use.
- Weight: Attaches to the hose to help retract the sprayer head.
- Connecting Nut/Fitting: To attach the hose to the faucet body.
- Gaskets/Washers: To ensure watertight seals.
Step 1: Preparing the Workspace and Turning Off the Water
Safety and cleanliness are paramount when working with plumbing.
Shutting Off the Water Supply
- Locate Shut-Off Valves: Look under your sink for two valves, usually connected to the hot and cold water supply lines that lead to your faucet. These are often small, oval-shaped knobs.
- Turn Off Valves: Turn both valves clockwise until they are snug. Do not overtighten.
- Test Water Flow: Turn on your faucet and let the water run until it stops. This empties the lines and relieves any remaining pressure. Check both hot and cold.
Clearing Under the Sink
- Remove everything from the cabinet under your sink. This provides ample working space and protects your stored items from water or dirt.
- Place towels or a bucket under the water supply connections to catch any drips.
Step 2: Disconnecting the Old Sprayer (If Applicable)
If you are replacing an existing sprayer, you’ll need to remove it first.
Detaching the Sprayer Hose
- Locate the Sprayer Connection: Follow the sprayer hose from the sprayer head down to where it connects to the faucet body or a dedicated port on the faucet.
- Use an Adjustable Wrench: Place the wrench on the nut connecting the sprayer hose to the faucet.
- Loosen the Nut: Turn the nut counter-clockwise to loosen it. Be prepared for a small amount of water to drain out.
- Remove the Sprayer Hose: Once the nut is free, pull the hose away from the faucet.
- Remove the Sprayer Head and Hose: Pull the sprayer head and hose up through the sink holes.
- Remove the Weight: If there’s a weight on the old hose, slide it off.
- Remove the Mounting Bracket: If your old sprayer had a separate mounting bracket, unscrew or unclip it from its position on the sink or countertop.
Step 3: Installing the New Sprayer Holder
The mounting bracket is where your new sprayer will live when not in use.
Attaching the Sprayer Holder
- Identify the Location: Most faucets are designed with a pre-drilled hole for a sprayer. If not, you’ll need to use one of the existing faucet holes or a dedicated sprayer hole. Many sprayers come with a separate holder that can be mounted on the sink deck or backsplash.
- Thread the Mounting Screw: If your holder has a screw that goes through from the underside, thread it through the hole from below the sink.
- Position the Holder: Place the mounting bracket on the top side of the sink deck or countertop, aligning it with the screw or mounting point.
- Secure the Holder:
- If using a screw from below: Hand-tighten the nut onto the screw from under the sink. Then, use an adjustable wrench to snug it up. Ensure the holder is straight before fully tightening.
- If the holder clips on or screws from the top: Follow the manufacturer’s specific instructions.
- Check for Stability: Make sure the holder is firmly in place and doesn’t wobble.
Step 4: Connecting the New Sprayer Hose to the Faucet
This is the core of the kitchen sink sprayer installation. Proper connection ensures no leaks.
How to Attach Sink Sprayer Hose
- Identify the Sprayer Outlet: On your faucet, locate the specific port where the sprayer hose connects. This is often a threaded nipple or a dedicated fitting.
- Prepare the Connection:
- On the Faucet Side: Ensure the threads on the faucet are clean. If they look corroded, gently clean them with a wire brush. Apply a few wraps of plumber’s tape clockwise around the threads.
- On the Sprayer Hose Side: The new sprayer hose usually has a fitting at one end. This end will connect to the faucet.
- Connect the Hose to the Faucet:
- Align the Threads: Carefully thread the hose fitting onto the faucet’s sprayer outlet.
- Hand-Tighten: Screw it in as tightly as you can by hand.
- Use an Adjustable Wrench: With the wrench, tighten the connection another quarter to half a turn. Do not overtighten, as this can damage the fittings or the hose. The goal is a snug fit that creates a good seal.
Connecting the Sprayer Head to the Hose
- Prepare the Hose End: Ensure the end of the sprayer hose that connects to the sprayer head is clean.
- Attach the Sprayer Head: Thread the sprayer head onto the other end of the hose. Again, hand-tighten first.
- Final Tightening: Use an adjustable wrench to tighten the connection slightly, typically another quarter turn. Be careful not to overtighten.
Step 5: Attaching the Sprayer Hose Weight
The weight is crucial for ensuring the sprayer head retracts smoothly.
Positioning the Sprayer Hose Weight
- Locate the Sprayer Hose: Find the flexible hose running from the faucet to the sprayer head.
- Determine the Optimal Position: Look for a mark or guideline on the hose, or test the retraction by holding the sprayer head in its holder and letting the hose hang freely. The weight should be positioned so that when the sprayer head is in its holder, the hose has enough slack to move freely but not so much that it kinks or rests on the cabinet floor. Typically, it’s placed a few inches below the faucet body.
- Install the Weight: Many weights are designed to clip or screw onto the hose. Some may require a small screwdriver to tighten a set screw.
- Clip-on Weights: Simply snap them into place.
- Screw-on Weights: Position the weight and tighten the screw to secure it to the hose.
Step 6: Testing for Leaks and Functionality
This is a critical step to ensure your kitchen faucet sprayer installation was successful.
Checking Connections
- Turn On the Water Supply: Slowly turn the hot and cold water shut-off valves back on (counter-clockwise).
- Inspect All Connections: Carefully examine the sink sprayer connection points at the faucet and where the hose meets the sprayer head. Look for any drips or moisture.
- Run Water Through the Faucet: Turn on the main faucet handle. Let water run for a minute.
- Test the Sprayer:
- Pull the sprayer head out of its holder.
- Press the trigger or button on the sprayer head to activate the spray.
- Check for leaks around the sprayer head and hose connections again while the water is running and pressurized.
- Turn off the faucet.
- Allow the sprayer head to retract back into its holder. Ensure the weight is pulling it back correctly without snagging.
Addressing Minor Leaks
If you notice a small drip from a connection, try tightening it slightly (about an eighth of a turn) with the adjustable wrench. If the leak persists, you may need to:
- Turn off the water supply again.
- Disconnect the fitting.
- Reapply plumber’s tape to the threads.
- Reconnect and tighten securely.
Troubleshooting Sink Sprayer Installation
Even with the best preparation, sometimes issues arise. Here are common problems and solutions for troubleshooting sink sprayer installation:
Problem: Sprayer Hose Leaks at Faucet Connection
- Cause: Loose connection, damaged threads, or missing/damaged gasket.
- Solution:
- Tighten the connection slightly.
- Disconnect, inspect threads for damage, and reapply plumber’s tape.
- Ensure the gasket is properly seated or replace it if it looks worn.
Problem: Sprayer Head Leaks When Water is On
- Cause: Loose connection at the sprayer head, or a faulty sprayer head or hose.
- Solution:
- Tighten the connection between the hose and the sprayer head.
- If it still leaks, the sprayer head itself might be defective. Consider replacing the sprayer head or the entire hose assembly.
Problem: Sprayer Head Doesn’t Retract Properly
- Cause: Weight is in the wrong position, hose is kinked, or the sprayer holder is too tight.
- Solution:
- Adjust the position of the sprayer hose weight. Experiment with slightly higher or lower placement.
- Ensure the hose is not kinked under the sink. Reroute if necessary.
- Loosen the sprayer holder slightly if it’s too restrictive on the hose.
Problem: No Water Comes Out of the Sprayer
- Cause: Blockage in the hose or sprayer head, or the diverter valve within the faucet isn’t working correctly.
- Solution:
- Check for blockages in the sprayer head screen. Unscrew it and clean it.
- If the faucet has a separate diverter, ensure it’s functioning. Sometimes, debris can get caught there. You might need to consult your faucet’s manual to locate and clean the diverter.
- Ensure the water supply lines are fully open.
Problem: Water Sprays Weakly or Unevenly
- Cause: Clogged aerator or sprayer head, or low water pressure.
- Solution:
- Clean the sprayer head screen (as mentioned above).
- Check the main faucet aerator for clogs.
- If you suspect low water pressure, test your main water supply.
Maintaining Your New Sink Sprayer
Proper maintenance will prolong the life of your new sink sprayer parts.
- Regular Cleaning: Wipe down the sprayer head and hose regularly to prevent mineral buildup. A mixture of vinegar and water can help dissolve deposits.
- Check for Leaks Periodically: Make it a habit to look for any signs of leaks under the sink.
- Test Retraction: Ensure the weight is still allowing smooth retraction.
Frequently Asked Questions (FAQ)
Q1: Do I need a special faucet to install a sink sprayer?
- A1: Most modern kitchen faucets are designed to accommodate a sprayer. They usually have an extra threaded port or are designed to have a sprayer installed in one of the faucet holes. Some older faucets may not have this provision, and you might need to replace the faucet.
Q2: How tight should I make the connections?
- A2: Hand-tighten all connections first, then use a wrench for a final quarter to half-turn. Overtightening can damage threads or crack fittings, leading to leaks. It’s better to tighten a bit more if you detect a leak than to overtighten initially.
Q3: Can I replace just the sprayer hose or just the sprayer head?
- A3: Yes, often you can purchase replacement sprayer heads or hoses separately. Ensure the threading size matches your existing faucet connection. If your old hose is leaking but the sprayer head is fine, replacing just the hose is a cost-effective solution. Similarly, if the sprayer head is clogged or damaged, you can buy a new one to connect sprayer to faucet.
Q4: What if my new sprayer doesn’t have a weight, or the old one doesn’t fit?
- A4: You can purchase universal sprayer hose weights at most hardware stores. They are designed to clip onto standard sprayer hoses. Make sure to position it correctly for optimal retraction.
Q5: My faucet has three holes, but my new faucet has only one. Can I still install a sprayer?
- A5: If your new faucet has only one hole and is designed for a sprayer, the sprayer will likely come with its own holder that mounts on the sink deck. If your faucet has three holes and is not designed for a sprayer, you might need to use an existing hole for the sprayer and cover the unused holes with decorative caps.
By following these detailed steps, you can confidently install or replace a kitchen sink sprayer, adding convenience and functionality to your kitchen. Remember to always prioritize safety and double-check your work to prevent leaks.