
What is the most important thing to measure when replacing a kitchen sink? The most crucial measurement is the sink cutout size of your existing countertop. Getting this right ensures your new sink will fit seamlessly into your current kitchen setup, preventing costly adjustments or the need for a new countertop.
When it comes to a kitchen remodel or simply replacing an old fixture, knowing how to measure a kitchen sink is essential. This guide will walk you through the entire process, from understanding basic sink dimensions to taking precise measurements for different sink types. Whether you’re dealing with an undermount sink measurements or a drop-in sink measurements, accuracy is key for a smooth kitchen sink installation. We’ll also touch upon standard kitchen sink sizes to help you visualize what’s common.
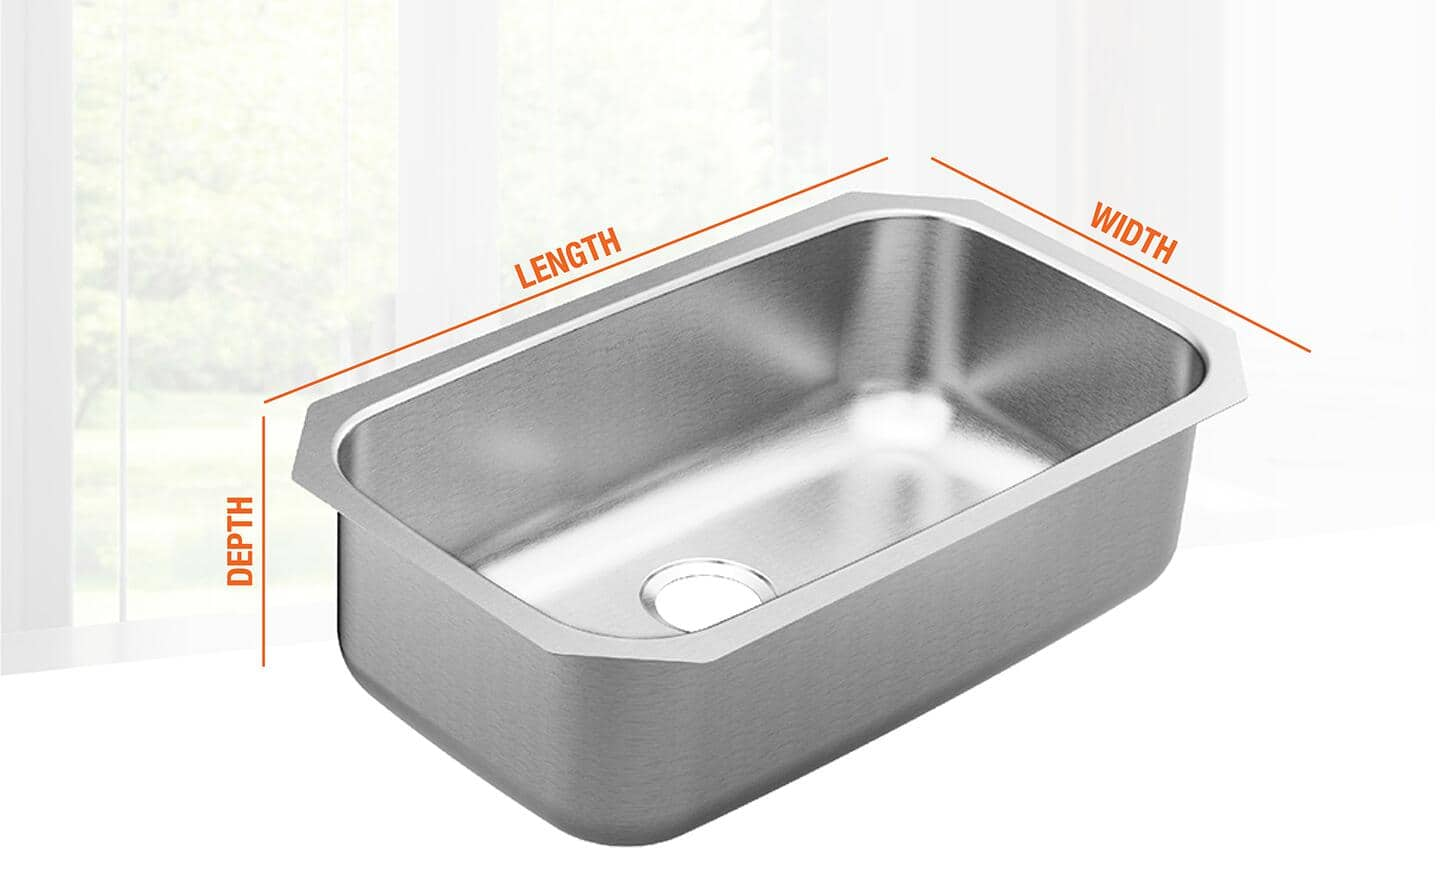
Image Source: dam.thdstatic.com
Why Precise Sink Measurements Matter
You might be wondering why such meticulousness is required for a simple sink. Well, a kitchen sink isn’t just a place to wash dishes; it’s a central feature of your kitchen.
- Fit and Functionality: An incorrectly measured sink won’t fit the existing countertop opening. This can lead to gaps, leaks, and an unsightly appearance. It can also affect how well your faucet and drain lines connect.
- Aesthetic Harmony: A sink that’s too large or too small can throw off the entire balance of your kitchen design. It might look awkward or feel cramped.
- Cost Savings: Having to order a new countertop or hire extra labor to modify an existing one due to incorrect measurements can add significant expense to your project.
- Ease of Installation: When you have accurate sink dimensions, the installation process becomes much simpler and faster. You’ll know exactly what to expect and what will fit.
This sink measurement guide is designed to empower you to make informed decisions and avoid common pitfalls.
Gathering Your Tools
Before you start measuring, gather a few basic tools. These will help ensure your sink dimensions are accurate.
- Tape Measure: A sturdy metal tape measure is best. Ensure it has clear markings in both inches and centimeters.
- Pen and Paper (or a digital note-taking app): To record your measurements carefully.
- Safety Glasses: Always protect your eyes, especially when working under a sink.
- A Helper (Optional but Recommended): Especially for larger sinks or awkward spaces, an extra pair of hands can make the job much easier and safer.
Measuring Your Existing Sink: The First Step
If you’re replacing an existing sink, measuring what’s already there is your starting point. This tells you what needs to fit into your current countertop space.
Step 1: Measure the Overall Sink Dimensions
This involves measuring the sink’s outer edges.
h4: Measuring Sink Length and Width
- Sink Length: This is the longest dimension of the sink basin.
- Sink Width: This is the shorter dimension of the sink basin.
- For Drop-In Sinks: Measure from the outer edge of the sink lip on one side to the outer edge of the lip on the opposite side.
- For Undermount Sinks: Measure from the outer edge of the sink where it meets the underside of the countertop to the opposite outer edge. You’ll typically need to get under the sink for this measurement.
h4: Measuring Sink Depth
The sink depth is crucial for ensuring clearance and proper plumbing connections.
- Place your tape measure across the top of the sink opening.
- Measure from the countertop surface down to the bottom of the sink basin.
- Do this for the deepest part of each basin if you have a multi-bowl sink.
Step 2: Measure the Countertop Opening (The Cutout Size)
This is arguably the MOST critical measurement. The sink cutout size is the hole in your countertop where the sink is installed.
h4: How to Measure the Countertop Cutout
- Locate the Edges: Carefully feel for the edges of the hole in your countertop. For drop-in sinks, you’ll feel the lip of the sink covering the edge. For undermount sinks, the edge of the hole is typically flush with the underside of the countertop.
- Measure Length: Measure the distance from one edge of the countertop opening to the other along the longest dimension.
- Measure Width: Measure the distance from one edge of the countertop opening to the other along the shorter dimension.
- Check for Squareness: Ensure the opening is as square as possible. Measure diagonally from corner to corner in both directions. The measurements should be very close. Any significant difference might indicate an issue with the countertop itself.
Important Note for Drop-In Sinks: When measuring the cutout for a drop-in sink, you are measuring the actual hole underneath the sink’s rim. The rim will overlap this opening. The sink’s advertised dimensions will include the rim.
Important Note for Undermount Sinks: For undermount sinks, the cutout is usually slightly larger than the sink’s outer dimensions to allow for mounting clips and a clean seal. It’s often best to consult the manufacturer’s specifications for the exact cutout dimensions if possible. If not, measure the existing opening very carefully.
Step 3: Consider Faucet Hole Placement
Think about where your faucet is mounted.
- On the Sink: Many sinks have pre-drilled holes for faucets. Note the number and spacing of these holes.
- On the Countertop: Some installations have the faucet mounted directly to the countertop. Measure the distance between any existing faucet holes on the countertop.
Measuring for a New Sink: What to Look For
When you’re ready to buy a new sink, you’ll see various dimensions listed by manufacturers. Here’s how they relate to your measurements:
h3: Understanding Sink Specifications
- Overall Dimensions (Length x Width): This refers to the outer dimensions of the sink itself, including any rims or edges.
- Bowl Dimensions (Length x Width x Depth): These are the internal measurements of the sink basin(s).
- Cabinet Size Recommendation: Manufacturers often suggest a minimum cabinet size that the sink will fit into. This is related to, but not the same as, the countertop cutout.
h3: Matching New Sink Dimensions to Your Space
h4: Drop-In Sink Measurements
For a drop-in sink measurements, the critical factor is the sink cutout size.
- Rule of Thumb: The cutout size of your countertop should be slightly smaller than the outer dimensions of the new drop-in sink. The rim of the drop-in sink will cover this opening.
- Example: If your countertop cutout is 30 inches x 18 inches, you’ll look for a drop-in sink with outer dimensions slightly larger, perhaps 31 inches x 19 inches, ensuring the rim provides sufficient overlap (typically 1-2 inches on all sides).
h4: Undermount Sink Measurements
Undermount sink measurements require a different approach to the countertop opening.
- Rule of Thumb: The countertop cutout for an undermount sink is typically designed to be the same size or slightly smaller than the sink’s outer dimensions. This allows the sink to hang securely from the countertop.
- Critical Consideration: The lip or flange of the undermount sink needs to sit flush against the underside of the countertop. You must ensure there’s enough clearance for the sink to be mounted securely.
- Manufacturer’s Template: Most undermount sinks come with a template. Use this template to mark and cut the countertop opening precisely. If you don’t have the template, you’ll need to measure the sink’s outer dimensions accurately and subtract a small amount (usually 1/4 inch to 1/2 inch) for the mounting clips and seal. It’s often best to add the sink to the cart first, then use its exact dimensions to create your template.
h3: Standard Kitchen Sink Sizes
While custom sizes exist, there are common standard kitchen sink sizes that fit most pre-cut countertops.
- Single Bowl Sinks: These can range from 20-30 inches in length and 16-22 inches in width.
- Double Bowl Sinks: These are typically longer, ranging from 30-48 inches in length, and similar in width (16-22 inches). The depth of bowls can vary, but 7-10 inches is common.
Knowing these standard kitchen sink sizes can give you a general idea, but always measure your specific space.
Measuring for Different Sink Materials and Styles
The material and style of your sink can sometimes influence the best way to measure or what to look for.
h4: Stainless Steel Sinks
Stainless steel sinks are very common. Their rigidity means they hold their shape well. Measurements are usually straightforward. Pay attention to the thickness of the stainless steel, as this can affect how it sits in certain mounting systems.
h4: Fireclay and Ceramic Sinks
These sinks can be heavier and sometimes have slight variations in their exact dimensions due to the firing process. Always double-check the actual dimensions of the sink you plan to purchase against the manufacturer’s specifications.
h4: Composite Sinks
Composite sinks, made from materials like granite or quartz dust, are durable. Their dimensions are usually very precise.
h4: Farmhouse/Apron Front Sinks
These sinks have a distinctive exposed front panel.
- Measurement Focus: For farmhouse sinks, you’ll need to measure the width of the cabinet opening where the apron front will sit. You also need to consider the sink depth and the depth of the cabinet itself, as these sinks can be quite deep and require specific cabinet modifications.
- Countertop Cutout: The cutout for a farmhouse sink is typically along the back edge and the sides where the sink meets the countertop. Measure this opening carefully, ensuring there’s enough space for the sink’s body and any mounting hardware.
Measuring for a New Kitchen Sink Installation
Once you have your measurements, you’re ready to select a new sink. Here’s how to make sure your choice aligns with your space.
h3: Selecting the Right Sink
- Compare to Cutout: Your primary comparison is the new sink’s outer dimensions (or template for undermount) against your countertop’s sink cutout size.
- Faucet Hole Compatibility: Ensure the new sink has the correct number and spacing of faucet holes if you’re mounting the faucet on the sink itself.
- Drain and Strainer Compatibility: Check that the drain hole size is standard (usually 3.5 inches) and compatible with your existing plumbing, garbage disposal, or strainer.
h3: Ensuring Proper Clearance and Fit
- Cabinet Space: While not directly a sink measurement, ensure the new sink will fit within your existing cabinet base. Manufacturers provide recommended cabinet sizes for their sinks.
- Plumbing Access: Once the sink is in place, will you have enough room to connect the drain, faucet supply lines, and any other plumbing fixtures? Consider the sink depth and how it might affect access.
- Backsplash Clearance: For drop-in sinks, ensure there’s enough space between the back edge of the sink and the backsplash.
Advanced Measurement Tips and Considerations
To further refine your measurements and ensure a perfect fit, consider these advanced tips.
h4: Measuring When Countertops Are Not Yet Installed
If you’re building a new kitchen or replacing countertops simultaneously, you have more flexibility.
- Template is King: For undermount sinks, always use the manufacturer’s provided template. This is the most accurate way to ensure the cutout is perfect for that specific sink.
- Work with Your Cabinetry: Measure the dimensions of the cabinet that will house the sink. This will dictate the maximum outer dimensions of your sink.
h4: Dealing with Irregularly Shaped Openings
If your current countertop opening isn’t perfectly square or rectangular, this adds complexity.
- Multiple Measurements: Measure the length and width at several points along the opening.
- Draw a Diagram: Sketch the opening and mark all your measurements. This helps visualize the space.
- Consult a Professional: For significantly irregular openings, it’s highly recommended to consult with a countertop fabricator or plumber. They can advise on the best way to fit a new sink or if countertop modifications are necessary.
h4: Rim Overlap for Drop-In Sinks
The rim of a drop-in sink is designed to cover the edge of the countertop cutout.
- Calculate Required Overlap: Ensure the new sink’s rim will overlap the countertop opening by at least 1 to 2 inches on all sides. This provides a secure fit and covers any minor imperfections in the cutout.
- Example: If your cutout is 29″ x 17″, and the sink outer dimensions are 31″ x 19″, you have a 1-inch overlap on each side (31-29 = 2 inches total, 1 inch per side; 19-17 = 2 inches total, 1 inch per side).
h4: Undermount Sink Mounting Clearance
For undermount sinks, the mounting hardware (clips) needs space to attach to the underside of the countertop.
- Check Manufacturer Specs: Always refer to the sink manufacturer’s instructions regarding the required clearance for mounting clips.
- Measure Underside: If possible, inspect the underside of your countertop to ensure there are no obstructions that would prevent mounting clips from being installed correctly.
Common Mistakes to Avoid
Even with the best intentions, measurement errors can happen. Here are common pitfalls to steer clear of:
- Only Measuring the Visible Part: For drop-in sinks, don’t just measure the basin. You need the outer lip dimensions. For undermount, you must measure the cutout beneath the countertop.
- Ignoring the Template: If your undermount sink comes with a template, use it. It’s designed for that specific sink.
- Assuming Standard Sizes: While there are standard kitchen sink sizes, your kitchen might have a custom cutout or an older, non-standard sink. Always measure your actual space.
- Not Measuring Depth: Sink depth is crucial for clearance with plumbing, disposals, and even how much water it can hold.
- Forgetting Faucet Holes: Mismatched faucet hole configurations can lead to needing a new faucet or a sink that won’t work with your desired setup.
- Measuring in Inches Only (or Metric Only): Be consistent with your units. If a sink is specified in inches, measure in inches.
Frequently Asked Questions (FAQ)
Q1: Can I install a larger sink if my current one is smaller?
A1: You can install a larger sink, but only if the new sink’s outer dimensions do not exceed the existing countertop cutout by too much. For drop-in sinks, you’ll need sufficient rim overlap. For undermount sinks, the countertop cutout will need to be modified to accommodate the larger sink’s dimensions, which often requires professional work.
Q2: How much bigger should my countertop cutout be for an undermount sink?
A2: Generally, the countertop cutout for an undermount sink is the same size as the sink’s main body, but slightly smaller than the sink’s overall outer dimensions to allow for mounting clips. Check the manufacturer’s template or specifications for the precise cutout size.
Q3: Do I need to measure the sink bowl or the outer dimensions?
A3: For most purposes, you need to measure the outer dimensions of the sink, especially the rim for drop-in sinks, and the overall footprint for undermount sinks. These dictate how the sink fits into the countertop. However, bowl dimensions are important for knowing how much usable space you have for washing dishes.
Q4: What if my countertop is laminate vs. granite? Does it change how I measure?
A4: The method of measurement remains the same. However, the ease of modifying the cutout varies. Laminate countertops are more difficult to modify precisely for undermount sinks. Granite and other solid surface countertops are more forgiving and are typically the preferred material for undermount sinks.
Q5: How do I measure a corner sink?
A5: Corner sinks are measured differently as they fit into a corner. You’ll typically measure the diagonal distance across the front of the sink and the dimensions from the corner to the edges of the sink. It’s best to refer to the specific sink’s template or installation guide.
By carefully following these steps and paying close attention to your sink dimensions, you can confidently measure your kitchen sink and select a replacement that fits perfectly, ensuring a successful kitchen sink installation. Happy remodeling!