
Can you paint kitchen cabinets yourself? Yes, you absolutely can! With the right preparation, tools, and techniques, achieving a professional-looking finish on your kitchen cabinets is within reach. This guide will walk you through everything you need to know for successful cabinet refinishing.
Painting your kitchen cabinets is a fantastic way to update your kitchen without a complete renovation. It’s a cost-effective way to refresh your space and can significantly boost your home’s aesthetic appeal. But to get that smooth, durable finish you see in magazines, careful planning and execution are key. We’ll cover all the essential steps, from initial cleaning to the final coat, ensuring you achieve a beautiful and lasting result.
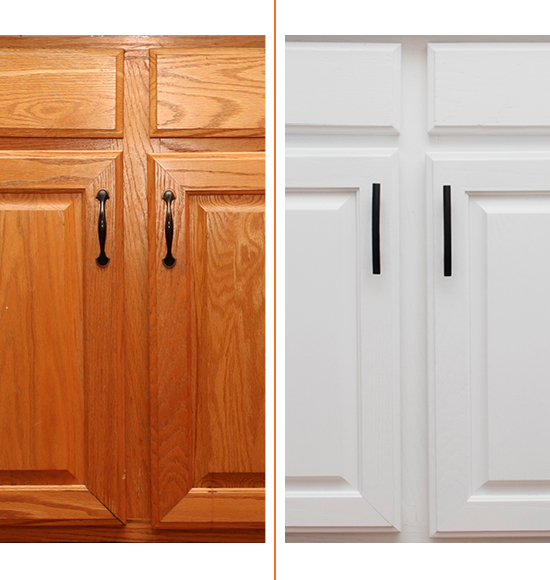
Image Source: www.nhance.com
Deciphering the Prep Work: The Foundation of a Flawless Finish
The secret to professional cabinet painting lies in the prep work. Skipping or rushing these steps is the most common mistake DIYers make, leading to a subpar finish that peels or chips prematurely. Think of it as building a strong foundation for a house; without it, nothing else will stand the test of time.
Thorough Cleaning: Removing the Grime
Before any sanding or priming can happen, your cabinets need to be immaculately clean. Kitchen cabinets are constantly exposed to grease, food splatters, and general household grime. This buildup can prevent paint from adhering properly.
Cabinet painting prep starts with a deep clean.
What to Use for Cleaning:
- Degreaser: A good quality kitchen degreaser is essential. Look for one specifically designed for kitchen use.
- Warm Water: Helps to loosen grime.
- Clean Cloths or Sponges: You’ll need several to wipe down and rinse.
- Mild Dish Soap: Can be used in conjunction with a degreaser for extra cleaning power.
Step-by-step cleaning process:
- Remove Cabinet Hardware: Before you start cleaning, remove all cabinet hardware removal including knobs, pulls, and hinges. Store them in a safe place, perhaps in a labeled bag.
- Apply Degreaser: Mix your degreaser with warm water according to the product instructions.
- Wipe Down Surfaces: Using a clean cloth or sponge, wipe down every surface of your cabinets, doors, and drawers. Work in sections and rinse your cloth frequently.
- Rinse Thoroughly: After degreasing, go over all surfaces again with a clean cloth dampened with plain water to remove any degreaser residue. Residue can also affect paint adhesion.
- Dry Completely: Allow all surfaces to dry thoroughly before proceeding. You can use a dry cloth or let them air dry.
Sanding for Smoothness: Creating Tooth for Adhesion
Sanding is crucial for creating a surface that the primer and paint can grip onto. Even if your cabinets are already painted or have a smooth finish, a light sanding will create the necessary “tooth” for the new paint to adhere to.
Sanding Tools and Materials:
- Medium-Grit Sandpaper (100-150 grit): For initial scuff sanding.
- Fine-Grit Sandpaper (220 grit): For smoothing after the initial sanding.
- Sanding Sponge: Great for getting into corners and curved areas.
- Orbital Sander (Optional): For large, flat surfaces if you have many cabinets.
- Tack Cloth: Essential for removing fine dust after sanding.
Sanding approach for cabinet painting:
- Scuff Sand: Lightly sand all cabinet surfaces with medium-grit sandpaper. The goal isn’t to remove the existing finish, but to dull the sheen and create a slightly rough texture.
- Smooth with Fine Grit: Follow up with fine-grit sandpaper to smooth out any rough spots or sanding marks from the medium grit.
- Clean Up Dust: This is where the tack cloth comes in. Gently wipe down all surfaces to pick up every speck of dust. Dust left behind will show up in your paint finish.
Filling Imperfections: Perfecting the Surface
Before you even think about primer, take a close look at your cabinets for any dings, dents, or scratches. Filling these now will result in a much smoother, more professional final look.
Filling Materials:
- Wood Filler or Bondo (for larger repairs): Choose a product that dries hard and can be sanded smooth.
- Putty Knife: For applying the filler.
- Fine-Grit Sandpaper (220 grit): For smoothing the dried filler.
Process for filling:
- Apply Filler: Apply a small amount of wood filler to any imperfections with a putty knife. Overfill slightly, as it will shrink as it dries.
- Let it Dry: Allow the filler to dry completely according to the manufacturer’s instructions.
- Sand Smooth: Once dry, sand the filled areas flush with the surrounding surface using fine-grit sandpaper.
- Clean Dust: Again, use a tack cloth to remove all sanding dust.
Selecting the Right Cabinet Paint Types and Finishes
Choosing the right cabinet paint types and cabinet paint finishes is as important as the preparation. Not all paints are created equal, and the wrong choice can lead to a finish that’s not durable or doesn’t look the way you envisioned.
Cabinet Paint Types: Durability and Adhesion
For cabinets, you need a paint that is durable, washable, and adheres well to the surface.
Recommended Cabinet Paint Types:
- Alkyd (Oil-Based) Enamels:
- Pros: Very durable, smooth, and hard finish; excellent adhesion.
- Cons: Strong odor, requires mineral spirits for cleanup, longer drying times, tends to yellow over time, especially in lighter colors.
- Water-Based (Latex/Acrylic) Enamels:
- Pros: Low odor, easy cleanup with soap and water, fast drying times, flexible (less prone to cracking), excellent color retention.
- Cons: Can be less durable than oil-based if not formulated for cabinets; requires a high-quality product.
- Best Choice: High-quality acrylic enamel specifically formulated for cabinets or trim is generally the best all-around choice for DIYers. Look for terms like “cabinet paint,” “enamel,” or “topcoat.”
Cabinet Paint Finishes: The Look and Feel
The sheen of the paint affects both the look and the durability.
Common Cabinet Paint Finishes:
| Finish | Sheen Level | Durability | Washability | Appearance | Best For |
|---|---|---|---|---|---|
| Flat | Very low | Low | Low | No shine, hides imperfections well. | Walls, areas not subject to heavy wear. |
| Eggshell | Low | Medium | Medium | Slight sheen, good for hiding minor imperfections. | Low-traffic areas, subtle sheen. |
| Satin | Medium | High | High | Smooth, velvety appearance; most popular choice. | All cabinet surfaces; balances durability and look. |
| Semi-Gloss | High | Very High | Very High | Reflective, highlights imperfections. | High-traffic areas, modern look; requires perfect surface. |
| High-Gloss | Very High | Highest | Highest | Mirror-like finish; shows every imperfection. | Modern, sleek look; requires professional application. |
Pro Tip: Satin or semi-gloss finishes are generally recommended for kitchen cabinets because they offer the best balance of durability, washability, and a pleasing aesthetic.
The Crucial Role of Cabinet Primer
Just like with walls, primer is a non-negotiable step when painting cabinets. It acts as a bridge between the cabinet surface and your topcoat, ensuring better adhesion, a more uniform color, and improved durability.
Why Use Cabinet Primer?
- Adhesion: Helps the paint stick to the cabinet surface, especially important on slick or previously finished surfaces.
- Blocking Stains: Prevents tannins or stains from the wood (like knots or wood grain) from bleeding through the new paint.
- Uniform Color: Creates an even base color, so your topcoat appears truer and requires fewer coats.
- Improved Durability: Contributes to a longer-lasting finish.
Selecting the Best Cabinet Primer:
- Stain-Blocking Primers: Essential if you’re painting over dark wood or a dark finish, or if you have wood with prominent knots. Look for primers containing shellac or a good quality oil-based formula.
- Water-Based Primers: High-quality acrylic or latex primers can work well, especially if you are using a water-based topcoat and have done excellent prep.
- Tinted Primer: Sometimes, tinting your primer to match your topcoat can help achieve better coverage with fewer coats of paint.
How to apply cabinet primer:
Apply primer in thin, even coats, just like you will with your paint. Allow each coat to dry completely according to the manufacturer’s instructions. Lightly sand with fine-grit sandpaper (220 grit) between coats if needed, and always remove dust with a tack cloth.
Mastering Cabinet Painting Techniques: Brush, Roller, or Sprayer?
The method you choose for applying paint significantly impacts the final result. Each has its pros and cons.
Brush and Roller: The DIYer’s Toolkit
This is the most common method for homeowners tackling cabinet painting.
Cabinet Painting Techniques: Brush and Roller
- Cabinet Door Painting (Off the Cabinet): This is highly recommended for a superior finish. Remove doors and drawers from their boxes. Lay them flat on a protected surface (drop cloths, painter’s pyramids, or 2x4s to lift them off the surface).
- Brush Application:
- Use a high-quality synthetic brush for water-based paints or a natural bristle brush for oil-based paints.
- Use thin, even strokes. Avoid over-brushing, which can leave marks.
- Work in one direction, typically with the grain of the wood.
- Roller Application:
- Use a high-density foam roller or a fine-nap mohair roller for a smooth finish. Avoid thick, fuzzy rollers that leave a stippled texture.
- Load the roller evenly but don’t overload it.
- Roll in a consistent direction.
- Use the brush to “back-brush” or “back-roll” any areas rolled to smooth out any roller marks. This means lightly going over the rolled area with a brush.
Cabinet Spraying: The Professional’s Choice
Cabinet spraying offers the smoothest, most professional-looking finish but requires specialized equipment and more significant prep.
Cabinet Spraying Considerations:
- Equipment: You’ll need a paint sprayer (HVLP – High Volume Low Pressure is often recommended for finer finishes), proper ventilation, and a spray booth or well-protected area.
- Prep: This is paramount. You must mask off everything you don’t want painted – walls, floors, countertops, appliances. Use painter’s tape and plastic sheeting meticulously.
- Paint Consistency: Paint often needs to be thinned to spray properly. Follow the paint and sprayer manufacturer’s recommendations.
- Technique: Maintain a consistent distance from the surface and move your arm smoothly at a steady speed. Overlap each pass by about 50%.
- Practice: It’s highly recommended to practice on scrap wood before spraying your cabinets.
Pros of Spraying:
- Achieves the smoothest, factory-like finish.
- Faster application for large projects.
- Less chance of brush or roller marks.
Cons of Spraying:
- Requires specialized equipment.
- More extensive masking and prep.
- Involves overspray and potential respiratory hazards if not done correctly with ventilation and a respirator.
Essential Cabinet Painting Supplies: What You’ll Need
Having the right cabinet painting supplies makes the entire process smoother and more effective.
Checklist of Cabinet Painting Supplies:
- Paint and Primer: High-quality enamel paint and a suitable primer.
- Brushes: Angled sash brushes (1.5″ or 2″) for detail work.
- Rollers: High-density foam rollers or fine-nap mohair rollers.
- Roller Trays and Liners: For easy cleanup.
- Sanding Tools: Sandpaper (100-150 grit, 220 grit), sanding sponges, orbital sander (optional).
- Cleaning Supplies: Degreaser, mild soap, clean cloths, bucket.
- Tack Cloths: For dust removal.
- Painter’s Tape: For masking edges and hardware holes.
- Drop Cloths: For protecting floors and surfaces.
- Plastic Sheeting: For larger areas or when spraying.
- Wood Filler and Putty Knife: For repairs.
- Screwdrivers: For cabinet hardware removal.
- Paint Stirrers: To ensure paint is well mixed.
- Stir Sticks or Small Paint Can: For dipping brushes/rollers without contaminating the main can.
- Work Surface: Painter’s pyramids, sawhorses, or scrap wood to elevate cabinet doors.
- Safety Gear: Gloves, safety glasses, dust mask or respirator (especially if spraying or sanding).
- Latex Gloves: For handling paint and keeping hands clean.
The Application Process: Putting It All Together
Once your prep is complete and you have all your supplies, it’s time to apply the primer and paint.
Applying Primer: The First Layer
- Stir, Don’t Shake: Stir your primer gently to mix it. Shaking can introduce air bubbles.
- Apply Thin, Even Coats: Whether brushing or rolling, apply thin, even coats. Avoid puddling or drips.
- Work in Sections: Prime one cabinet box or a few doors at a time.
- Allow Drying Time: Let the primer dry completely. Check the manufacturer’s instructions for recoat times.
- Light Sanding (Optional but Recommended): After the primer is dry, lightly scuff sand with 220-grit sandpaper if you see any imperfections or rough spots. Wipe with a tack cloth.
Applying Paint: The Color Transformation
You will apply your chosen cabinet paint types in thin, even coats.
Cabinet Painting Techniques: Applying Paint
- Stir Paint: Stir your paint thoroughly. If using multiple cans of the same color, mix them together in a larger bucket to ensure color consistency.
- Door Painting:
- Edges First: Start by brushing the edges and any detailed areas of the cabinet doors.
- Flat Surfaces: Use a roller or brush to apply thin, even coats to the flat surfaces. Aim for a consistent sheen.
- Back-Brush/Roll: If using a roller, lightly back-brush to smooth out any texture.
- Drying: Let the first coat dry completely.
- Cabinet Boxes:
- Use your brush and roller for the cabinet frames. Be careful not to overload your brush, which can lead to drips.
- For the inside of the cabinet boxes, you can use a smaller roller or brush.
- Multiple Coats: Most projects will require at least two coats of paint for full coverage and durability. Some darker colors or significant color changes might need three.
- Drying Between Coats: Allow each coat of paint to dry thoroughly according to the manufacturer’s recommendations before applying the next. This is critical for adhesion and preventing peeling.
- Light Sanding Between Coats (Optional): For an ultra-smooth finish, you can lightly scuff sand with 220-grit sandpaper between coats and wipe with a tack cloth. This knocks down any subtle imperfections or dust nibs.
Reattaching Hardware and Doors
Once the final coat of paint is dry (allow at least 24-48 hours for full curing, though it may feel dry to the touch sooner), you can reattach the cabinet hardware and doors.
- Handle with Care: Be careful not to scratch the new paint when reattaching hardware.
- Align Doors: Ensure doors are properly aligned before tightening screws.
- Clean Up: Remove all painter’s tape and plastic sheeting.
Achieving Different Cabinet Paint Finishes
The way you apply your paint can influence the final cabinet paint finishes.
Smooth and Flawless: The Ideal Finish
To achieve this:
- Thin Coats: Apply multiple thin coats rather than one thick coat.
- Quality Tools: Use high-quality brushes and rollers.
- Proper Technique: Use consistent strokes and avoid overworking the paint.
- Spraying: The ultimate method for a completely smooth finish.
Slightly Textured Finish: A Subtle Look
This can be achieved with:
- Satin or Eggshell Sheen: These finishes can hide very minor surface imperfections better than glossier sheens.
- Light Roller Texture: A fine-nap roller can leave a very subtle texture that adds visual interest.
Frequently Asked Questions About Painting Kitchen Cabinets
Q: How long does it take to paint kitchen cabinets?
A: This depends on the number of cabinets, your preparation speed, and whether you spray or brush/roll. A typical kitchen can take anywhere from a weekend to a full week or more, considering drying times between coats.
Q: What’s the best cabinet paint to use?
A: High-quality acrylic enamel paint formulated for cabinets or trim is generally the best choice for DIYers due to its durability, ease of use, and low odor.
Q: Do I need to remove my cabinet doors?
A: Yes, absolutely. Removing cabinet doors and drawers allows you to paint them flat, which is essential for a smooth, drip-free finish. It also makes painting the cabinet boxes much easier.
Q: Can I paint over laminate cabinets?
A: Yes, but preparation is even more critical. You’ll need a specialized bonding primer designed for laminate or slick surfaces to ensure the paint adheres properly.
Q: How many coats of paint do I need?
A: Typically, two to three coats of paint are recommended for good coverage and durability. Always ensure the previous coat is dry before applying the next.
Q: How long should I wait before putting my hardware back on?
A: While the paint may feel dry to the touch much sooner, it’s best to wait at least 24-48 hours before reattaching hardware to avoid damaging the new finish. For full curing, wait several days or even a week if possible.
Painting kitchen cabinets is a rewarding project that can dramatically transform your kitchen. By meticulously following the prep steps, choosing the right materials, and employing proper cabinet painting techniques, you can achieve a beautiful, professional-looking finish that you’ll love for years to come. Happy painting!