
Yes, you can paint wood kitchen cabinets yourself! This guide provides a comprehensive cabinet painting tutorial to help you achieve a professional look. Painting your cabinets is a fantastic way to give your kitchen a complete makeover. It’s a budget-friendly alternative to full cabinet replacement and a rewarding DIY cabinet refinishing project. If you’re looking for cabinet painting ideas, you’ve come to the right place. We’ll walk you through every step, from preparation to the final coat.
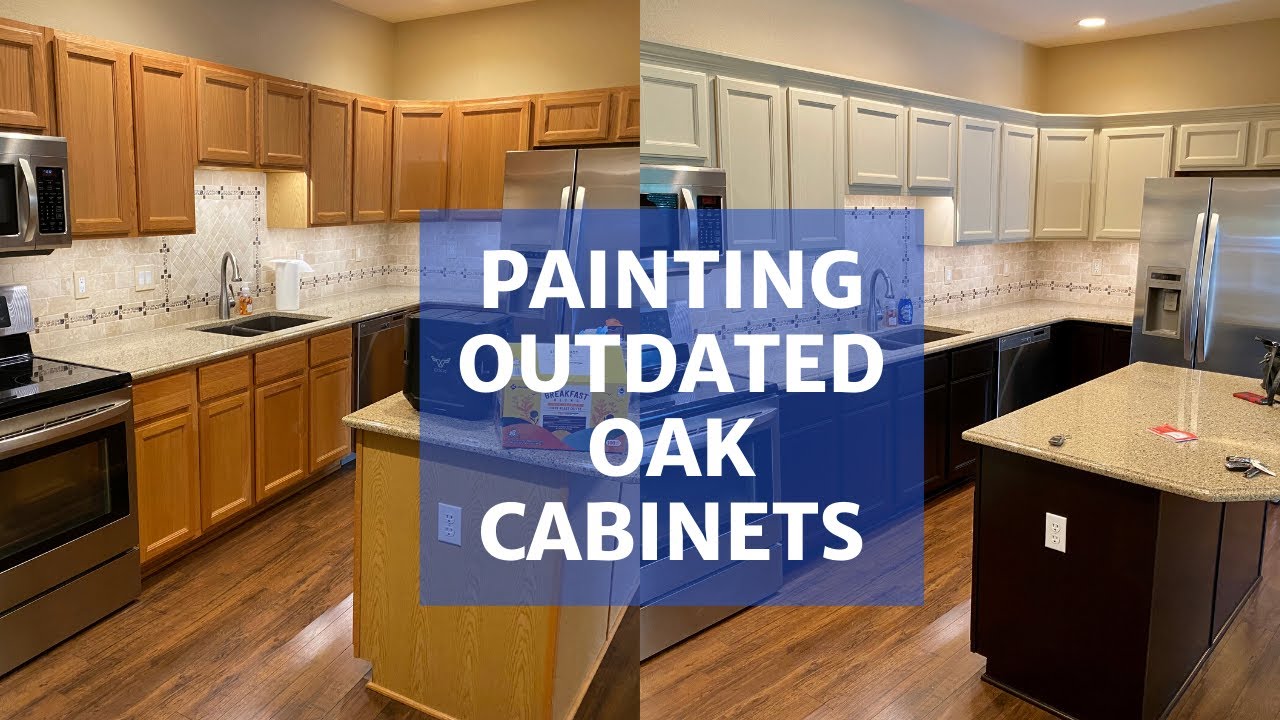
Image Source: i.ytimg.com
Why Paint Your Kitchen Cabinets?
Updating wooden cabinets with a fresh coat of paint can dramatically transform your kitchen’s aesthetic. It allows you to:
- Change the Style: Go from dated oak to modern white, or from dark cherry to a bold color.
- Boost Home Value: A modern, well-maintained kitchen is a major selling point.
- Save Money: Painting is significantly cheaper than buying new cabinets or even refacing them.
- Personalize Your Space: Express your style with custom colors and finishes.
The Ultimate Cabinet Painting Checklist
Embarking on this project requires careful planning and the right materials. Here’s a breakdown of what you’ll need for a successful cabinet painting endeavor.
Essential Materials for Cabinet Painting
- Screwdriver: For removing cabinet doors and hardware.
- Painter’s Tape: To protect areas you don’t want to paint.
- Drop Cloths: To protect your floors and countertops.
- Degreaser/Cleaner: For thorough cleaning of cabinets.
- TSP (Trisodium Phosphate) or a good degreasing cleaner: For tough grease.
- Sandpaper: Various grits (120-grit for initial sanding, 220-grit for smoothing).
- Sanding Blocks or Electric Sander: For efficient sanding.
- Tack Cloths: To remove dust after sanding.
- Primer: High-quality bonding primer is crucial for adhesion.
- Paint: Specifically formulated for cabinets or furniture.
- Paint Brushes: High-quality synthetic or natural bristle brushes for detail work.
- Foam Rollers or Microfiber Rollers: For smooth application on flat surfaces.
- Paint Trays: For holding paint.
- Stir Sticks: For mixing paint.
- Rags: For cleanup.
- Gloves and Safety Glasses: For protection.
- Optional: Cabinet Hardware: For a complete update.
Step-by-Step Cabinet Painting Tutorial
This detailed guide breaks down the process into manageable steps.
Step 1: The Crucial Cabinet Prep for Painting
This is arguably the most important step. Proper cabinet prep for painting ensures your paint adheres well and lasts for years. Skipping or rushing this phase will lead to chipping and peeling.
Clearing the Kitchen
- Empty Cabinets: Remove everything from inside your cabinets and drawers.
- Remove Doors and Drawers: Use a screwdriver to carefully detach all cabinet doors and drawer fronts. Label each one with painter’s tape (e.g., “Upper Left,” “Drawer 2”) so you know exactly where it goes back.
- Remove Hardware: Unscrew hinges, knobs, and pulls. Store them in labeled bags to avoid mixing them up.
Cleaning the Cabinets
Grease and grime are the enemies of good paint adhesion. You need to get your cabinets spotless.
- Degrease Thoroughly: Use a strong degreaser or a solution of TSP (Trisodium Phosphate) mixed with water. Wear gloves and eye protection.
- Scrub Gently: Use a soft sponge or cloth to wipe down all surfaces. For stubborn spots, you might need a bit more elbow grease.
- Rinse and Dry: Wipe down all surfaces with a clean, damp cloth to remove any cleaner residue. Then, dry them completely with clean towels. Allow them to air dry for a few hours to ensure no moisture remains.
Step 2: Cabinet Sanding Tips for a Smooth Finish
Sanding creates a surface that the primer and paint can grip onto. This is essential for durability.
Initial Sanding (Rougher Grit)
- Use 120-Grit Sandpaper: This grit is good for removing any old finish, minor imperfections, and creating a good ‘tooth’ for the primer.
- Sand in the Direction of the Wood Grain: Whether you’re using a sanding block or an orbital sander, always move with the wood grain.
- Focus on all Surfaces: Don’t forget the edges and any carved details.
Smoothing Sanding (Finer Grit)
- Switch to 220-Grit Sandpaper: After the initial sanding, use a finer grit to smooth out any rough patches or sanding marks.
- Gentle Pressure: You’re not trying to remove material here, just smooth the surface.
Cabinet sanding tips also include knowing when to stop. You don’t need to sand down to bare wood unless the existing finish is severely damaged or peeling. The goal is a dull, matte surface.
Step 3: Dust Removal and Tack Cloth Magic
After sanding, your cabinets will be covered in fine dust. This dust must be removed completely before priming.
- Vacuum: Use a vacuum cleaner with a brush attachment to remove the bulk of the dust.
- Wipe with a Damp Cloth: Lightly dampen a clean microfiber cloth with water and wipe down all surfaces to pick up any remaining dust.
- Use Tack Cloths: This is where the magic happens. Tack cloths are slightly sticky cloths that grab even the tiniest dust particles. Wipe down every surface thoroughly. Work from top to bottom.
Step 4: The Power of Cabinet Priming Techniques
Primer is your foundation. It seals the wood, prevents bleed-through from wood tannins (especially in oak and cherry), and provides a uniform surface for the paint.
Choosing the Right Primer
- Bonding Primer: For glossy or laminate surfaces, a good bonding primer is essential.
- Oil-Based Primer: Excellent for blocking stains and providing a durable base. However, it has stronger fumes and requires mineral spirits for cleanup.
- Water-Based (Latex) Primer: Easier to work with, low VOCs, and water cleanup. Many modern water-based primers offer excellent adhesion and stain-blocking properties.
For cabinet priming techniques, we recommend a high-quality, stain-blocking, water-based primer. If you’re unsure about your wood type or the existing finish, an oil-based primer is a safer bet for preventing tannins from bleeding through your paint.
Application of Primer
- Apply Thin, Even Coats: Avoid thick, globby application. Thin coats are easier to manage and dry faster.
- Use a Brush for Edges and Details: Get into corners and any decorative grooves with a good quality brush.
- Use a Roller for Flat Surfaces: For doors and drawer fronts, a small foam roller or a microfiber roller will give you a smoother finish.
- Allow Proper Drying Time: Check the primer can for recommended drying times between coats. This is crucial for adhesion.
- Light Sanding Between Coats: After the first coat of primer is dry, lightly sand it with 220-grit sandpaper. This will knock down any dust nibs and create an even smoother surface for your paint. Wipe away dust with a tack cloth.
- Apply a Second Coat (If Needed): Some wood types or colors might require a second coat of primer for complete coverage and stain blocking.
Step 5: Selecting the Best Paint for Kitchen Cabinets
Choosing the best paint for kitchen cabinets is vital for a durable and beautiful finish. Kitchens are high-traffic areas with moisture and grease, so the paint needs to hold up.
Paint Types to Consider
- Alkyd (Oil-Based) Paint: Traditionally considered the most durable for cabinets due to its hardness and resistance to moisture and wear. However, it has strong fumes, requires mineral spirits for cleanup, and yellows over time, especially in lighter colors.
- Water-Based Acrylic Enamel Paint: Modern water-based paints have come a long way. High-quality acrylic enamels offer excellent durability, flexibility, and resistance to chips and scratches, comparable to alkyds. They are easier to use, clean up with water, and have low VOCs (Volatile Organic Compounds). This is often the preferred choice for DIYers.
- Laminate Paint: If your cabinets have a laminate or melamine finish, you’ll need a paint specifically designed for these surfaces, often a bonding primer followed by a specialized topcoat.
Recommended Finishes
- Satin Finish: Offers a slight sheen, is durable, and easier to clean than matte finishes. It hides imperfections better than semi-gloss.
- Semi-Gloss Finish: Highly durable, easy to wipe clean, and reflects light, making cabinets appear brighter. It can highlight imperfections more than satin.
- Gloss Finish: The most durable and easiest to clean, but it will show every imperfection on the surface. Best for a very modern, sleek look.
For most people, a satin or semi-gloss water-based acrylic enamel is the ideal choice for updating wooden cabinets.
Step 6: Painting Your Cabinets: The Art of Application
Now for the exciting part – applying the color!
Techniques for a Smooth Finish
- Work in a Well-Ventilated Area: Open windows or use fans to ensure good airflow.
- Stir Paint Thoroughly: Don’t shake the can; stir it gently to avoid introducing air bubbles.
- Apply Thin, Even Coats: This is the golden rule for a professional finish. Two to three thin coats are always better than one thick coat.
- Use a High-Quality Brush for Edges and Details: Work the paint into any crevices and around edges first.
- Use a Roller for Flat Surfaces: For doors and drawer fronts, load your foam or microfiber roller evenly and apply smooth, consistent strokes. Overlap your strokes slightly.
- Maintain a Wet Edge: When rolling, try to overlap the previously painted section while it’s still wet. This prevents visible roller marks.
- Paint Doors and Drawer Fronts Flat: Lay them on drop cloths on a flat surface for the most even finish. Avoid painting them while they are still hanging.
- Avoid Overworking the Paint: Once you’ve applied the paint, don’t keep going over it. Let it flow out.
Drying Times and Between-Coat Sanding
- Follow Paint Manufacturer’s Instructions: Pay close attention to the recoat times.
- Light Sanding Between Coats: After each coat of paint has dried (but not fully cured), lightly sand with 220-grit sandpaper or a fine-grit sanding sponge. This removes any dust nibs or imperfections and helps the next coat adhere better.
- Wipe with a Tack Cloth: After each sanding, always wipe down with a tack cloth to remove dust.
Step 7: Reassembling and Cabinet Hardware Replacement
Once all your cabinet doors and drawer fronts are painted and completely dry, it’s time to put everything back together.
Reattaching Doors and Drawers
- Carefully Reinstall Hinges and Hardware: Use your labeled bags to ensure you’re putting the correct hardware back on the correct doors.
- Attach Doors to Cabinet Boxes: This can be a two-person job to hold doors steady while you reattach them. Adjust hinges as needed for proper alignment.
- Reinsert Drawers: Slide drawers back into their place.
Cabinet Hardware Replacement
This is a great opportunity to update your kitchen’s look even further.
- Knobs and Pulls: Changing out old hardware for new ones can instantly modernize your cabinets.
- Hinges: You can also update hinges to a more modern style (like soft-close) or a different finish. Ensure you choose hinges that are compatible with your cabinet doors and boxes, or be prepared to fill old holes and drill new ones.
When choosing new cabinet hardware replacement, consider the style of your kitchen, the color of your cabinets, and the overall feel you want to achieve.
Popular Cabinet Painting Ideas and Color Palettes
The possibilities are endless when it comes to cabinet painting ideas. Here are some popular choices:
| Color Family | Popular Shades | Vibe | Considerations |
|---|---|---|---|
| Whites | Crisp White, Off-White, Creamy White | Bright, Clean, Airy | Can show dirt easily; consider satin or semi-gloss. |
| Grays | Light Gray, Charcoal Gray, Greige | Modern, Sophisticated | Versatile; pairs well with many countertop colors. |
| Blues | Navy Blue, Teal, Dusty Blue | Calm, Coastal, Chic | Can be bold; consider the amount of natural light. |
| Greens | Sage Green, Olive Green, Emerald Green | Earthy, Natural, Elegant | Creates a serene atmosphere; pairs well with wood. |
| Blacks | Matte Black, Charcoal Black | Dramatic, Bold, Modern | Requires meticulous prep; shows dust easily. |
| Wood Tones | White Washed, Gray Washed, Light Oak | Natural, Rustic, Beachy | Preserves some wood grain; requires specific stains. |
Trendy Techniques
- Two-Tone Cabinets: Paint upper cabinets one color (often lighter) and lower cabinets another (often darker).
- Color Blocking: Use contrasting colors on adjacent cabinet sections for a bold statement.
- Glazing: Apply a glaze over a painted finish for an antique or distressed look.
- Stenciling: Add decorative patterns to cabinet doors for a unique touch.
Common Mistakes to Avoid
Even with the best intentions, some pitfalls can ruin your cabinet painting project.
- Skipping Preparation: Not cleaning or sanding properly is the number one mistake.
- Using the Wrong Paint: Kitchens demand durable paint. Avoid interior latex paints not meant for high-wear areas.
- Applying Paint Too Thickly: This leads to drips, brush marks, and an unprofessional finish.
- Not Allowing Sufficient Drying Time: Rushing the process between coats can cause adhesion issues.
- Not Using a Primer: Especially important for wood with tannins or for achieving a true color.
- Using Low-Quality Brushes and Rollers: These can leave streaks and lint.
Frequently Asked Questions (FAQ)
Q1: How long does it take to paint kitchen cabinets?
A: The entire process, including drying time between coats, can take anywhere from 3-7 days, depending on how many doors you have and how much drying time is required between each step. Painting itself might only take a couple of days of active work.
Q2: Can I use chalk paint for cabinets?
A: Yes, you can use chalk paint for cabinets. Chalk paint is known for its matte finish and adhesion to various surfaces with minimal prep. However, chalk paint is porous and requires a durable topcoat (like polycrylic or wax) to protect it in a kitchen environment. Ensure you seal it thoroughly for longevity.
Q3: What is the best paint finish for kitchen cabinets?
A: The best paint for kitchen cabinets typically has a satin or semi-gloss finish. These finishes are more durable, easier to clean, and resist moisture better than matte or flat finishes.
Q4: Do I need to remove my cabinet doors to paint them?
A: While it’s possible to paint cabinets with doors on, removing them is highly recommended for a professional, smooth finish. Painting doors flat ensures even coverage without drips and allows you to reach all edges and corners more easily.
Q5: How do I repair minor damage before painting?
A: For small dings or scratches, use a wood filler or putty. Apply it with a putty knife, let it dry completely, then sand it smooth until it’s flush with the surrounding surface. Always wipe away any dust with a tack cloth before priming.
Q6: Can I paint over stained wood?
A: Yes, you can paint over stained wood, but proper prep is crucial. Ensure the stain is sealed and you use a high-quality primer, especially if the stain is dark or prone to bleeding.
Q7: How often do painted cabinets need touching up?
A: With proper preparation and the right paint, your painted cabinets should last for many years with minimal touch-ups. Regular cleaning with a mild soap and water will help maintain their finish.
By following these pro tips and detailed steps, you can successfully paint your wood kitchen cabinets and enjoy a beautifully refreshed kitchen. Happy painting!