
Thinking about a new kitchen look but wincing at the thought of a full kitchen remodel? You’re in luck! Cabinet refacing offers a fantastic way to transform your kitchen’s appearance without breaking the bank. This process involves updating the visible surfaces of your existing cabinets, giving them a fresh, modern feel.
So, how do you reface kitchen cabinets? Cabinet refacing typically involves applying a new veneer or laminate to the existing cabinet boxes, and replacing the old cabinet doors and drawer fronts with new ones. You can also update your cabinet hardware for an even more dramatic change. This guide will walk you through the entire process, helping you achieve a stunning, budget-friendly kitchen makeover.
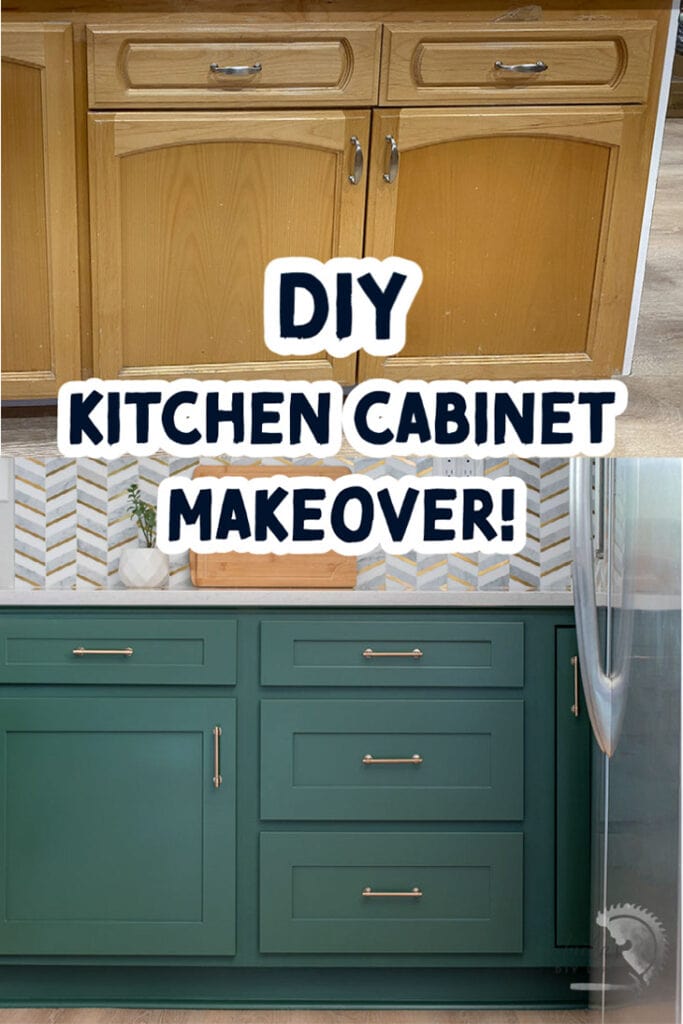
Image Source: www.anikasdiylife.com
Why Choose Cabinet Refacing?
A full kitchen remodel can be incredibly expensive and disruptive. Cabinet refacing, on the other hand, provides a middle ground, delivering significant aesthetic improvements for a fraction of the cost and effort.
Advantages of Cabinet Refacing:
- Cost-Effective: Compared to full cabinet replacement or a complete kitchen remodel, refacing is significantly more affordable.
- Speedy Transformation: The process is generally quicker than replacing cabinets, meaning less downtime for your kitchen.
- Durability: New surfaces and doors are often made with durable materials that can withstand daily wear and tear.
- Eco-Friendly: By reusing your existing cabinet boxes, you reduce waste and are being kinder to the environment.
- Customization: You have a wide range of styles, colors, and finishes to choose from, allowing for a truly personalized look.
- Maintains Layout: If you’re happy with your current kitchen layout, refacing lets you keep it while updating the style.
Comparing Refacing to Other Options:
Let’s look at how refacing stacks up against other popular kitchen upgrades.
| Option | Approximate Cost Range (per linear foot) | Time Commitment | Impact on Kitchen Layout | DIY Friendliness |
|---|---|---|---|---|
| Cabinet Refacing | $100 – $400 | 2-5 days | Minimal | Moderate |
| Cabinet Painting | $50 – $150 | 3-7 days | Minimal | High |
| Cabinet Refinishing | $75 – $200 | 3-7 days | Minimal | Moderate |
| New Cabinet Doors | $75 – $300 | 1-3 days | Minimal | High |
| New Cabinets | $300 – $1,000+ | 1-3 weeks | Can be altered | Low |
| Full Kitchen Remodel | $1,500 – $5,000+ (per linear foot) | 4-12 weeks+ | Can be significantly altered | Very Low |
Note: These are approximate costs and can vary greatly based on materials, labor, and location.
Deciphering the Cabinet Refacing Process
Cabinet refacing involves several key steps to give your kitchen a fresh face. The core idea is to update the visible parts of your existing cabinets.
Step 1: Planning and Preparation
This is arguably the most crucial step. Good planning ensures a smooth process and a beautiful result.
Assessing Your Current Cabinets:
Before you begin, take a close look at your existing cabinets.
- Are the cabinet boxes in good condition? Check for any damage, water stains, or structural issues. Refacing works best on sturdy, well-built cabinet boxes.
- What type of material are your cabinet boxes made of? Most refacing methods work well on particleboard, plywood, or solid wood.
- Measure everything accurately. You’ll need precise measurements of all cabinet boxes, drawer boxes, and the areas you plan to cover.
Choosing Your Refacing Material:
There are several popular options for refacing, each with its own pros and cons.
- Veneer Cabinet Refacing: This involves applying thin sheets of real wood veneer to the exposed surfaces of your cabinet boxes.
- Pros: Offers the natural beauty and warmth of real wood, can be stained to match existing woodwork, relatively easy to work with.
- Cons: Can be susceptible to moisture and scratching if not properly sealed, requires careful application to avoid bubbles or tears.
- Laminate Cabinet Refacing: This uses a plastic-based material bonded to a core (often particleboard or MDF).
- Pros: Highly durable, resistant to scratches, stains, and moisture, comes in a wide array of colors and patterns, generally easier to clean.
- Cons: Doesn’t offer the natural look of real wood, can be more prone to chipping if impacted heavily, a damaged section often requires replacing the entire panel.
- Vinyl Wrap: A self-adhesive vinyl film applied to the cabinet surfaces.
- Pros: Very budget-friendly, wide variety of colors and finishes, can be a good DIY option.
- Cons: Durability can be an issue; vinyl can peel, scratch, or discolor over time, especially in high-heat areas like around ovens.
- Thermafoil: Similar to vinyl wrap but heated and molded to the cabinet surface for a smoother finish.
- Pros: Smooth, seamless look, good for modern designs.
- Cons: Can be prone to peeling or blistering with heat exposure.
Selecting New Cabinet Doors and Drawer Fronts:
This is where you get to really change the look of your kitchen. You can choose from:
- Wood: Solid wood or wood veneers offer a classic, high-quality look. Options include maple, cherry, oak, and more.
- MDF (Medium-Density Fiberboard): Often painted or laminated, MDF is a stable and affordable option.
- Thermofoil/Laminate: These materials provide a durable and low-maintenance surface, often mimicking wood grains or offering solid colors.
Planning Your New Style:
Consider the overall aesthetic you want to achieve.
- Door Style: Shaker, flat-panel, raised-panel, or decorative styles can all dramatically alter your kitchen’s feel.
- Color/Finish: From classic white and natural wood tones to bold colors, the finish is key.
- Cabinet Hardware: New knobs and pulls are an easy and impactful way to update the look and feel of your cabinets.
Step 2: Demolition and Surface Preparation
This stage involves preparing your existing cabinets for their new coverings.
Removing Old Doors and Drawer Fronts:
- Carefully unscrew all cabinet doors from their hinges.
- Remove drawer fronts from the drawer boxes.
- Keep all hardware organized; you might reuse some of it, or it will be helpful for reinstallation.
Cleaning and Preparing the Cabinet Boxes:
This is a critical step for ensuring the new veneer or laminate adheres properly.
- Clean thoroughly: Use a degreaser to remove any grease, grime, or cooking oils from the cabinet surfaces. A solution of TSP (trisodium phosphate) or a strong degreaser is often recommended.
- Sand lightly: For wood cabinets, a light sanding with fine-grit sandpaper (120-150 grit) can help create a better surface for adhesion. For laminate or painted surfaces, you might need a stronger grit or a specialized primer.
- Repair imperfections: Fill any small holes or dents with wood filler or putty. Sand smooth once dry.
- Prime (if necessary): Depending on the surface and the adhesive you’re using, a primer might be needed for optimal adhesion.
Step 3: Applying New Surfaces (Veneer or Laminate)
This is the core of the refacing process. Patience and precision are key here.
Working with Wood Veneer:
- Measure and Cut: Measure the cabinet box panels and cut the veneer to size, allowing a slight overlap for trimming.
- Apply Adhesive: Most veneers come with a pre-applied adhesive that’s activated by heat (using an iron or a heat gun). Follow the manufacturer’s instructions carefully. Alternatively, you may use a contact cement or specialized veneer adhesive.
- Apply Veneer: Carefully align the veneer and press it firmly onto the cabinet surface. Start from one edge and work your way across, using a roller or a squeegee to ensure good contact and remove air bubbles.
- Trim Edges: Once the adhesive is set, use a sharp utility knife or a specialized veneer trimmer to carefully cut away any excess veneer along the edges.
- Sand and Finish: Once all surfaces are covered, lightly sand the entire area to smooth any rough edges or minor imperfections. Apply a stain or finish to match your new doors or to achieve your desired look.
Working with Laminate:
- Measure and Cut: Measure the cabinet box panels and cut the laminate sheets to size, again allowing for a small overlap.
- Apply Contact Cement: This is the most common adhesive for laminate. Apply an even coat of contact cement to both the cabinet surface and the back of the laminate sheet. Allow both to become tacky (usually 15-30 minutes, check product instructions).
- Apply Laminate: Carefully align the laminate sheet and press it firmly onto the cabinet surface. Start from one edge and work your way across, using a roller or a block of wood to ensure good adhesion and eliminate air bubbles.
- Trim Edges: Use a router with a flush-trim bit or a sharp utility knife to carefully trim the excess laminate from the edges.
- File Edges: Lightly file the edges to smooth them out.
Dealing with Edges and Corners:
- Edge banding: For a professional finish on laminate or veneer edges, consider using iron-on edge banding that matches your chosen material.
- Caulking: For slight gaps or seams, a thin bead of paintable caulk can create a clean finish.
Step 4: Installing New Doors and Drawer Fronts
This is the exciting part where your kitchen starts to transform.
Pre-Drilling and Hardware Installation:
- Drill Pilot Holes: Before attaching the new doors and drawer fronts, drill pilot holes for hinges and handles. Measure carefully to ensure they are perfectly aligned.
- Attach Hinges: Screw the hinges onto the new cabinet doors and drawer fronts according to the manufacturer’s instructions.
- Attach Hardware: Install your chosen cabinet hardware (knobs, pulls) on the doors and drawer fronts.
Attaching to Cabinet Boxes:
- Hang Doors: Align the hinges with the pre-drilled holes on the cabinet boxes and secure them with screws. Adjust the hinges as needed to ensure doors are straight and hang evenly.
- Attach Drawer Fronts: Depending on your drawer box construction, you’ll either screw the drawer front directly onto the drawer box from the inside, or use a strong adhesive like construction adhesive.
Step 5: Finishing Touches
These small details make a big difference.
Installing New Drawer Slides (Optional but Recommended):
- If your old drawer slides are worn out or you’re upgrading to soft-close, now is the time to install new ones. This requires removing the old slides and attaching the new ones to both the cabinet boxes and the drawers.
Updating Shelving (Optional):
- While you’re at it, consider adding new shelves or updating existing ones for better organization and a fresh look.
Cleaning Up:
- Once everything is installed, give your new cabinets a good cleaning. Remove any dust, fingerprints, or adhesive residue.
DIY Cabinet Refacing vs. Hiring a Professional
The decision of whether to tackle DIY cabinet refacing or hire a professional often comes down to your budget, time, and skill level.
DIY Cabinet Refacing:
Pros:
- Significant Cost Savings: You save on labor costs, which can be a substantial portion of the cabinet refacing cost.
- Sense of Accomplishment: Completing a project like this yourself can be very rewarding.
- Complete Control: You have total control over every aspect of the process, from material selection to execution.
Cons:
- Time Consuming: This is not a weekend project. It requires dedication and several days of focused work.
- Requires Skill and Precision: Working with veneers and laminates can be tricky. Mistakes can be costly and affect the final appearance.
- Tools and Equipment: You may need to invest in specific tools like a good utility knife, a laminate trimmer, a roller, and possibly a heat gun or iron.
- Potential for Errors: Inexperience can lead to bubbling, tearing of veneers, misaligned doors, or uneven finishes.
Hiring a Professional:
Pros:
- Expertise and Experience: Professionals have the skills and knowledge to ensure a flawless finish and avoid common pitfalls.
- Time Savings: They can complete the project much faster than a DIYer.
- Quality Assurance: Most professional services offer warranties on their work.
- Less Stress: You don’t have to worry about the intricate steps or sourcing all the materials yourself.
Cons:
- Higher Cost: You will pay for their expertise and labor, increasing the overall cabinet refacing cost.
- Less Control: You’ll need to trust their process and choices within the scope of your agreement.
When to DIY: If you have good DIY skills, plenty of patience, a tight budget, and are meticulous about detail, DIY can be a great option.
When to Hire: If you value your time, want a guaranteed professional finish, or are less confident in your manual dexterity and precision, hiring a professional is likely the better choice.
Cost Considerations for Cabinet Refacing
The cabinet refacing cost can vary widely depending on the materials you choose, the size of your kitchen, and whether you do it yourself or hire a professional.
Factors Influencing Cost:
- Materials: Real wood veneers are generally more expensive than laminate or vinyl. High-end door styles and finishes will also increase the price.
- Kitchen Size: The more cabinets you have, the more materials and labor will be required.
- DIY vs. Professional: As discussed, DIY significantly reduces labor costs.
- Labor Rates: Professional installation costs vary by region.
- Additional Services: If you opt for new drawer slides, custom organizers, or other upgrades, the cost will increase.
Budgeting Tips:
- Get Multiple Quotes: If hiring a professional, obtain quotes from several reputable companies.
- Compare Material Costs: Research the prices of different veneers, laminates, and door styles to find options that fit your budget.
- Consider a Phased Approach: If your budget is very tight, you could start by replacing doors and hardware, then tackle refacing the cabinet boxes later.
- Look for Sales and Discounts: Keep an eye out for promotions from material suppliers or cabinet shops.
Alternatives to Cabinet Refacing
While refacing is an excellent option, other methods can also update your cabinets.
Cabinet Painting:
- Process: Involves thoroughly cleaning, sanding, priming, and painting the existing cabinet boxes, doors, and drawer fronts.
- Pros: Very affordable, vast color options, can dramatically change the look.
- Cons: Can be labor-intensive, requires careful prep work for a durable finish, paint can chip or scratch over time, especially with lower-quality products or application. This is a great option if your existing cabinet doors are in good shape and you want a new color.
Cabinet Refinishing:
- Process: Involves stripping old finishes, sanding, and applying a new stain or protective coating.
- Pros: Restores the natural beauty of wood, can change the wood tone.
- Cons: More involved than painting, requires careful stripping and sanding, results depend heavily on the quality of the existing wood. This is a good choice if you have solid wood cabinets and want to enhance their natural grain.
Cabinet Door Replacement:
- Process: Only the cabinet doors and drawer fronts are replaced, while the existing cabinet boxes are kept.
- Pros: Relatively easy DIY project, significantly updates the look, good if cabinet boxes are in excellent condition.
- Cons: Doesn’t address the appearance of the cabinet boxes themselves.
Frequently Asked Questions About Cabinet Refacing
Q1: What is cabinet refacing?
Cabinet refacing is a kitchen cabinet update process where the visible surfaces of your existing cabinet boxes (the frames) are covered with a new material, like wood veneer or laminate. In addition, all the old cabinet doors and drawer fronts are replaced with new ones.
Q2: How long does cabinet refacing take?
The time it takes can vary. For DIY refacing, it can take anywhere from 2 to 5 days, depending on your skill level and the size of your kitchen. Professionally done refacing typically takes 3 to 7 days.
Q3: Can I reface my own cabinets?
Yes, you absolutely can! DIY cabinet refacing is a popular option for those who are comfortable with home improvement projects and want to save money on labor. However, it requires patience, precision, and the right tools.
Q4: What’s the difference between refacing and refinishing cabinets?
Refacing involves covering the existing cabinet boxes with new materials and replacing doors and drawer fronts. Refinishing, on the other hand, means stripping the old finish off your current cabinets and applying a new stain or sealant. Refacing is a more significant aesthetic change.
Q5: Is cabinet refacing cheaper than buying new cabinets?
In most cases, yes. Cabinet refacing can cost between 40% to 60% less than a full replacement with new custom cabinets.
Q6: What materials are commonly used for cabinet refacing?
The most common materials for refacing the cabinet boxes are real wood veneers (like oak, maple, cherry) and laminate. New cabinet doors and drawer fronts can be made from wood, MDF, laminate, or thermofoil.
Q7: What kind of maintenance do refaced cabinets require?
Refaced cabinets generally require similar maintenance to new cabinets made from the same materials. Laminate and vinyl are usually easy to wipe clean. Wood veneers should be cleaned with a damp cloth and mild soap, and you should avoid harsh chemicals or excessive moisture. Always follow the manufacturer’s care instructions for your chosen materials.
Q8: Can I change the color of my cabinets when refacing?
Absolutely! This is one of the biggest advantages of refacing. You can choose from a wide range of wood veneers that can be stained in various colors, or opt for laminate or thermofoil in virtually any color or finish imaginable. This allows for a complete style transformation.
Q9: Do I need special tools for DIY cabinet refacing?
Yes, some specialized tools are helpful for a professional-looking finish. These can include a good quality utility knife or laminate trimmer, a contact cement roller, a heat gun or iron (for some veneers), a measuring tape, a level, and a drill with various bits.
Q10: How do I choose new cabinet hardware?
When selecting cabinet hardware, consider the style of your new doors and the overall design of your kitchen. You can opt for matching knobs and pulls, or mix and match for a more eclectic look. Finishes like brushed nickel, matte black, brass, and chrome are popular choices. Ensure the style and size of the hardware complement your cabinet doors.
Conclusion
Cabinet refacing offers a compelling solution for anyone looking to revitalize their kitchen without the expense and disruption of a full remodel. By carefully planning, selecting the right materials, and executing the steps with precision, you can achieve a beautiful, updated kitchen that feels brand new. Whether you choose the natural elegance of veneer cabinet refacing, the durability of laminate, or the simplicity of cabinet door replacement, the result will be a kitchen that not only looks fantastic but also reflects your personal style and budget.