
Image Source: contentgrid.homedepot-static.com
How To Refinish Kitchen Cabinet Doors: Stunning Results
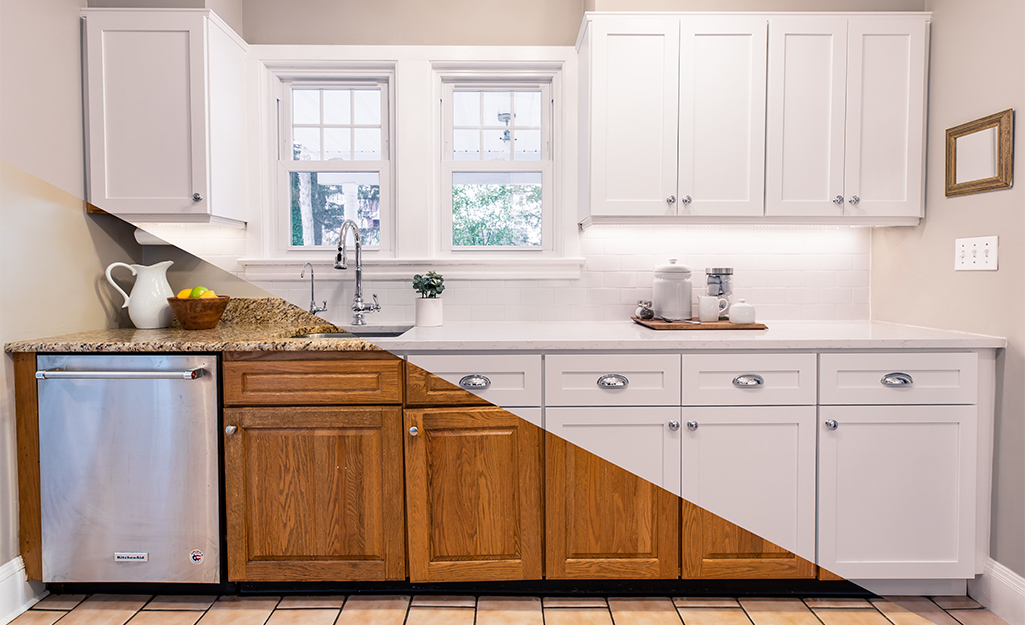
Can you refinish kitchen cabinet doors? Yes, you absolutely can! Refinishing kitchen cabinet doors is a fantastic DIY project that can dramatically update your kitchen’s look without the cost of full replacement. It’s a rewarding process that breathes new life into old cabinets, transforming them from tired and worn to fresh and fabulous. This guide will walk you through everything you need to know about kitchen cabinet restoration, from preparation to the final coat. Whether you’re looking to achieve a painted finish or a beautiful stained look, this comprehensive breakdown will help you achieve stunning results.
Why Refinish Your Kitchen Cabinets?
Over time, kitchen cabinets can show their age. The finish might become scratched, faded, or chipped. You might simply be tired of the current color or style. Refinishing offers a cost-effective and impactful solution.
- Budget-Friendly: Compared to buying new cabinets, refinishing is significantly cheaper.
- Customization: You get to choose the exact color, finish, and style you desire.
- Environmental Impact: Reusing existing cabinets reduces waste.
- Satisfying DIY: The sense of accomplishment from a job well done is immense.
Getting Started: Planning Your Refinishing Project
Before you dive in, a little planning goes a long way. This ensures a smoother process and better results.
Deciding on Your Finish: Paint vs. Stain
The first major decision is whether you want to paint or stain your cabinet doors.
- Painting: Offers a vast spectrum of colors. It’s great for hiding imperfections and achieving a modern or farmhouse look. It can also be easier to achieve a uniform look compared to staining.
- Staining: Reveals the natural beauty of the wood grain. It’s ideal for a classic, warm, or traditional kitchen. Staining requires more careful preparation to ensure an even color.
Choosing Your Colors and Hardware
- Color Palette: Consider your kitchen’s existing decor. Do you want a bold statement or a subtle update? White, gray, and navy are popular choices for painted cabinets. For stained cabinets, consider medium to dark wood tones.
- Hardware: New cabinet hardware replacement can also significantly enhance the finished look. Think about knobs and pulls that complement your chosen finish.
The Essential Tools and Materials
Gathering everything you need beforehand will save you time and frustration.
For Preparation and Sanding:
- Screwdriver or drill for removing doors and hardware
- Drop cloths or old sheets
- Painter’s tape
- Sandpaper (various grits: 100, 150, 220)
- Sanding block or orbital sander
- Tack cloths
- Vacuum cleaner with a brush attachment
- Degreaser or TSP (Trisodium Phosphate) substitute
- Sponge and bucket
- Safety glasses
- Dust mask or respirator
For Painting:
- Kitchen cabinet primer (high-quality, oil-based or water-based depending on your topcoat)
- Paint (cabinet-specific enamel paint is recommended for durability)
- Paint rollers (foam rollers are excellent for smooth finishes)
- Paintbrushes (angled brushes for cutting in edges)
- Paint tray or bucket
- Stir sticks
For Staining:
- Wood conditioner (essential for even stain absorption, especially on soft woods like pine)
- Wood stain
- Clean, lint-free cloths or foam applicators for staining
- Polyurethane or other clear topcoat (satin, semi-gloss, or gloss finish)
- Fine-grit sandpaper (220-320 grit) for between coats
Cabinet Refinishing Steps: A Detailed Breakdown
This section covers the core cabinet refinishing steps, applicable to both painting and staining.
Step 1: Removing and Organizing Cabinet Doors
This is where the DIY kitchen cabinets journey truly begins.
- Label Everything: As you remove each door and drawer front, label it clearly on the back with a number or letter corresponding to its location. This is crucial for putting everything back correctly. A simple masking tape label works well.
- Remove Hardware: Use your screwdriver or drill to detach hinges, knobs, and pulls. Store them in a safe place, perhaps in labeled plastic bags.
- Work Area: Designate a clean, well-ventilated space for drying. A garage, basement, or even a spare room can work. Lay down drop cloths to protect your floors.
Step 2: Cleaning the Cabinet Doors
Proper cleaning removes grease, grime, and dirt that can interfere with adhesion.
- Degrease: Kitchen cabinets are notorious for grease buildup. Use a degreaser or a TSP substitute. Mix it according to the product instructions.
- Scrub Gently: Use a sponge to wash down all surfaces of the doors and drawer fronts. Pay attention to corners and edges.
- Rinse Thoroughly: Wipe down all surfaces with a clean, damp cloth to remove any cleaning residue.
- Dry Completely: Allow the doors to air dry thoroughly or wipe them down with a clean towel.
Step 3: Sanding for a Smooth Surface
Cabinet door sanding is a critical step for ensuring your new finish adheres properly and looks smooth.
- Initial Sanding: Start with a medium-grit sandpaper (around 100-150 grit) to remove the old finish, imperfections, and any glossy residue. This is important for both painting and staining.
- Smoothing: Once the initial sanding is done, switch to a finer grit (220 grit). This will create a smooth surface for your primer or stain. For cabinet door sanding, it’s best to sand in the direction of the wood grain.
- Detail Sanding: Use a sanding block for flat surfaces to ensure even pressure. For detailed areas or corners, you might use folded sandpaper or a sanding sponge.
- Clean Up Dust: After sanding, use a vacuum cleaner with a brush attachment to remove most of the dust. Then, wipe down all surfaces with a tack cloth. Tack cloths are sticky and effectively pick up fine dust particles. Repeat the tack cloth wipe down after any subsequent sanding steps.
Step 4: Priming for a Flawless Finish (For Painted Cabinets)
Primer is essential for cabinet door painting. It acts as a base, ensuring even color, better adhesion, and hiding any stains or imperfections from the wood.
- Choose the Right Primer: Select a high-quality kitchen cabinet primer. Oil-based primers offer superior adhesion and stain blocking, while water-based primers are easier to clean up and dry faster.
- Apply Thin Coats: Apply a thin, even coat of primer using a brush or roller. Avoid thick application, which can lead to drips and unevenness.
- Allow to Dry: Let the primer dry completely according to the manufacturer’s instructions.
- Light Sanding: Once dry, lightly sand the primed surfaces with a fine-grit sandpaper (220 grit). This will further smooth the surface and improve adhesion for the paint. Wipe down with a tack cloth again.
Step 5: Applying the Paint (For Painted Cabinets)
This is where your cabinet door painting project starts to come alive.
- Paint Application: Apply your chosen cabinet paint. Again, thin, even coats are key. You can use a sprayer for a very smooth, professional finish, but rollers and brushes also work well.
- Roller Technique: For flat surfaces, use a foam roller to apply paint in smooth, overlapping strokes.
- Brush Technique: Use an angled brush to get into corners and along edges.
- Multiple Coats: Most cabinet jobs require at least two coats of paint, and sometimes three, for full coverage and durability.
- Drying Between Coats: Allow each coat of paint to dry completely before applying the next. This is crucial for a durable finish. Lightly sand with 220-grit sandpaper between coats and wipe with a tack cloth for the smoothest results.
Step 6: Staining the Cabinet Doors (For Stained Cabinets)
Cabinet door staining requires a slightly different approach to achieve that rich wood look.
- Wood Conditioner: If you are staining wood that tends to blotch (like pine, maple, or cherry), apply a pre-stain wood conditioner. This helps the stain absorb more evenly. Follow the product’s instructions for application and drying time.
- Stain Application: Apply the stain using a clean, lint-free cloth, foam brush, or applicator pad. Work in the direction of the wood grain. Apply it generously but evenly.
- Wipe Off Excess: Allow the stain to penetrate the wood for the time recommended by the manufacturer (usually 5-15 minutes). Then, wipe off the excess stain with a clean, lint-free cloth, again working with the grain. The longer you leave the stain on, the darker the color will be.
- Second Coat (Optional): For a darker, richer color, you can apply a second coat of stain after the first has dried.
- Drying Time: Allow the stain to dry completely. This can take 24-72 hours depending on the type of stain and humidity.
Step 7: Applying a Protective Topcoat
A topcoat protects your newly finished cabinet doors and makes them durable enough for kitchen use.
- For Painted Cabinets: After your final coat of paint has dried and cured (check paint can for curing time), you can apply a clear protective topcoat, like a water-based polyurethane, if desired for extra durability. Many cabinet paints are self-sealing.
- For Stained Cabinets: Apply thin, even coats of a clear topcoat such as polyurethane, varnish, or lacquer. A water-based polyurethane is often preferred for its clarity and durability.
- Application: Use a high-quality synthetic brush or foam applicator. Apply in the direction of the wood grain.
- Multiple Coats: Apply 2-3 thin coats for maximum protection.
- Sanding Between Coats: Lightly sand with 220-320 grit sandpaper between each coat of topcoat and wipe with a tack cloth. This ensures a super smooth and professional finish.
- Curing Time: Allow the topcoat to cure completely before reassembling the cabinets. This can take several days to a week.
Step 8: Reassembling the Cabinets
The final step in your kitchen cabinet resurfacing journey!
- Reattach Hardware: Screw the hinges, knobs, and pulls back onto the doors and drawer fronts.
- Hang Doors: Carefully reattach the cabinet doors to the cabinet frames.
- Insert Drawers: Slide the drawer fronts back into place.
- Admire Your Work: Step back and enjoy your beautifully refinished kitchen cabinets!
Table: Comparing Paint vs. Stain for Cabinet Refinishing
| Feature | Painting | Staining |
|---|---|---|
| Appearance | Solid color, modern or classic looks | Natural wood grain, warm and traditional |
| Color Options | Vast array of colors | Limited by wood type and stain availability |
| Wood Type | Hides wood imperfections well | Best for attractive wood grain |
| Prep Time | Essential to prime and sand thoroughly | Requires wood conditioning for evenness |
| Application | Multiple thin coats, can spray or roll | Even application, wiping off excess |
| Durability | High-quality enamel paints are very durable | Topcoat protection is key for durability |
| Touch-ups | Easier to match paint for touch-ups | Can be more challenging to touch up |
Tips for Stunning Results
- Work in a Well-Ventilated Area: This is crucial for your health when using paints, stains, and solvents.
- Patience is Key: Don’t rush the drying times between coats. This is the most common mistake people make.
- Test Your Finish: Before applying stain or paint to your actual doors, test it on a scrap piece of wood or an inconspicuous area of a door to ensure you like the color and application.
- Invest in Quality Products: Using good quality paint, primer, and topcoats will make a noticeable difference in the final appearance and durability.
- Consider Spraying: If you have access to a paint sprayer and are comfortable using one, it can provide the smoothest, most professional finish for cabinet door painting.
- Don’t Forget the Cabinet Boxes: While this guide focuses on doors and drawer fronts, you can also refinish the cabinet boxes themselves for a completely cohesive look.
Frequently Asked Questions (FAQ)
Q: Can I refinish laminate or thermofoil kitchen cabinets?
A: While it’s more challenging than solid wood, it is possible. Laminate and thermofoil surfaces require special primers designed for slick surfaces and very thorough cleaning and light sanding to ensure adhesion. You’ll also want to use a paint specifically formulated for cabinets.
Q: How long does it take to refinish kitchen cabinets?
A: The time involved can vary significantly depending on the size of your kitchen, the chosen finish, and how much prep work is needed. However, a typical kitchen cabinet refinishing project can take anywhere from a weekend to a couple of weeks, factoring in drying and curing times.
Q: Do I need to remove the cabinet doors to refinish them?
A: It’s highly recommended to remove the cabinet doors and drawer fronts. This allows for a much more thorough and professional finish. Trying to paint or stain them while attached can lead to drips, uneven coverage, and missed spots.
Q: What’s the difference between refinishing and resurfacing kitchen cabinets?
A: While often used interchangeably, “refinishing” typically refers to changing the color or finish of the existing cabinet doors (e.g., painting or staining). “Resurfacing” can sometimes imply adding a new material or veneer over the existing surface, or it can be used more broadly to encompass a full update. In the context of this guide, we are focusing on refinishing through painting or staining.
Q: Can I paint over stained cabinets?
A: Yes, you can paint over stained cabinets, but proper preparation is essential. You’ll need to thoroughly clean, degrease, sand, and prime the stained cabinets before applying paint. Using a good quality kitchen cabinet primer is crucial for ensuring the paint adheres well and doesn’t show the stain underneath.
By following these detailed steps and tips, you can embark on your kitchen cabinet restoration with confidence and achieve stunning results that will transform your kitchen’s aesthetic. Happy refinishing!