
Can you refinish kitchen cabinets yourself? Yes, you absolutely can refinish kitchen cabinets yourself! With a bit of patience and the right approach, you can transform your kitchen with a DIY cabinet makeover that looks professionally done. This comprehensive guide will walk you through every step of kitchen cabinet refinishing steps, from preparation to the final coat, helping you achieve stunning results without breaking the bank.
Refurbishing kitchen cabinets is a rewarding project that can dramatically update the look and feel of your kitchen. Many homeowners wonder about the cabinet refinishing cost compared to replacing cabinets entirely. Generally, refinishing is significantly more affordable, costing a fraction of the price of new cabinetry. This guide will equip you with the knowledge and techniques to tackle this project confidently, ensuring a beautiful and durable finish.
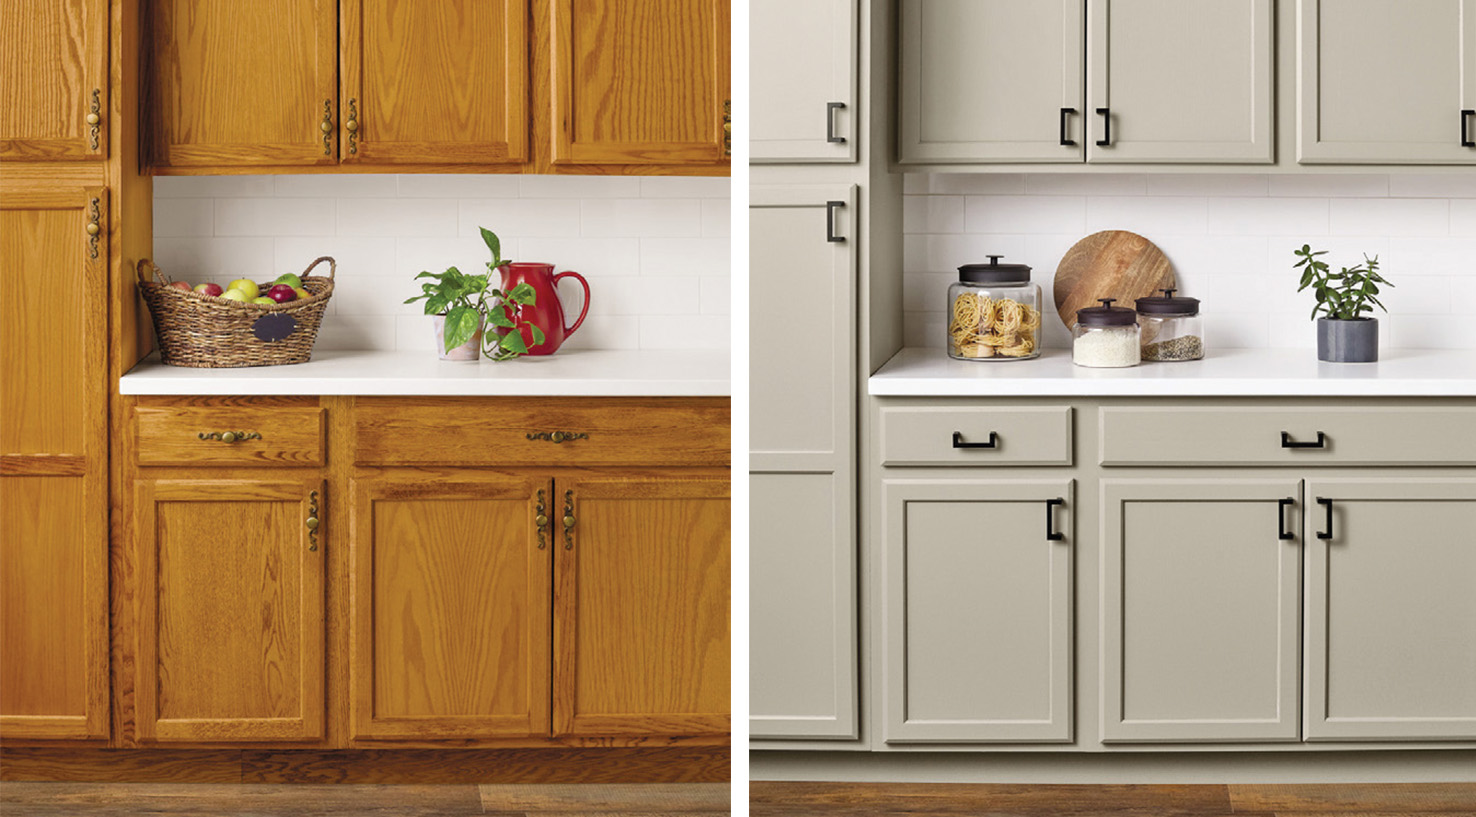
Image Source: swppc.com
Deciphering Your Cabinet Refinishing Goal
Before diving into the actual work, it’s crucial to define what you want to achieve. Are you looking for a fresh coat of paint, a natural wood look, or something entirely new? Your desired outcome will influence the best cabinet refinishing products and techniques you’ll employ.
Painting vs. Staining: Choosing Your Finish
- Painting: Offers a vast array of color options, allowing for a complete style overhaul. It’s excellent for covering up older, less attractive wood or laminate.
- Staining: Enhances the natural beauty of wood grain. It’s ideal for cabinets that are already in good condition and have desirable wood characteristics. You’ll need to consider kitchen cabinet stain colors that complement your kitchen’s existing décor.
Preparing Your Kitchen Cabinets: The Foundation of Success
This is arguably the most critical phase of kitchen cabinet refinishing steps. Proper preparation ensures that your paint or stain adheres well and provides a smooth, long-lasting finish. Skipping these steps can lead to peeling, chipping, and an unprofessional appearance. This section will detail how to prep kitchen cabinets.
Step 1: Removing Cabinet Doors and Hardware
- Label Everything: As you remove doors and drawer fronts, use painter’s tape and a pen to label each piece and its corresponding cabinet opening. This is crucial for reassembly. Numbering them sequentially is a good practice.
- Remove Hardware: Unscrew hinges, knobs, and pulls. Store them in a safe place, perhaps in labeled plastic bags, so you don’t lose them and can easily reattach them later.
Step 2: Cleaning Your Cabinets Thoroughly
Grease, grime, and dust are the enemies of a good finish. A thorough cleaning is essential.
- Degreaser: Use a strong degreaser like TSP (trisodium phosphate) or a dedicated cabinet cleaner. Wear gloves and eye protection when using TSP.
- Application: Apply the cleaner with a sponge or cloth, working in sections.
- Rinse: Wipe down the cabinets with a damp cloth to remove all cleaning residue. Allow them to dry completely.
Step 3: Cabinet Stripping and Sanding for a Flawless Surface
This is where the magic starts to happen, preparing the surface for its new look. This stage involves cabinet stripping and sanding.
If Painting:
- Sanding: For painted cabinets, you’ll typically need to scuff sand the surface to create a surface for the primer and paint to adhere to.
- Sanding Grit: Start with a medium-grit sandpaper (100-150 grit) to remove any old finish or imperfections. Then, move to a finer grit (180-220 grit) for a smoother finish.
- Sanding Technique: Sand with the grain of the wood. Use a sanding block or an orbital sander for large, flat surfaces. For detailed areas, use sanding sponges or folded sandpaper.
- Dust Removal: After sanding, it’s imperative to remove all dust. Use a shop vacuum with a brush attachment, followed by a tack cloth. Dust left behind will show up in your final paint job.
If Staining:
- Stripping (if necessary): If your cabinets have a thick, old finish that’s peeling or uneven, you might need to strip them.
- Chemical Strippers: These are effective but require careful handling due to fumes and skin irritation. Always follow product instructions and wear appropriate safety gear (gloves, goggles, respirator).
- Application: Apply the stripper with a brush, let it penetrate, and then scrape off the old finish with a putty knife or scraper, working with the wood grain.
- Neutralizing: After stripping, you’ll usually need to neutralize the stripper with a mineral spirit or a specific neutralizer recommended by the manufacturer.
- Sanding for Stain: Once stripped or if the original finish is thin, sanding is crucial for stain application.
- Sanding Grit: Start with a coarser grit (80-100 grit) to remove any remaining finish or imperfections from stripping. Then, progressively move to finer grits (150, 180, 220 grit). The smoother the surface, the more even the stain will be.
- Pre-Stain Conditioner: For soft woods like pine or maple, applying a pre-stain wood conditioner is highly recommended. This helps the stain penetrate evenly, preventing blotchiness.
- Dust Removal: As with painting, thorough dust removal with a vacuum and tack cloth is vital.
Step 4: Repairing Imperfections
Inspect your cabinets for any dings, dents, or scratches.
- Wood Filler: Use wood filler to fill any holes or deep scratches. Choose a filler that can be stained if you plan on staining your cabinets.
- Sanding Filler: Once the filler is dry, sand it smooth and flush with the surrounding surface.
Applying Your New Finish: Bringing Your Vision to Life
With your cabinets prepped and ready, it’s time to apply the finish. This stage requires precision and patience for the best results. Here are crucial cabinet painting tips and staining techniques.
Priming for Paint
Primer acts as a base coat, promoting adhesion, blocking stains, and ensuring a more even color.
- Type of Primer: Use a high-quality oil-based or shellac-based primer for best adhesion, especially on laminate or previously varnished surfaces. Water-based primers can also work well if the surface is properly prepared.
- Application: Apply a thin, even coat of primer using a brush, roller, or sprayer. Ensure good coverage without drips.
- Drying and Sanding: Allow the primer to dry completely according to the manufacturer’s instructions. Once dry, lightly sand with 220-grit sandpaper and wipe away dust with a tack cloth. This creates a super-smooth surface for your paint.
Painting Your Cabinets
- Paint Choice: Opt for high-quality cabinet paint, typically a durable enamel like acrylic enamel or oil-based enamel. These paints offer better adhesion and durability.
- Application Methods:
- Spraying: This offers the smoothest, most professional finish but requires a sprayer and a well-ventilated area, preferably outdoors or in a spray booth.
- Rolling and Brushing: Use a high-quality foam roller for large, flat surfaces and a good-quality angled brush for edges and details. Apply thin, even coats, working with the grain. Avoid overworking the paint.
- Multiple Coats: Apply at least two thin coats of paint, allowing adequate drying time between each coat. Lightly sand with 220-grit sandpaper between coats and wipe with a tack cloth for a glass-smooth finish.
Staining Your Cabinets
- Stain Application:
- Wipe On: This is a popular and forgiving method for DIYers. Apply the stain with a lint-free cloth or sponge, working in the direction of the wood grain. Apply it evenly and wipe off the excess with a clean cloth after a few minutes, controlling the depth of the color.
- Brush On: Some stains can be brushed on. Apply evenly and wipe off the excess.
- Drying Time: Allow the stain to dry completely as per the manufacturer’s instructions. This can take several hours.
- Multiple Coats: You can apply multiple coats of stain to achieve a deeper, richer color. Ensure each coat is dry before applying the next.
Applying a Protective Topcoat (Crucial for Both Paint and Stain)
A topcoat protects your finish from wear and tear, spills, and moisture.
- For Painted Cabinets:
- Polyurethane/Varnish: A water-based polyurethane or a high-quality varnish is recommended. It dries clear and provides excellent durability.
- Application: Apply thin, even coats with a high-quality brush or foam applicator.
- Sanding Between Coats: Lightly sand between coats with 320-grit sandpaper and wipe with a tack cloth for a smooth finish.
- For Stained Cabinets:
- Polyurethane/Varnish: Similar to painted cabinets, a clear polyurethane or varnish is essential. Water-based polyurethanes are less likely to yellow the stain. Oil-based polyurethanes offer superior durability but can impart a slight amber tone.
- Application: Apply in thin, even coats, following the wood grain.
- Sanding Between Coats: Lightly sand with 320-grit sandpaper between coats and wipe with a tack cloth.
Table: Best Cabinet Refinishing Products by Finish Type
| Finish Type | Recommended Products | Key Features |
|---|---|---|
| Paint | Benjamin Moore Advance, Sherwin-Williams Emerald, Behr Premium Cabinet & Enamel Paint | Durable, self-leveling, good adhesion, washable. Water-based or oil-based options available. |
| Primer | Kilz Adhesion, Zinsser B-I-N Shellac-Based Primer | Excellent adhesion, stain blocking, smooth base for paint. |
| Stain | Minwax Wood Finish (Wipe-On), Varathane Premium Wood Stain | Easy application, even penetration, wide color selection. Consider pre-stain conditioner for soft woods. |
| Topcoat | Minwax Polycrylic (Water-Based), General Finishes High-Performance Polyurethane | Durable, scratch-resistant, water-resistant, available in matte, satin, semi-gloss, and gloss finishes. |
Reassembly and Final Touches
Once all your cabinet doors, drawers, and hardware have their new finish and the topcoat is fully cured, it’s time to put everything back together.
- Reattach Hardware: Screw back in your cleaned or new knobs and pulls.
- Rehang Doors and Insert Drawers: Carefully reattach the cabinet doors to their respective openings using the original hinges. Slide the drawers back into place.
- Final Wipe-Down: Give your newly refinished cabinets a final gentle wipe-down with a soft cloth to remove any dust or fingerprints.
The Art of Cabinet Refinishing Cost
The cabinet refinishing cost can vary significantly depending on the size of your kitchen, the condition of the existing cabinets, and whether you choose to paint or stain.
- Materials: The primary costs will be for sandpaper, primers, paints or stains, topcoats, brushes, rollers, degreaser, and possibly a chemical stripper. For a standard-sized kitchen, you might spend anywhere from $200 to $500 on materials.
- Tools: If you don’t already own them, you might need to invest in a good orbital sander, a paint sprayer, or quality brushes and rollers.
- Time: The biggest “cost” is your time. This project can take anywhere from a weekend to several weeks, depending on your pace and drying times.
When you compare this to the cost of replacing kitchen cabinets, which can easily run into thousands or even tens of thousands of dollars, refinishing is a highly cost-effective solution for a dramatic kitchen update.
Exploring Kitchen Cabinet Stain Colors and Painting Trends
Choosing the right color or stain is key to the success of your DIY cabinet makeover.
Popular Kitchen Cabinet Stain Colors:
- Dark Walnuts and Espresso: Offer a rich, sophisticated look that pairs well with lighter countertops and backsplashes.
- Honey and Light Oak: Provide a warm, natural feel that brightens the kitchen and works well with various décor styles.
- Gray Stains: A modern and versatile option that can lean towards cool or warm tones, complementing many color palettes.
- White Washed or Cerused Oak: A popular choice for achieving a coastal or modern farmhouse look, highlighting the wood grain with a subtle white hue.
Trending Cabinet Painting Colors:
- Deep Blues and Greens: Navy blue, forest green, and teal are making bold statements, adding depth and character.
- Warm Off-Whites and Creams: A softer alternative to stark white, offering a cozy and inviting feel.
- Black: For a dramatic and contemporary look, matte or semi-gloss black cabinets can be stunning.
- Two-Tone Kitchens: Pairing a different color for upper and lower cabinets or for the island can add visual interest.
When to Consider Cabinet Resurfacing
While this guide focuses on refinishing, it’s worth mentioning kitchen cabinet resurfacing guide options. Resurfacing can sometimes be an alternative if your cabinet boxes are in good shape, but the doors are beyond repair or you desire a completely new door style. This might involve replacing just the doors and drawer fronts, or applying a veneer over existing cabinet boxes. However, for most situations where you want to update the look of your existing cabinets, refinishing is the most accessible and cost-effective DIY approach.
Frequently Asked Questions (FAQ)
Q1: How long does it take to refinish kitchen cabinets?
The time commitment varies greatly depending on your experience, the number of cabinets, and the chosen finish. A typical range is from a long weekend to 1-2 weeks, allowing for drying and curing times between coats.
Q2: Do I need to remove my cabinets to refinish them?
No, you do not need to remove the entire cabinet boxes. You only need to remove the doors and drawer fronts. The cabinet boxes themselves can be painted or stained in place.
Q3: What is the easiest way to refinish kitchen cabinets?
For most DIYers, painting is generally considered easier than staining, especially if the cabinets are not solid wood or have a less desirable grain. Wipe-on stains are also quite beginner-friendly. The most crucial “easy” factor is thorough preparation.
Q4: Can I refinish laminate kitchen cabinets?
Yes, you can refinish laminate cabinets, but it requires specific preparation. Thorough cleaning, degreasing, and proper priming with a bonding primer designed for laminate are essential for the paint to adhere.
Q5: How do I get a smooth finish when painting cabinets?
Achieve a smooth finish by using high-quality brushes and rollers, applying thin, even coats, allowing adequate drying time between coats, lightly sanding with fine-grit sandpaper (220-320 grit) between coats, and always wiping with a tack cloth to remove dust. Using a paint sprayer can also yield the smoothest results.
Q6: What’s the difference between refinishing and refacing cabinets?
Refinishing involves cleaning, sanding, and applying a new finish (paint or stain) to the existing cabinet surfaces, doors, and drawer fronts. Refacing involves removing the old doors and drawer fronts and replacing them with new ones, often with a new veneer applied to the cabinet boxes themselves. Refinishing is a cosmetic update, while refacing is a more substantial renovation.
Q7: Should I spray or brush/roll my cabinets?
Spraying provides the smoothest, most factory-like finish but requires specialized equipment and a well-ventilated space. Brushing and rolling are more accessible for DIYers and can produce excellent results with the right technique and quality tools.
By following these detailed kitchen cabinet refinishing steps, you can embark on a rewarding DIY cabinet makeover that revitalizes your kitchen and provides stunning, long-lasting results. Good luck!