
Yes, you can replace a 3-hole kitchen faucet yourself. This guide will walk you through the process step-by-step, making your kitchen sink faucet replacement a manageable DIY project.
Replacing a 3-hole kitchen faucet might seem daunting, but with the right preparation and tools, it’s a very achievable DIY project. This detailed guide will help you navigate the entire process, from shutting off the water to enjoying your new faucet. Whether you’re dealing with a leaky faucet that needs a leak repair, or you’re just looking for a style update, this guide covers everything you need to know for a successful kitchen faucet installation.
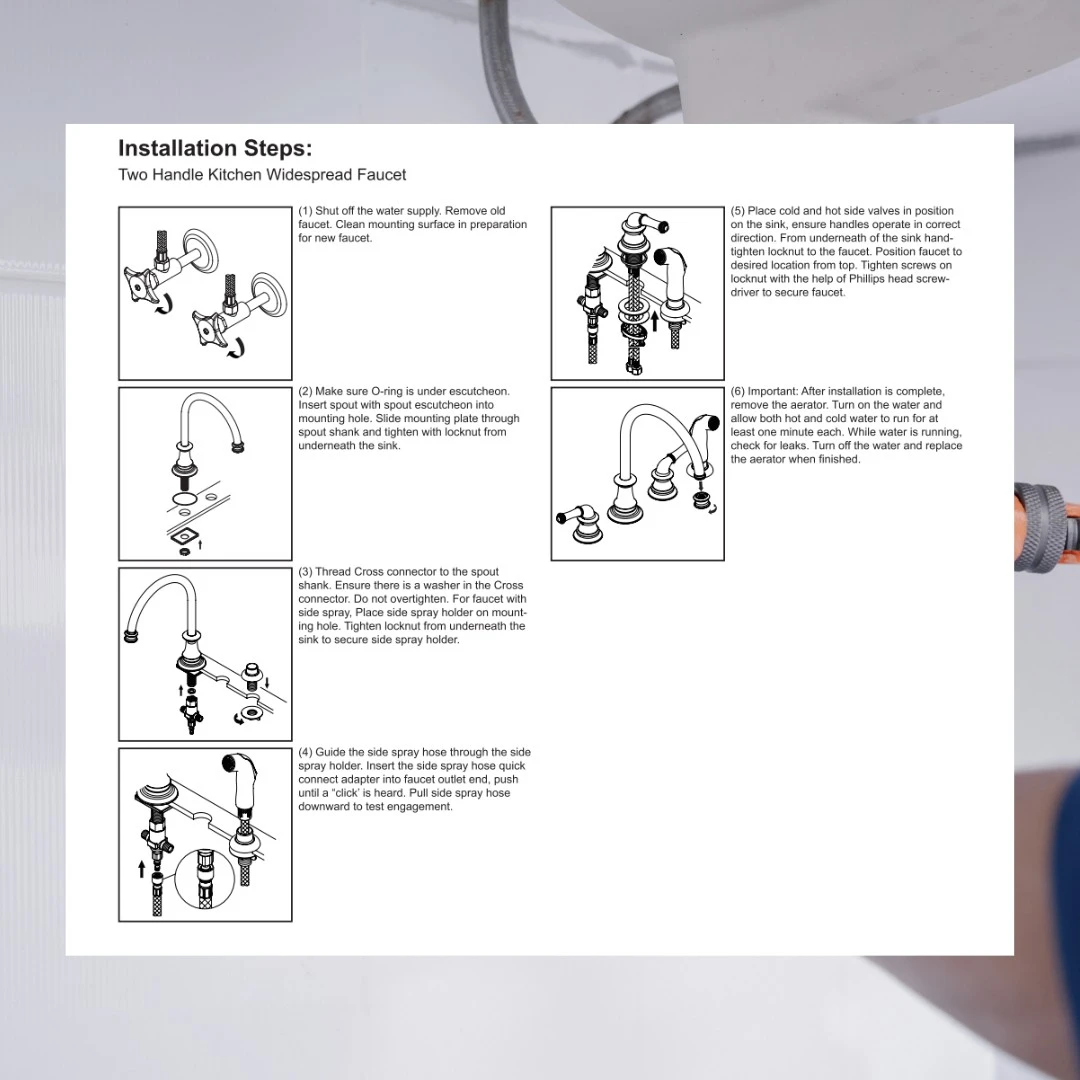
Image Source: pioneerind.com
Getting Ready: Tools and Materials
Before you start, gather all your tools and materials. Having everything on hand will make the process smoother and prevent frustrating trips to the store mid-project.
Essential Tools You’ll Need:
- Adjustable Wrench: This is your go-to tool for tightening and loosening nuts and fittings.
- Basin Wrench: This specialized tool is crucial for reaching nuts in tight spaces under the sink, often required for faucet mounting hardware.
- Plumber’s Putty or Silicone Caulk: To create a watertight seal between the faucet base and the sink.
- Bucket: To catch any residual water when disconnecting old plumbing supply lines.
- Towels or Rags: For cleaning up spills and drying parts.
- Safety Glasses: To protect your eyes from falling debris or splashing water.
- Flashlight or Headlamp: To see clearly in the often-dark space under the sink.
- Screwdriver Set: You might need a Phillips or flathead screwdriver depending on your faucet’s design.
- Putty Knife: To help scrape away old putty or caulk.
- Scrub Brush or Old Toothbrush: For cleaning the sink surface.
New Faucet and Related Parts:
- New 3-Hole Kitchen Faucet: Ensure it’s designed for a 3-hole sink, typically with an 8-inch center spread.
- New Plumbing Supply Lines: It’s highly recommended to replace old supply lines when installing a new faucet. Check the connections on your shut-off valves and the new faucet to ensure you get the correct size and type.
- Optional: New Shut-off Valves: If your existing shut-off valves are old, corroded, or difficult to turn, consider replacing them at this time.
Step-by-Step Guide to Replacing Your 3-Hole Kitchen Faucet
Let’s dive into the actual process of how to replace a 3-hole kitchen faucet.
Step 1: Shut Off the Water Supply
This is the most critical first step for any plumbing work.
- Locate the shut-off valves under your sink. There should be two: one for hot water and one for cold water.
- Turn both valves clockwise until they are fully closed.
- Turn on your old faucet to release any remaining water pressure in the lines and to confirm the water is indeed off. Water should stop flowing after a few seconds. If it continues to trickle, the shut-off valves might need replacement.
Step 2: Disconnect Old Plumbing Supply Lines
Now, you’ll detach the old faucet from the water supply.
- Place your bucket and towels under the connections.
- Use your adjustable wrench to loosen the nuts connecting the plumbing supply lines to the shut-off valves.
- Once disconnected from the valves, disconnect the other end of the supply lines from the old faucet. There might be some water left in the lines, which the bucket will catch.
Step 3: Remove the Old Faucet
This can be the trickiest part due to the confined space.
- Look up under the sink where the faucet base meets the sink. You’ll see large nuts or mounting hardware holding the faucet in place.
- Use your basin wrench to loosen and remove these nuts. This is where the basin wrench really shines, allowing you to grip and turn nuts in awkward angles.
- Once the mounting hardware is removed, carefully lift the old faucet straight up and out of the sink holes.
- If the faucet is stuck, check for any remaining connections or caulk. A putty knife can help gently loosen any stubborn sealant.
Step 4: Clean the Sink Surface
A clean surface is essential for a good seal with the new faucet.
- Use your putty knife to carefully scrape away any old plumber’s putty or silicone caulk from the sink surface around the faucet holes.
- Wipe down the area with a damp cloth. A scrub brush or old toothbrush can help remove stubborn residue.
- Ensure the surface is dry before installing the new faucet.
Step 5: Prepare and Install the New Faucet
Now it’s time to put in your new 3-hole faucet. The process for a 3-hole faucet typically involves three separate pieces: the main faucet body and two side valves (or a single-handle faucet with a deck plate that covers the extra holes).
- Read the Manufacturer’s Instructions: Each faucet is slightly different. Always refer to the specific installation manual that came with your new faucet. This is crucial for ensuring correct kitchen faucet installation.
- Apply Plumber’s Putty or Caulk: Place a rope of plumber’s putty or a bead of silicone caulk around the base of the main faucet body and any separate side valves that will sit directly on the sink deck. This creates a watertight seal. Some faucets come with rubber gaskets, in which case putty or caulk might not be necessary; check your instructions.
- Position the Faucet: Carefully feed the faucet’s shanks (the threaded pipes that extend down from the faucet) through the corresponding holes in your sink. For a 3-hole setup, this means placing the main faucet body in the center hole and any side valves in the outer holes. If you have a single-handle faucet with a deck plate for a 3-hole sink, you’ll install the deck plate first, then the faucet. This type of installation is common when upgrading from separate hot and cold handles to a more modern single handle faucet installation.
- Secure the Faucet: From underneath the sink, slide any provided washers and rubber gaskets onto the faucet shanks. Then, thread on the faucet mounting hardware (nuts or mounting brackets) that came with your new faucet. Tighten these by hand first to ensure the faucet is aligned correctly on the sink.
- Tighten the Mounting Hardware: Use your basin wrench and adjustable wrench to snugly tighten the mounting hardware. Be careful not to overtighten, as this can damage the sink or faucet. Ensure the faucet is straight and secure.
Step 6: Connect New Plumbing Supply Lines
Connect the new faucet to the water supply.
- Attach the new plumbing supply lines to the faucet shanks. Hand-tighten them first, then use an adjustable wrench to give them a snug turn.
- Connect the other ends of the supply lines to the appropriate shut-off valves (hot to hot, cold to cold). Again, hand-tighten first, then snug them up with a wrench. Make sure not to overtighten, which can damage the fittings.
Step 7: Test for Leaks
Before you call the job done, thoroughly check for leaks.
- Turn the shut-off valves back on slowly by turning them counter-clockwise.
- Turn on your new faucet and let both hot and cold water run for a minute.
- While the water is running and after you turn it off, carefully inspect all the connections under the sink for any drips or moisture. Pay close attention to where the supply lines connect to the shut-off valves and the faucet.
- If you find any leaks, gently tighten the connections a quarter turn at a time until the leak stops. If a leak persists, you may need to disconnect and reconnect the line, ensuring the fitting is seated correctly.
Step 8: Final Touches
Once you’ve confirmed there are no leaks, it’s time to clean up and enjoy your new faucet.
- Wipe away any excess plumber’s putty or caulk that may have squeezed out from under the faucet base.
- Clean up any water spills under the sink.
- Turn off the faucet and check one last time for any residual drips from the spout.
Common Issues and Troubleshooting for DIY Faucet Replacement
Even with the best preparation, you might run into a few snags. Here’s how to handle common problems when you replace 3 hole faucet.
Stubborn Old Faucet
Sometimes, old faucets are really stuck. This is often due to mineral buildup or years of sealant.
- Penetrating Oil: Spraying a penetrating oil on the mounting nuts can help loosen them. Let it sit for about 15-30 minutes.
- Gentle Tapping: Sometimes, a few gentle taps with a hammer on the basin wrench handle can help break the bond.
- Cutting Nuts: As a last resort, if the nuts absolutely will not budge, you might need to use a hacksaw or a rotary tool with a metal cutting wheel to carefully cut through the mounting nuts. Be extremely careful not to damage the sink itself.
Leaky Connections
A small drip can turn into a big problem if not addressed.
- Tighten Fittings: As mentioned, a quarter turn can often fix a minor leak.
- Check Washers/Seals: Ensure all rubber washers and seals are properly in place and not damaged. If a supply line has a rubber seal, and it looks worn or cracked, it’s best to replace the entire supply line.
- Damaged Threads: If threads on the faucet or shut-off valve are damaged, you might need to replace the entire faucet or shut-off valve.
Problems with Cartridge Replacement
While this guide is about full faucet replacement, many leaks in older faucets are due to a faulty cartridge. If you were attempting a cartridge replacement instead of a full swap, issues often arise from not seating the cartridge correctly or damaging the O-rings during installation. Ensure the new cartridge is aligned with any notches or tabs in the faucet body and that O-rings are lubricated with plumber’s grease.
Low Water Pressure
If your new faucet has low water pressure, check a few things:
- Aerator: The aerator (the little screen at the tip of the spout) can get clogged with debris from the installation process. Unscrew it and clean it out.
- Shut-off Valves: Ensure the shut-off valves are fully open.
- Supply Lines: Make sure the new plumbing supply lines are not kinked.
- Internal Debris: Sometimes, debris from old pipes can get lodged inside the faucet itself. You might need to temporarily disconnect the supply lines and flush them out (check manufacturer instructions for proper flushing procedure).
Benefits of Upgrading Your Kitchen Faucet
Beyond fixing leaks, replacing an old faucet offers several advantages.
- Improved Aesthetics: A new faucet can dramatically update the look of your kitchen.
- Better Functionality: Modern faucets often have features like pull-down sprayers, touchless operation, or more ergonomic handles that make daily tasks easier.
- Water Efficiency: Many new faucets are designed to be more water-efficient, helping you save on your water bills and reduce your environmental impact.
- Prevent Future Leaks: Installing new plumbing supply lines and ensuring proper faucet mounting hardware are tightened can prevent future leak repair headaches.
Frequently Asked Questions (FAQ)
Here are some common questions people have when undertaking a diy faucet change.
Q1: How long does it typically take to replace a kitchen faucet?
A: For a 3-hole faucet, if you have all the tools and parts ready and are working methodically, it usually takes about 1 to 3 hours for an experienced DIYer. For a first-timer, it might take a bit longer, perhaps 3-4 hours.
Q2: Do I need to turn off the main water supply to the house?
A: No, you typically do not need to turn off the main water supply. The individual shut-off valves under the sink are sufficient for isolating the water flow to the faucet.
Q3: What is the difference between plumber’s putty and silicone caulk for sealing a faucet?
A: Plumber’s putty is a pliable dough-like substance that creates a seal and prevents water from seeping under the faucet base. It remains somewhat soft and can be removed relatively easily. Silicone caulk, on the other hand, cures to a hard, flexible rubbery seal. For most faucet installations, plumber’s putty is traditionally used, but silicone caulk is also an acceptable and often more durable option, especially on porous surfaces. Always check your faucet’s installation manual for the manufacturer’s recommendation.
Q4: Can I replace just one part of a 3-hole faucet, like a handle or spout?
A: Yes, it’s often possible to replace individual parts like handles or spouts, especially if your faucet is relatively new and the parts are available. However, if you’re experiencing leaks, it might be the internal cartridge replacement that’s needed, or the seals within the handles or spout are worn. If multiple parts are failing or the faucet is old, a full replacement is usually more cost-effective and provides a more reliable solution.
Q5: What is an 8-inch center spread for a 3-hole faucet?
A: An 8-inch center spread refers to the distance between the center of the hot water handle hole and the center of the cold water handle hole on your sink or countertop. Most 3-hole kitchen faucets are designed for an 8-inch spread, but it’s always crucial to measure your existing sink’s hole configuration before purchasing a new faucet to ensure compatibility.
Q6: My new faucet has a longer shank than my old one. Is this a problem?
A: Not necessarily. Longer shanks usually mean the faucet can accommodate thicker countertops. You’ll just use the extra length provided by the faucet mounting hardware. Ensure you still have enough thread to securely fasten the nuts. If the shank is excessively long and protrudes too far, you might need to cut it down carefully, but this is rarely necessary with standard installations.
By following this comprehensive guide, you’ll be well-equipped to tackle your 3-hole kitchen faucet replacement, transforming your kitchen with a fresh look and reliable functionality. Remember to work patiently, double-check your connections, and enjoy the satisfaction of a successful DIY project!