
Image Source: i.ytimg.com
How To Replace Kitchen Sink Drain: Step-by-Step
Can you replace a kitchen sink drain yourself? Yes, you absolutely can! Replacing a kitchen sink drain is a manageable DIY project that can save you money and ensure your sink drains smoothly. This guide will walk you through the entire process, from gathering your tools to ensuring a watertight connection. We’ll cover everything you need to know about your kitchen sink plumbing, including P-trap replacement, dealing with a garbage disposal drain, and the proper sink strainer installation. Let’s get your kitchen sink plumbing repair underway!
Why Replace Your Kitchen Sink Drain?
Over time, the drain components in your kitchen sink can wear out. Here are common reasons you might need to replace your sink drain:
- Leaks: Small drips around the drain flange or under the sink can indicate failing seals or cracked components.
- Slow Draining: Persistent slow drains, even after snaking or using chemical drain cleaners, can point to a buildup in the drainpipe assembly or a faulty drain stopper.
- Corrosion or Rust: Metal drain parts can corrode, especially if you have hard water or dispose of harsh substances down the drain. This can lead to leaks and aesthetic issues.
- Damaged Strainer Basket: The strainer basket is the part you see in the sink. If it’s cracked, bent, or has a poorly fitting seal, it can cause leaks and prevent proper drainage.
- Outdated Fixtures: You might want to upgrade to a more modern or functional drain assembly, perhaps with a different type of stopper or a better-fitting strainer.
- Garbage Disposal Issues: If your garbage disposal drain is leaking or clogged, it might be time to replace the entire drain assembly connected to it.
Tools and Materials You’ll Need
Before you start, gather all the necessary tools and materials to make the job go smoothly.
Tools:
- Bucket or large bowl (to catch water)
- Adjustable wrench or pipe wrench
- Plumber’s putty or silicone sealant
- Screwdriver (Phillips and/or flathead, depending on your current drain)
- Putty knife or scraper
- Rag or old towels
- Safety glasses
- Gloves
- Flashlight or headlamp
- Wire brush (optional, for cleaning threads)
- Basin wrench (helpful for tight spaces under the sink)
- Pliers (channel-lock pliers can be useful)
Materials (New Kitchen Sink Drain Kit):
Your new drain kit will typically include:
- Sink strainer body
- Gasket(s) for the sink strainer
- Locknut for the sink strainer
- Tailpiece (the pipe that connects to the strainer body)
- Washers and nuts for the tailpiece connection
- P-trap replacement parts (if needed, often come with a full drain kit or are purchased separately)
- Garbage disposal drain flange and gasket (if applicable)
- Drainpipe assembly components (depending on what you’re replacing)
- Sink strainer installation hardware
Step-by-Step Guide to Replacing Your Kitchen Sink Drain
Let’s break down the process into manageable steps.
Step 1: Prepare the Work Area
Safety and cleanliness are key.
- Clear the Sink: Remove everything from the sink and the cabinet below.
- Protect the Cabinet: Place towels or a tarp in the cabinet to catch any residual water.
- Turn Off Water: While not strictly necessary for the drain itself, it’s good practice to turn off the hot and cold water supply valves under the sink. This prevents accidental water release if you disturb the supply lines. Look for small knobs or levers on the pipes leading to your faucet.
Step 2: Old Drain Removal
This is where you’ll start disconnecting the existing drain.
H3: Draining Residual Water
- Place your bucket or bowl directly under the P-trap (the U-shaped pipe) to catch any water that might still be in the pipes.
- Loosen the slip nuts connecting the P-trap to the tailpiece (the pipe coming directly from the sink drain) and the wall drainpipe. You can usually do this by hand, but you might need pliers if they are tight.
- Carefully remove the P-trap and empty any water into the bucket.
H3: Detaching the Tailpiece and Strainer
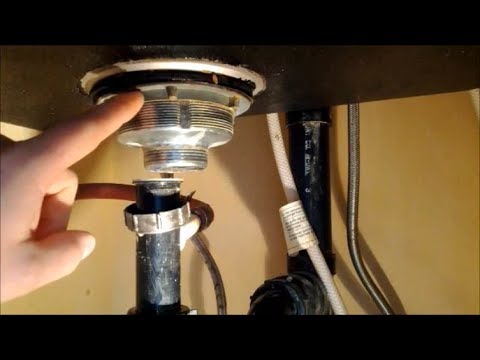
- Locate the Locknut: Look for the large locknut underneath the sink that secures the sink strainer to the underside of the sink basin.
- Loosen the Locknut: Use your adjustable wrench or basin wrench to loosen and remove this locknut. Be prepared for a bit of water to drip out as you loosen it.
- Remove the Tailpiece: Once the locknut is off, the tailpiece and the bottom part of the strainer assembly should come loose. You might need to wiggle it a bit.
- Remove the Sink Strainer: From inside the sink basin, lift the old sink strainer straight up. If it’s stuck, you might need to use a putty knife to gently pry around the edges.
- Clean the Sink Underside: Use your putty knife and scraper to remove any old plumber’s putty or sealant from the sink drain opening. A wire brush can help clean up any stubborn residue.
Step 3: Preparing for the New Drain
Now that the old drain is out, it’s time to get the new one ready.
H3: Inspecting the Sink Opening
- Ensure the sink drain opening is clean and free of any debris. This is crucial for a good seal.
- If you are replacing a drain for a double sink or a sink with a garbage disposal drain, make sure you have the correct type of strainer for that configuration. Garbage disposals often have a specific flange that needs to be compatible.
H3: Applying Plumber’s Putty or Sealant
This is a critical step for sealing drain flange and preventing leaks.
- For Standard Strainers: Roll a rope of plumber’s putty about the thickness of a pencil. Apply this putty evenly around the underside of the new sink strainer flange.
- For Garbage Disposal Flanges: Many garbage disposal flanges come with a built-in gasket, or you might need to apply plumber’s putty or silicone sealant. Check the manufacturer’s instructions for your specific garbage disposal drain flange. For most, a thick bead of plumber’s putty around the underside of the flange is recommended.
- Alternative Sealants: Silicone sealant can also be used, especially for certain materials or if you prefer a more permanent bond.
Step 4: Sink Strainer Installation
Getting the new strainer seated correctly is vital.
H3: Positioning the New Strainer
- Carefully insert the new sink strainer into the drain opening from inside the sink basin.
- Press down firmly to seat the putty or sealant against the sink basin.
- If you have a garbage disposal, ensure the drain opening for the disposal is oriented correctly.
H3: Securing the New Drain Fitting
- From underneath the sink, slide the rubber gasket, followed by the metal washer and then the large locknut onto the threaded shank of the sink strainer.
- Tighten the locknut by hand as much as possible.
- Use your adjustable wrench or basin wrench to tighten the locknut an additional quarter to half turn. Be careful not to overtighten, as this can crack the sink basin or damage the strainer. The goal is to create a watertight connection.
- Wipe away any excess plumber’s putty that squeezes out from under the strainer flange inside the sink.
Step 5: Assembling the Drainpipe Assembly
This involves connecting the tailpiece and the P-trap.
H3: Connecting the Tailpiece
- Thread the tailpiece onto the bottom of the sink strainer assembly. Hand-tighten it first.
- Attach the rubber gasket and the plastic or metal slip nut onto the tailpiece.
H3: Assembling the P-Trap
- Connect the P-trap to the tailpiece. Ensure the inlet of the P-trap connects to the tailpiece.
- Slide the rubber washer into the slip nut connecting to the tailpiece, then thread the slip nut onto the P-trap. Hand-tighten.
- Connect the other end of the P-trap to the drainpipe coming from the wall. Again, use the rubber washer and slip nut, and hand-tighten.
- Align the P-trap so it fits snugly without being overly stressed.
Step 6: Final Tightening and Testing
This is where you ensure everything is secure and leak-free.
H3: Tightening Slip Nuts
- Use pliers or an adjustable wrench to tighten the slip nuts on the P-trap. Tighten them until they are snug, but avoid overtightening, which can strip the plastic threads or crack the pipes. You want a firm seal.
H3: Testing for Leaks
- Run Water: Fill the sink with a few inches of water.
- Check All Connections: While the water is filling and as it drains, carefully inspect all the connections you made:
- Around the sink strainer flange inside the sink.
- Where the tailpiece connects to the strainer assembly.
- All slip nut connections on the P-trap and tailpiece.
- Where the P-trap connects to the wall drainpipe.
- Dry Thoroughly: Use a dry rag to wipe down all connections.
- Drain the Sink: Let the water drain completely. Watch closely for any drips or leaks.
- Repeat if Necessary: If you find any leaks, try tightening the offending slip nut a bit more. If a leak persists around the strainer flange, you may need to re-do that section, ensuring proper putty application and tightening.
Step 7: Reattaching Garbage Disposal (If Applicable)
If you have a garbage disposal, this step is crucial.
- Connect Disposal to Flange: Most garbage disposals have a mounting system that attaches directly to the disposal flange you installed in the sink. Follow the manufacturer’s instructions for your specific model. This usually involves aligning the disposal, rotating it into place, and securing it with locking rings and screws.
- Connect Drainpipe: The outlet on the garbage disposal will connect to the rest of your drainpipe assembly, typically via a short tailpiece and a P-trap. Ensure all connections are secure.
What if My Garbage Disposal Drain is Clogged or Leaking?
If your issue is with the garbage disposal drain, you may need to disassemble the connections to it. Often, a leak from the disposal unit itself indicates a problem with the unit’s seals, not just the drain fitting. For clogs specific to the disposal, consult your disposal’s manual. If the connection between the disposal and the sink drain is leaking, it usually means the flange seal or the connections to the disposal are loose or worn.
Troubleshooting Common Issues
Here are some common problems and how to fix them.
- Leaking Around the Strainer:
- Cause: Insufficient plumber’s putty, improper tightening, or a damaged sink basin.
- Fix: Re-do the sink strainer installation. Ensure ample putty is used and the locknut is tightened securely.
- Leaking at Slip Nuts:
- Cause: Loose slip nuts, missing or damaged washers, or cracked plastic threads.
- Fix: Tighten slip nuts. If the leak persists, replace the rubber washer. If the plastic threads are damaged, you may need to replace the pipe section or the fitting.
- Slow Draining After Replacement:
- Cause: The P-trap might be installed backward, or there could be a blockage further down the drainpipe.
- Fix: Ensure the P-trap is oriented correctly (water flows into the trap from the sink and out towards the wall). If it’s still slow, try snaking the drainpipe leading from the P-trap.
- Bad Odors:
- Cause: Dried-out P-trap, or debris trapped in the drain.
- Fix: Run water for a few minutes to replenish the water in the P-trap. If odors persist, clean out the drainpipe assembly thoroughly.
Frequently Asked Questions (FAQ)
Q1: How often should I replace my kitchen sink drain?
A: There’s no set schedule. You should replace it when you notice leaks, persistent clogs, corrosion, or damage to the strainer.
Q2: What is plumber’s putty, and why is it used?
A: Plumber’s putty is a soft, pliable compound used to create a watertight seal around plumbing fixtures, like sink strainers, where they meet the sink basin. It’s essential for preventing leaks.
Q3: Can I use silicone sealant instead of plumber’s putty?
A: Yes, in many cases, silicone sealant can be used. However, check the instructions for your new drain kit, as some manufacturers specifically recommend putty. Silicone offers a more permanent bond, which can make future repairs more difficult.
Q4: My old drain is really stuck. What can I do?
A: You might need a basin wrench for extra leverage on the locknut. Gentle persuasion with a rubber mallet on the underside of the strainer might help loosen it. If it’s severely corroded, you might need to carefully cut it away with a hacksaw, taking care not to damage the sink basin.
Q5: What’s the difference between a sink strainer and a drain flange?
A: The drain flange is the part that sits inside the sink and connects to the rest of the drain assembly. The sink strainer is the basket or stopper part that fits into the flange to catch food particles and control water flow. Often, these are integrated into one unit in a drain kit.
Q6: Do I need to replace the P-trap when I replace the sink drain?
A: Not always. If your P-trap is in good condition, without cracks or significant corrosion, you can often reuse it. However, drain kits sometimes include new P-trap components, and it’s a good idea to replace old or worn-out P-traps simultaneously for a complete kitchen sink plumbing repair.
By following these steps, you can successfully replace your kitchen sink drain and ensure your kitchen sink plumbing functions correctly. This DIY approach not only addresses immediate issues but also enhances your home’s overall functionality.