
What is the best way to sharpen kitchen knives? The best way to sharpen kitchen knives is a combination of regular honing and periodic sharpening using the right tools and techniques. Can I sharpen my knives at home? Yes, you absolutely can sharpen your knives at home with practice and the correct equipment. Who is this guide for? This guide is for anyone who wants to keep their kitchen knives performing at their peak, from beginner home cooks to seasoned culinary enthusiasts.
A dull knife is not only frustrating but also dangerous. It requires more force to cut, increasing the risk of slippage and injury. Learning how to properly sharpen your kitchen knives can transform your cooking experience, making prep work faster, more enjoyable, and safer. This comprehensive guide will walk you through the essential steps and tools to achieve a razor-sharp edge, bringing your knives back to their former glory. We’ll delve into the different sharpening methods, explain the importance of various grit levels, and cover essential blade maintenance for longevity.
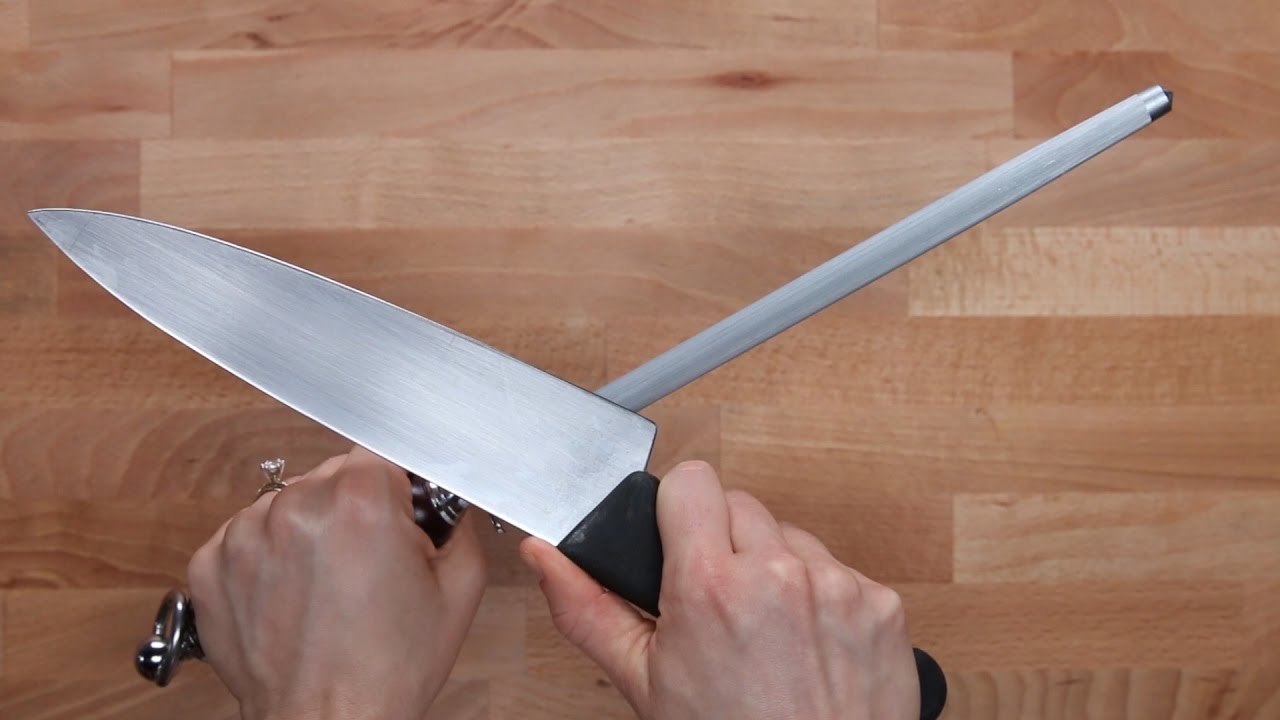
Image Source: i.ytimg.com
The Fundamentals of a Sharp Knife
Before we dive into the sharpening process, let’s grasp a few basic concepts. A truly sharp knife has a cutting edge that is thin and uniform. When you sharpen a knife, you are essentially removing a small amount of metal to create this thin edge.
Why Knives Become Dull
Knives dull for several reasons:
- Normal Use: Every time you slice through food, especially tough ingredients or surfaces like cutting boards, the microscopic teeth of the blade wear down.
- Improper Storage: Storing knives loosely in a drawer can cause them to bang against other utensils, nicking and dulling the edge.
- Incorrect Cleaning: Putting knives in the dishwasher can expose them to harsh detergents and high heat, which can damage the edge and cause corrosion.
- Using the Wrong Cutting Surface: Cutting on hard surfaces like glass, ceramic, or stone can quickly dull even the best knives.
Types of Sharpening Tools
There are several tools you can use to sharpen your kitchen knives. Each has its own strengths and learning curve.
Honing Steel vs. Sharpening Steel
It’s crucial to distinguish between a honing steel (often called a sharpening steel, though this term can be confusing) and a true sharpening tool.
-
Honing Steel (or Honing Rod): This tool doesn’t actually remove metal. Instead, it realigns the microscopic teeth of the blade that have bent or rolled over during use. Think of it like straightening a bent comb. Regular honing keeps an already sharp edge performing well between sharpenings. They are typically made of steel, ceramic, or diamond-coated steel. Diamond rods have a fine layer of diamond particles and do remove a tiny amount of metal, acting as a light sharpener.
-
Sharpening Steel: This term is often used interchangeably with honing steel, but technically, a true sharpening steel does remove metal to create a new edge. However, most rods sold as “sharpening steels” are primarily for honing.
Whetstones (Knife Sharpening Stones)
Whetstones, also known as knife sharpening stones, are the traditional and arguably most effective way to sharpen a knife. They come in various materials and grit levels, which determine how much metal they remove and how fine the resulting edge is.
- Waterstones: These are the most common type. They require soaking in water before use. They cut quickly and produce a good edge.
- Oilstones: These require oil as a lubricant. They tend to cut slower than waterstones but can provide a very refined edge.
- Diamond Stones: These are very durable and effective, cutting quickly without needing soaking. They are a great option for harder steels.
Electric Knife Sharpeners
These are convenient and fast. They typically have slots with abrasive wheels or belts that guide the blade at a preset angle. While quick, they can remove more metal than manual methods and may not offer the same level of control over the edge.
Sharpening Systems and Guides
Many sharpening systems include angle guides to help maintain a consistent angle, which is vital for effective sharpening. These can be very helpful for beginners.
Mastering the Whetstone: The Pro’s Choice
Using whetstones is the most versatile and rewarding method for achieving a truly professional edge. It requires practice, patience, and an understanding of whetstone angles.
Choosing Your Whetstones
The key to effective sharpening with whetstones lies in using a progression of grit levels.
Grit Levels Explained
Grit refers to the coarseness of the abrasive particles on the stone.
- Coarse Grit (e.g., 120-400): Used for repairing damaged edges, reprofiling a blade, or sharpening very dull knives. This grit removes a significant amount of metal.
- Medium Grit (e.g., 600-1500): The workhorse grit for general sharpening and restoring a good edge.
- Fine Grit (e.g., 2000-6000): Used to refine the edge and make it sharper.
- Extra-Fine Grit (e.g., 8000+): Used for polishing the edge to an extremely keen, mirror-like finish.
A good starting set for most home cooks would be a combination stone with a medium grit (around 1000) on one side and a fine grit (around 4000) on the other.
Preparing Your Whetstone
- Waterstones: Soak your waterstone in water until it stops producing bubbles. This usually takes 5-10 minutes, but check the manufacturer’s instructions. Some stones are splash-and-go and don’t require soaking.
- Oilstones: Apply a thin layer of sharpening oil to the surface of the stone.
Finding the Right Angle
This is the most critical aspect of sharpening. Most Western-style kitchen knives perform best with an edge angle of 15-20 degrees per side. Japanese knives often have a steeper angle, typically 10-15 degrees.
- How to Estimate the Angle: A common trick is to place the knife on the stone and adjust the angle until the entire bevel of the blade is in contact with the stone.
- To achieve 20 degrees, lay the knife flat on the stone, then lift the spine until the spine is roughly at the same height as the edge.
- To achieve 15 degrees, lift the spine slightly higher.
Using Angle Guides
If you’re new to sharpening, angle guides can be invaluable. These small clips attach to the spine of the knife and help maintain a consistent angle throughout the stroke.
The Sharpening Process with Whetstones
- Secure Your Stone: Place your prepared whetstone on a non-slip surface. A damp cloth or a special stone holder works well.
- Start with the Coarsest Grit (if needed): If your knife is very dull or damaged, begin with your coarse stone.
- Stroke Technique:
- Hold the knife firmly with one hand, placing your fingers on the blade just behind the edge.
- Use your other hand to guide the spine of the knife, applying steady, even pressure.
- Push the knife across the stone, maintaining your chosen whetstone angles, from heel to tip. Imagine you are trying to slice a thin layer off the stone.
- Pull the knife back across the stone, again maintaining the angle and pressure.
- Repeat this motion, working the entire length of the blade.
- Create a Burr: As you sharpen one side, you’ll eventually feel a slight lip or “burr” form on the opposite side of the edge. This indicates you’ve sharpened through to the very apex of the blade. You want to create this burr along the entire length of the edge.
- Switch Sides: Once a burr is formed along the entire length of one side, flip the knife over and repeat the sharpening process on the other side until a burr forms on the first side.
- Progress to Finer Grits: Move to your medium grit stone and repeat the process, focusing on removing the burr created by the coarser stone and refining the edge. You’ll use fewer strokes on finer grits.
- Refine the Edge: Continue this process with your fine and extra-fine stones. On these grits, the goal is to polish the edge and remove any remaining microscopic burrs.
Testing the Sharpness
- Paper Test: A sharp knife should easily slice through a piece of paper held vertically. It should cut cleanly without tearing or snagging.
- Tomato Test: A truly sharp knife will bite into the skin of a ripe tomato with minimal pressure.
Maintaining Your Edge: The Role of Honing
Honing steel is essential for maintaining the sharpness of your knives between full sharpenings. It realigns the microscopic burrs that form on the cutting edge during use, restoring its keenness.
How to Use a Honing Steel
- Secure the Steel: Hold the honing steel vertically with the tip resting on a stable surface (like a cutting board or counter).
- Find the Angle: Position the knife against the steel at the same angle you used for sharpening (15-20 degrees for most Western knives, 10-15 for Japanese).
- Hone One Side: Lightly draw the blade down the steel from heel to tip. Apply very light pressure.
- Alternate Sides: Flip the knife and repeat the motion on the other side of the blade.
- Repeat: Perform 5-10 strokes on each side.
Important: Honing is about realigning, not sharpening. Use light pressure.
Electric Knife Sharpeners: Convenience and Speed
Electric knife sharpeners offer a quick and easy way to sharpen your knives, especially if you’re pressed for time or find manual sharpening challenging.
How Electric Sharpeners Work
Most electric sharpeners have multiple slots, each containing abrasive wheels or belts set at specific angles. You draw the knife through these slots.
- Coarse/Sharpening Slot: This slot has coarser abrasives to set or restore the edge.
- Fine/Honing Slot: This slot has finer abrasives to refine and polish the edge.
Tips for Using an Electric Sharpener
- Read the Instructions: Each sharpener is slightly different. Always follow the manufacturer’s guidelines.
- Use Light, Even Pressure: Don’t force the knife. Let the machine do the work.
- Maintain a Consistent Angle: Most electric sharpeners have guides to help you maintain the correct angle.
- Alternate Strokes: Draw the knife through each slot a few times, alternating sides if the sharpener is designed that way.
- Don’t Over-Sharpen: Too many passes can remove excessive metal and shorten the lifespan of your knife.
- Clean Your Knife: After sharpening, wipe your knife clean to remove any metal dust.
Caution: While convenient, electric knife sharpeners can remove more metal than manual methods. Use them judiciously for general maintenance rather than major repairs.
Stropping Blades: The Final Polish
Stropping blades is the final step in achieving an incredibly sharp and polished edge. It involves using a flexible material, like leather, to remove any remaining microscopic burr and align the very apex of the cutting edge.
What is Stropping?
Stropping is essentially a very fine form of honing, using a smooth abrasive surface to polish and refine the edge. It’s often done with leather strops, which can be plain or loaded with very fine abrasive compounds.
How to Strop
- Prepare Your Strop: If using a compound, apply a thin, even layer to the leather.
- Angle: Hold the knife at a slightly shallower angle than you used for sharpening (often around 10-15 degrees).
- Stropping Motion:
- Place the heel of the blade on the strop.
- Draw the knife away from the edge, moving heel to tip, ensuring the spine of the knife is leading. You are essentially gliding the spine of the blade across the strop, not slicing into it.
- Flip the knife over and repeat on the other side.
- Repeat: Perform 10-20 alternating strokes on each side.
Key: The motion is away from the edge, and the spine leads. This polishes and aligns the edge without cutting into the strop.
Blade Maintenance for Longevity
Proper blade maintenance is as important as sharpening for keeping your knives in top condition.
Cleaning Your Knives
- Hand Wash Only: Always wash your knives by hand with warm, soapy water.
- Dry Immediately: Never let your knives air dry. Moisture can lead to rust, especially on high-carbon steel knives. Dry them thoroughly with a soft cloth immediately after washing.
- Avoid the Dishwasher: Dishwashers are the enemy of sharp knives. The high heat, harsh detergents, and jostling can damage the edge, cause corrosion, and dull the blade.
Proper Storage
- Knife Block: A wooden knife block keeps individual knives separate and protected.
- Magnetic Strip: A magnetic strip mounted on the wall is a great space-saver and keeps blades visible and accessible.
- In-Drawer Organizers: Special inserts for drawers keep knives from banging against each other.
- Blade Guards: If you must store knives in a drawer without other protection, use blade guards to cover the edge.
Using the Right Cutting Boards
- Wood and Bamboo: These materials are generally good for knife edges as they have some “give.”
- Plastic: Plastic cutting boards are also acceptable.
- Avoid: Glass, ceramic, granite, marble, and metal cutting boards will dull your knives very quickly.
Understanding Steel Type
The steel type of your knife affects how it holds an edge and how easy it is to sharpen.
- High-Carbon Steel: Holds an edge very well and is easy to sharpen but can be prone to rust and staining if not cared for properly.
- Stainless Steel: More resistant to rust and corrosion but can be harder to sharpen and may not hold an edge as long as high-carbon steel.
- High-Carbon Stainless Steel Alloys: Many modern knives use alloys that aim to combine the best of both worlds – edge retention and rust resistance.
Knowing your knife’s steel type can help you choose the right sharpening method and understand its maintenance needs.
Troubleshooting Common Sharpening Issues
| Problem | Possible Cause | Solution |
|---|---|---|
| Knife still won’t cut | Not enough sharpening strokes | Continue sharpening on the current stone, then move to finer grits. |
| Incorrect sharpening angle | Ensure you are maintaining a consistent and appropriate angle. Use an angle guide. | |
| Burr not removed | Ensure you are creating a burr on both sides and removing it on finer grits and strops. | |
| Edge rolls over easily | Sharpening angle too shallow | Increase the angle slightly. |
| Over-honing (too much pressure on honing steel) | Use lighter pressure when honing. | |
| Knife chips easily | Sharpening angle too acute (too shallow) | Increase the sharpening angle to 17-20 degrees for most knives. |
| Over-sharpening on a very fine grit | Reduce strokes on very fine grits. | |
| Knife is brittle (poor heat treatment of steel) | This can be a manufacturing issue; contact the manufacturer. | |
| Knife feels “gritty” | A small burr remains on the edge | Continue stropping or use a ceramic rod to remove the final burr. |
Frequently Asked Questions (FAQ)
Q1: How often should I sharpen my kitchen knives?
A: This depends on how often you use them and what you cut. A good rule of thumb is to hone your knives every few uses and sharpen them when honing no longer brings back the keenness. This might be every few weeks for a home cook, or more often for heavy users.
Q2: What is the difference between sharpening and honing?
A: Sharpening removes metal to create a new, sharp edge. Honing realigns the existing microscopic edge, which can be bent or rolled over during use. Honing keeps an already sharp knife sharper for longer.
Q3: Can I sharpen serrated knives with a whetstone?
A: Yes, but it requires a specific technique and often a thin, tapered sharpening stone or ceramic rod designed for serrated edges. You sharpen each “gullet” individually. Many people prefer specialized electric sharpeners or professional services for serrated knives.
Q4: How do I know if my knife is sharp enough?
A: A sharp knife will slice through paper easily without tearing, glide through a tomato with minimal effort, and make clean cuts through herbs and vegetables. If you have to press hard to cut something soft, it’s likely dull.
Q5: Is a diamond sharpening steel better than a steel honing steel?
A: A diamond steel will remove a small amount of metal and can sharpen a dull knife to some extent, while a traditional steel rod primarily realigns the edge. For regular maintenance, a ceramic or traditional steel rod is often preferred for honing. Diamond rods are good for light sharpening or touch-ups.
Q6: How do I prevent rust on my knives?
A: Always wash and dry your knives immediately after use. Store them in a dry place. If you have high-carbon steel knives, a light coating of food-grade mineral oil can provide extra protection.
By following these guidelines and practicing regularly, you can master the art of knife sharpening and ensure your kitchen tools are always ready for action, providing a safer and more enjoyable cooking experience. Remember that consistent blade maintenance and the right tools are key to keeping that perfect cutting edge.